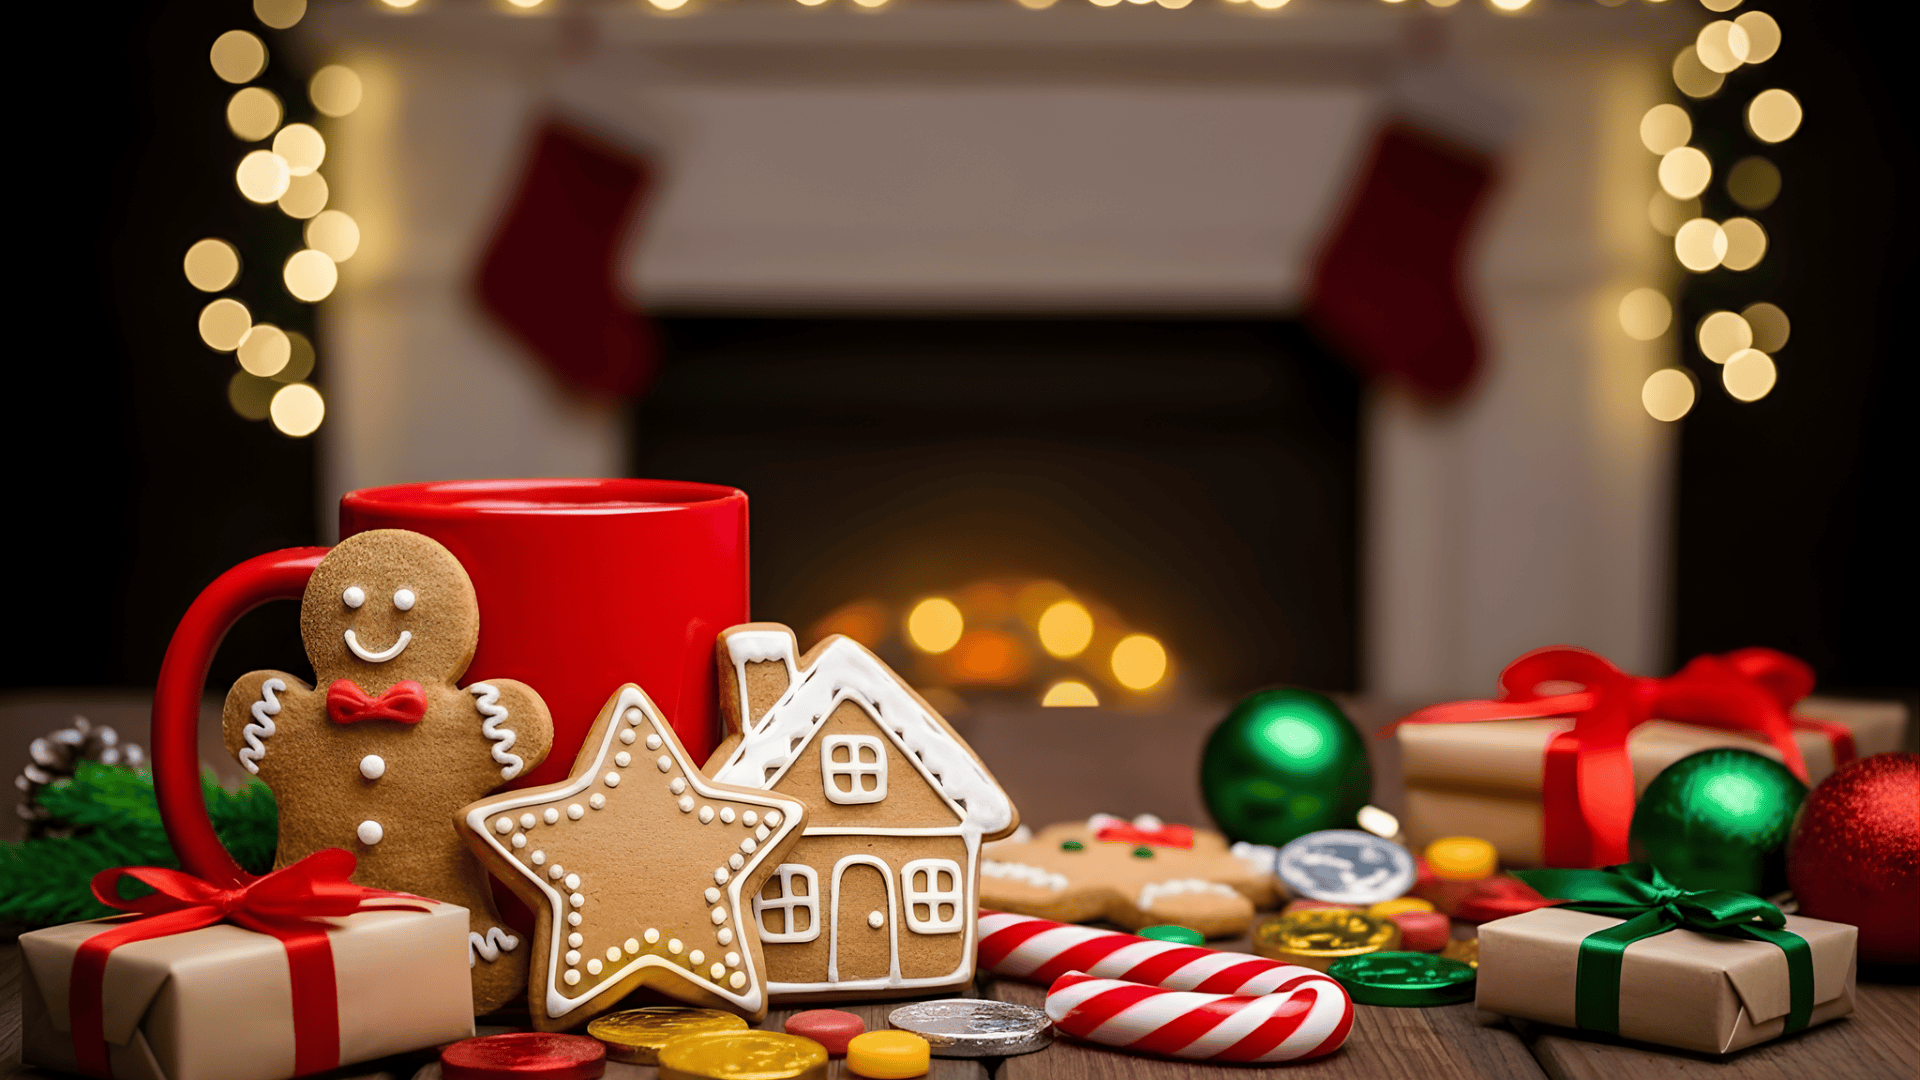
47 Simple DIY Christmas Ornaments Ideas for Kids
If you’re hoping to slow things down this holiday season and make room for moments that feel calmer, easier, and more connected with your kids, this guide is here to help.
I know how quickly December fills up, and it can be hard to find simple activities that don’t add more stress.
That’s why I put together a list of easy DIY Christmas ornaments for kids, projects you can make with basic supplies in just a few steps.
You’ll get a mix of quick ideas and helpful tips that fit into real family life. You don’t need special skills; just a few minutes, a few materials, and the willingness to create together.
As you read, you’ll feel supported and confident that you’re in the right place to start.
Why DIY Ornaments are Great for Kids
DIY ornaments are a simple way for kids to slow down, get creative, and enjoy the holidays. They help children build fine motor skills as they cut, glue, paint, and shape different materials.
Making ornaments also brings families together, giving everyone a chance to talk, laugh, and share small holiday moments.
Plus, most DIY crafts use basic supplies you already have at home, which keeps decorating fun and budget-friendly.
Best DIY Christmas Ornament Ideas for Kids with Steps
Kids enjoy simple Christmas crafts because they’re easy to make and fun to decorate with. These ideas help them learn new skills while creating ornaments they’ll be proud of:
Paper & Cardstock Ornament Ideas
Paper ornaments are light, quick, and easy for kids to handle. They also use simple supplies, which makes them perfect for busy families.
1. Paper Strip Bauble Ornament
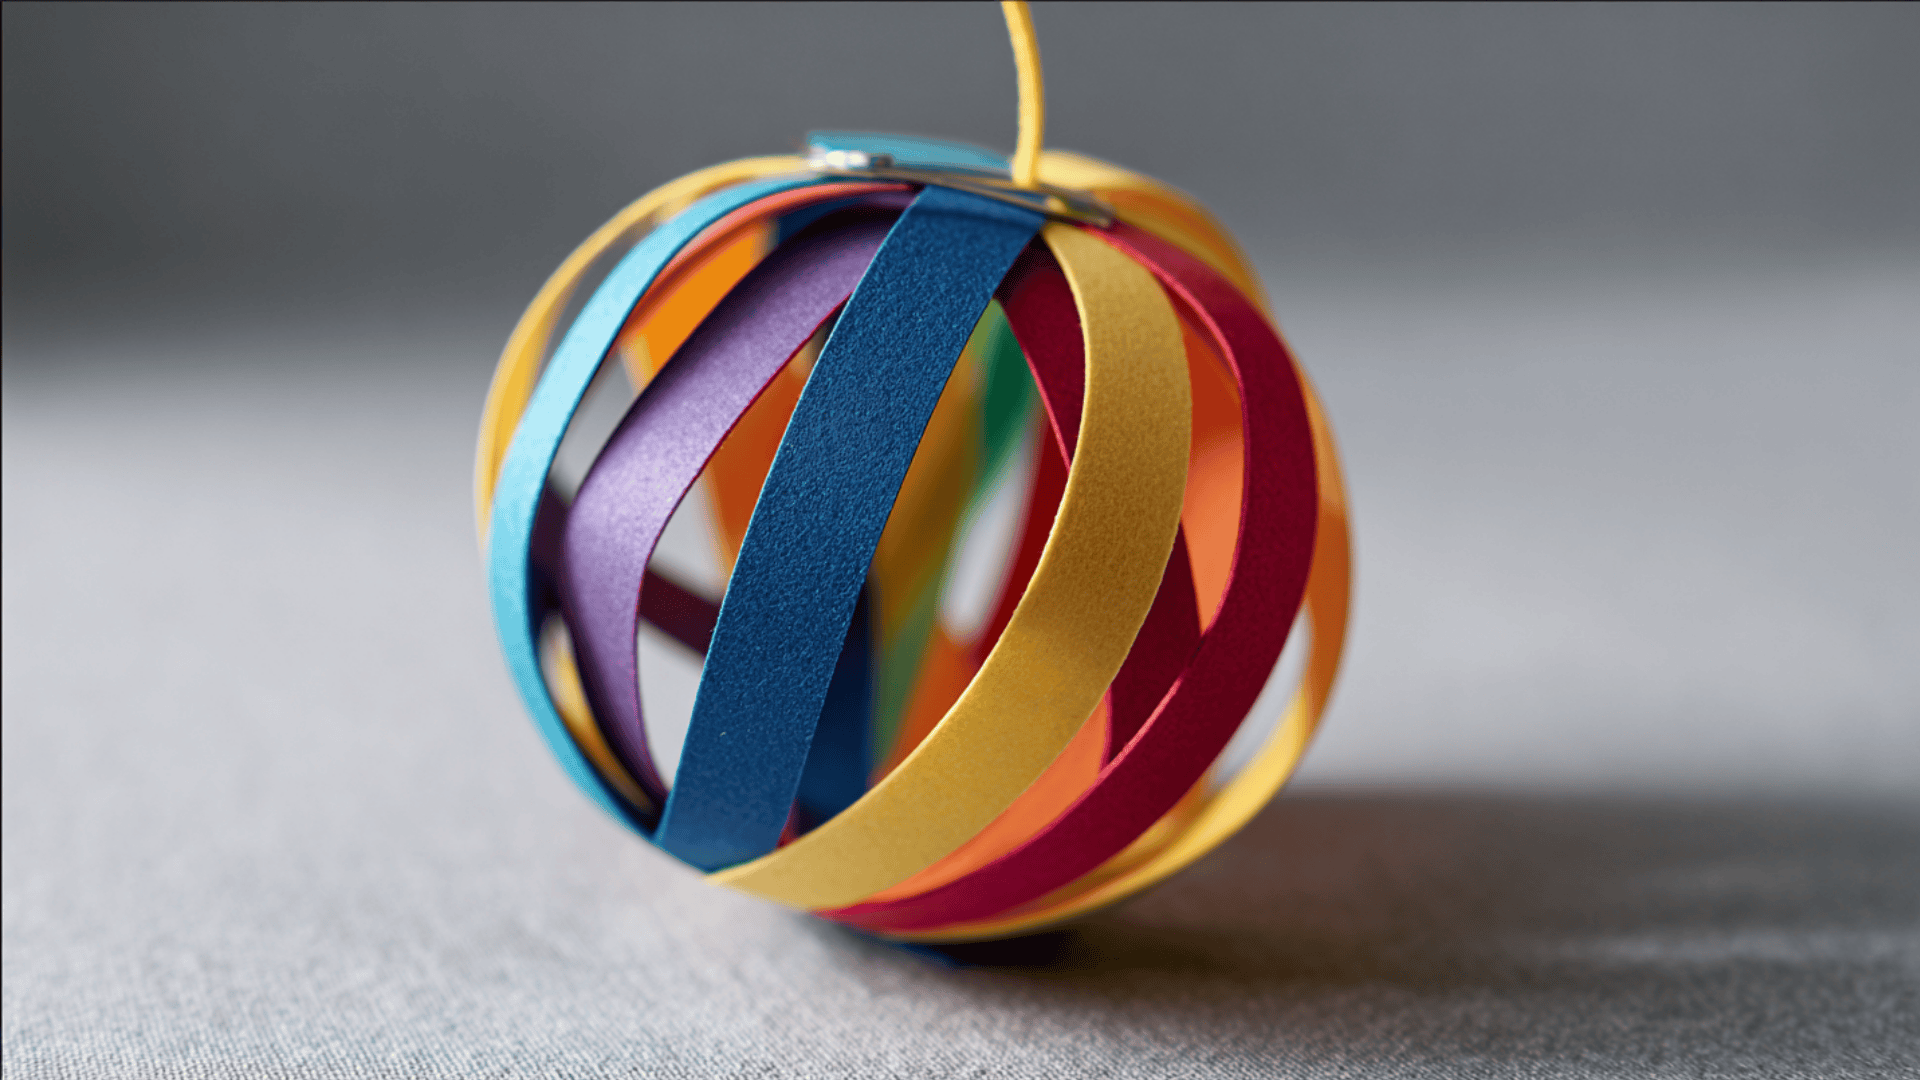
This colorful bauble is great for practicing cutting and stacking. Kids love watching the flat strips turn into a round shape.
Materials Needed:
- Cardstock strips
- Hole punch
- Two small brads
- String or ribbon
Process:
- Cut several strips of equal length.
- Punch holes at the ends of each strip.
- Secure one end with a brad.
- Fan the strips around and secure the other end.
- Add a string for hanging.
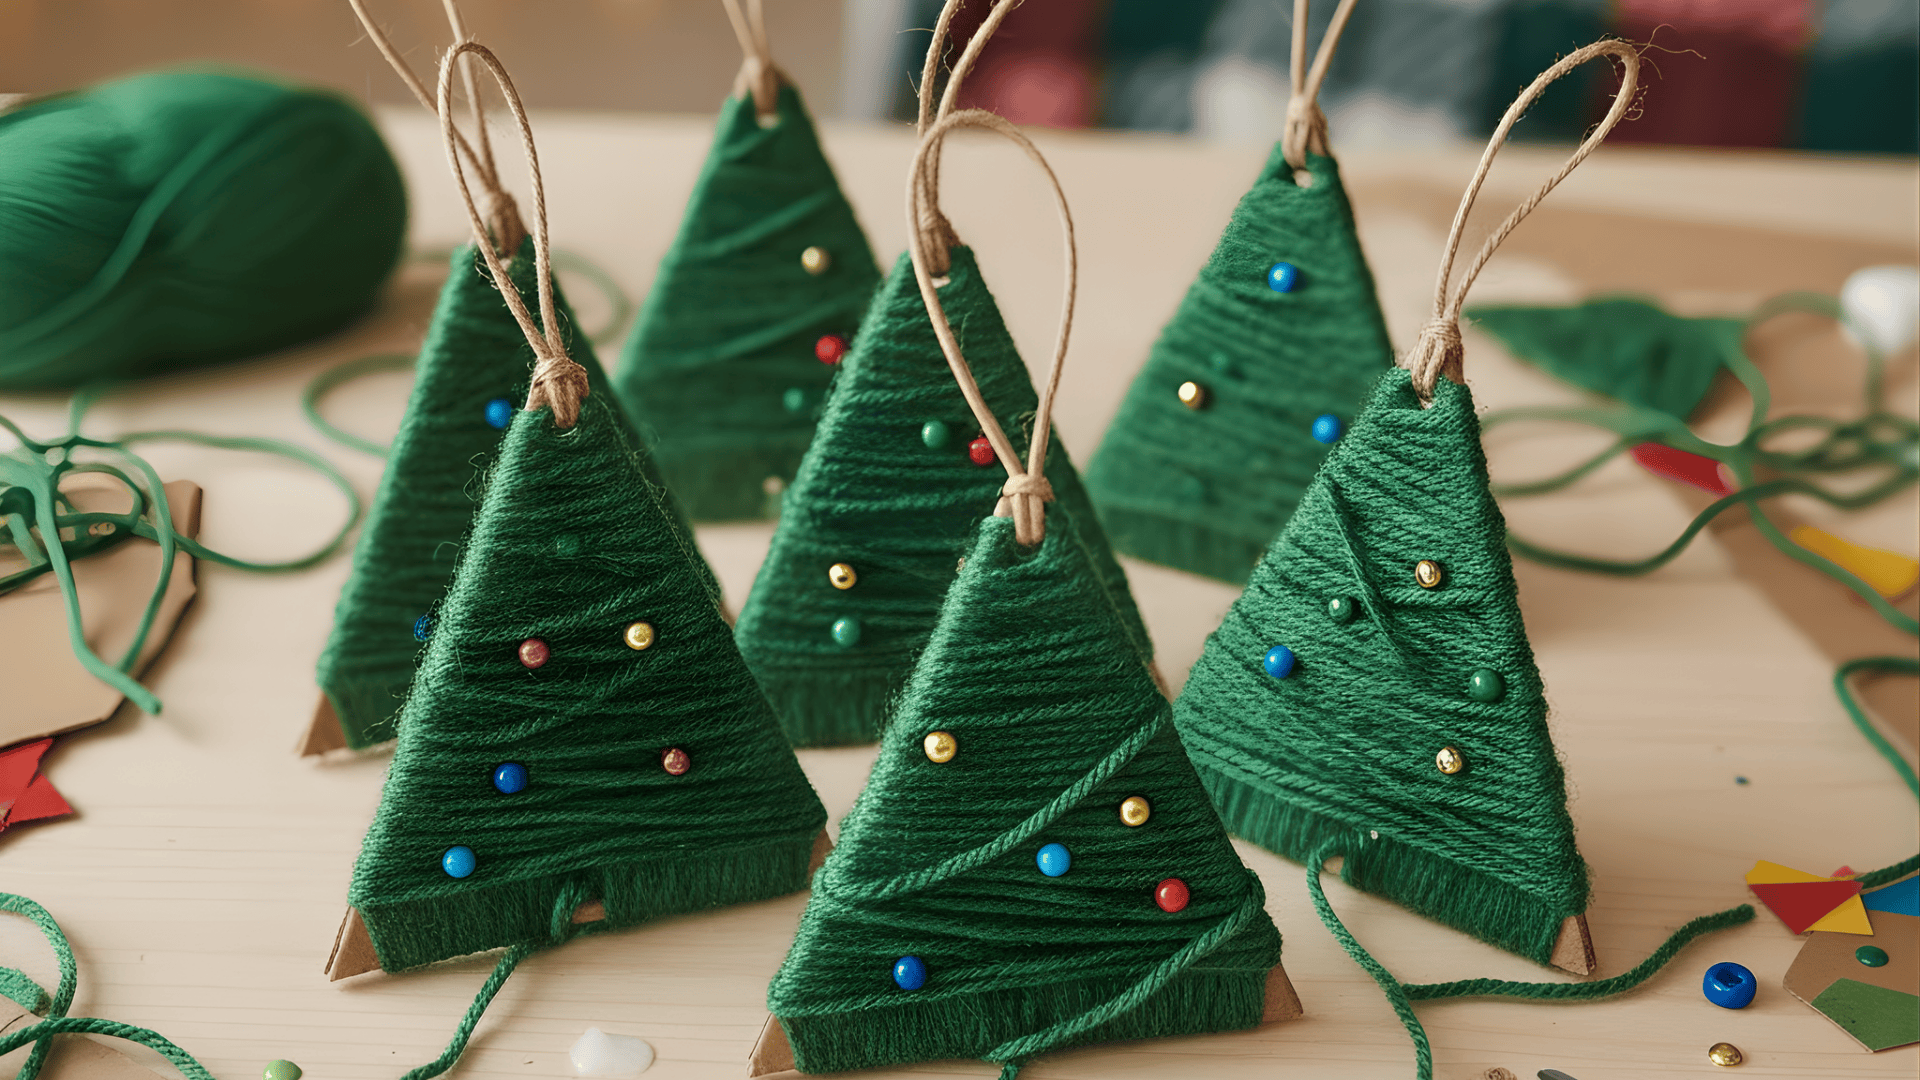
2. Accordion Fold Christmas Tree Ornament
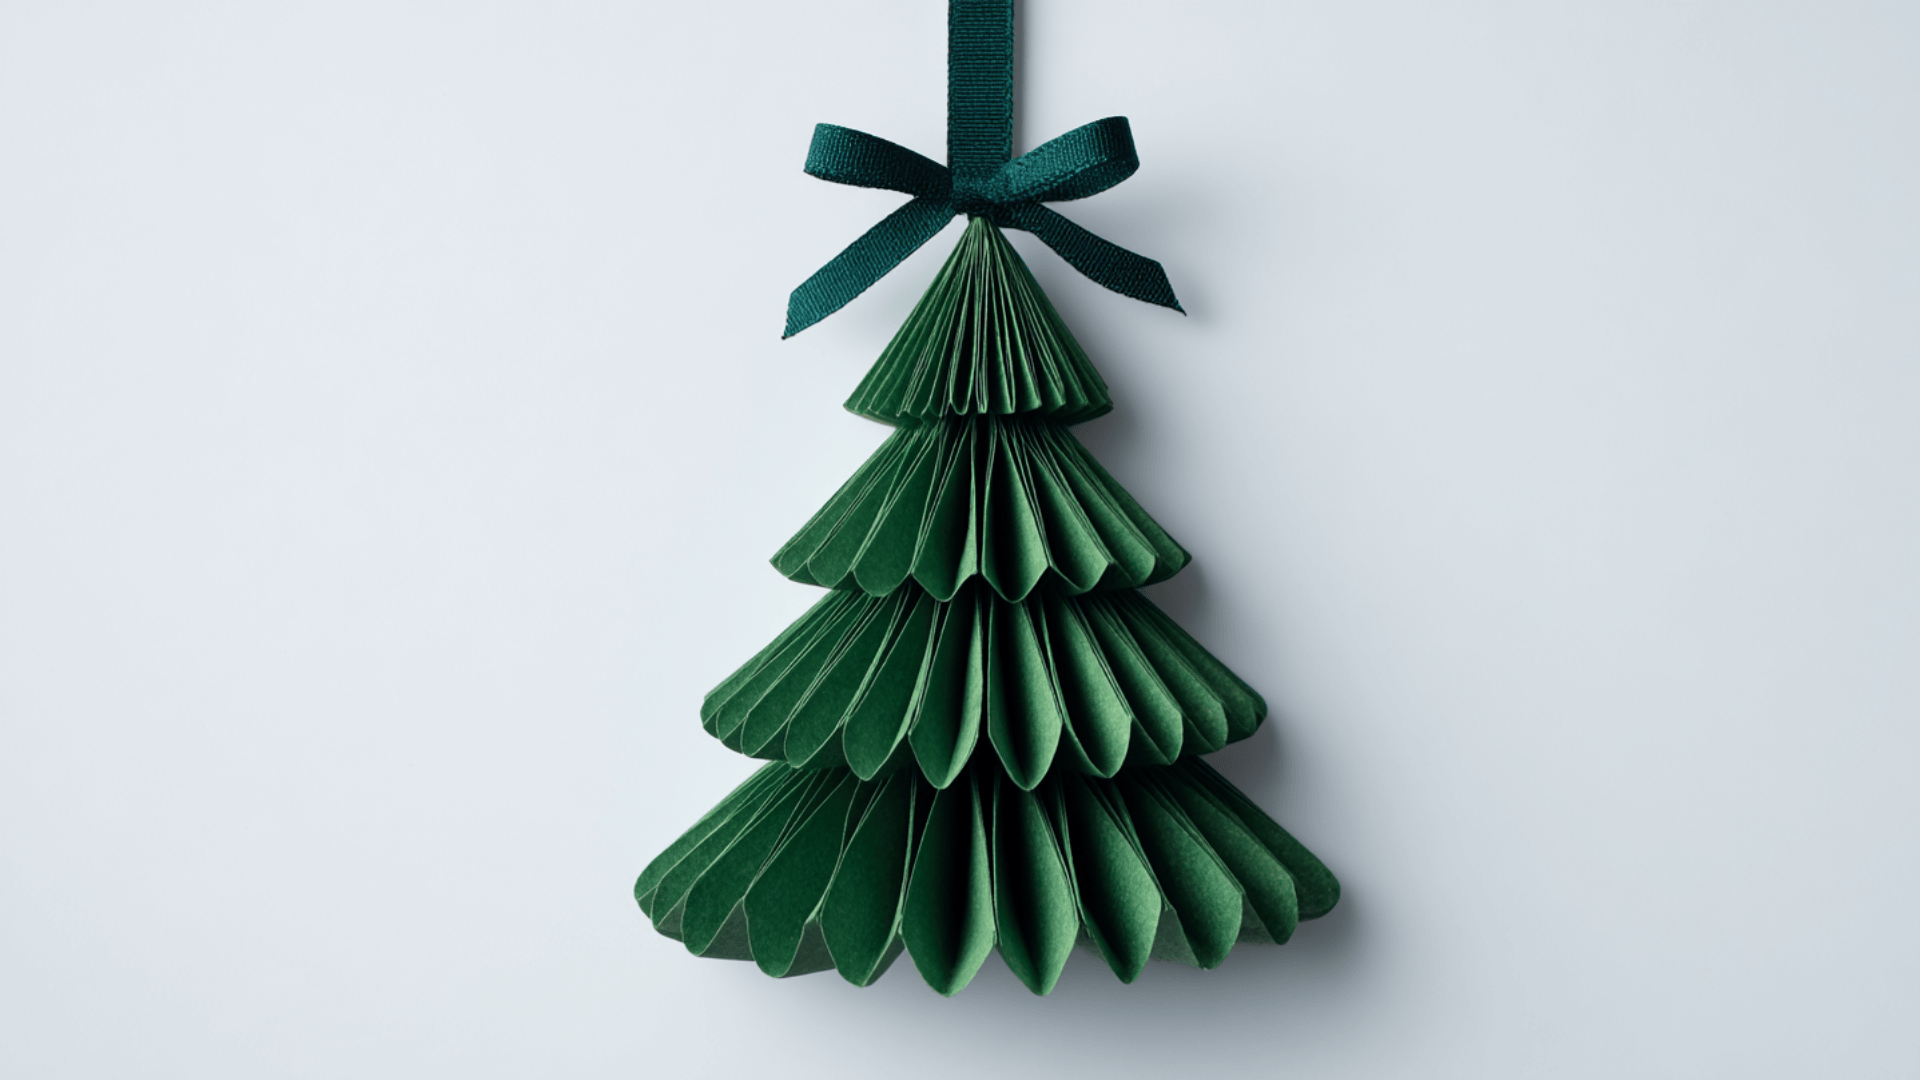
This folded tree teaches simple paper skills and gives the tree a 3D look. Kids enjoy trimming the shape and adding tiny decorations.
Materials Needed:
- Green paper
- Scissors
- Glue
- Paper strip or small popsicle stick
- Ribbon
Process:
- Cut a rectangle of green paper.
- Fold it back and forth like a fan.
- Shape it into a triangle by trimming the edges.
- Glue on the trunk.
- Add a ribbon to finish the top.
- Let it dry before hanging.
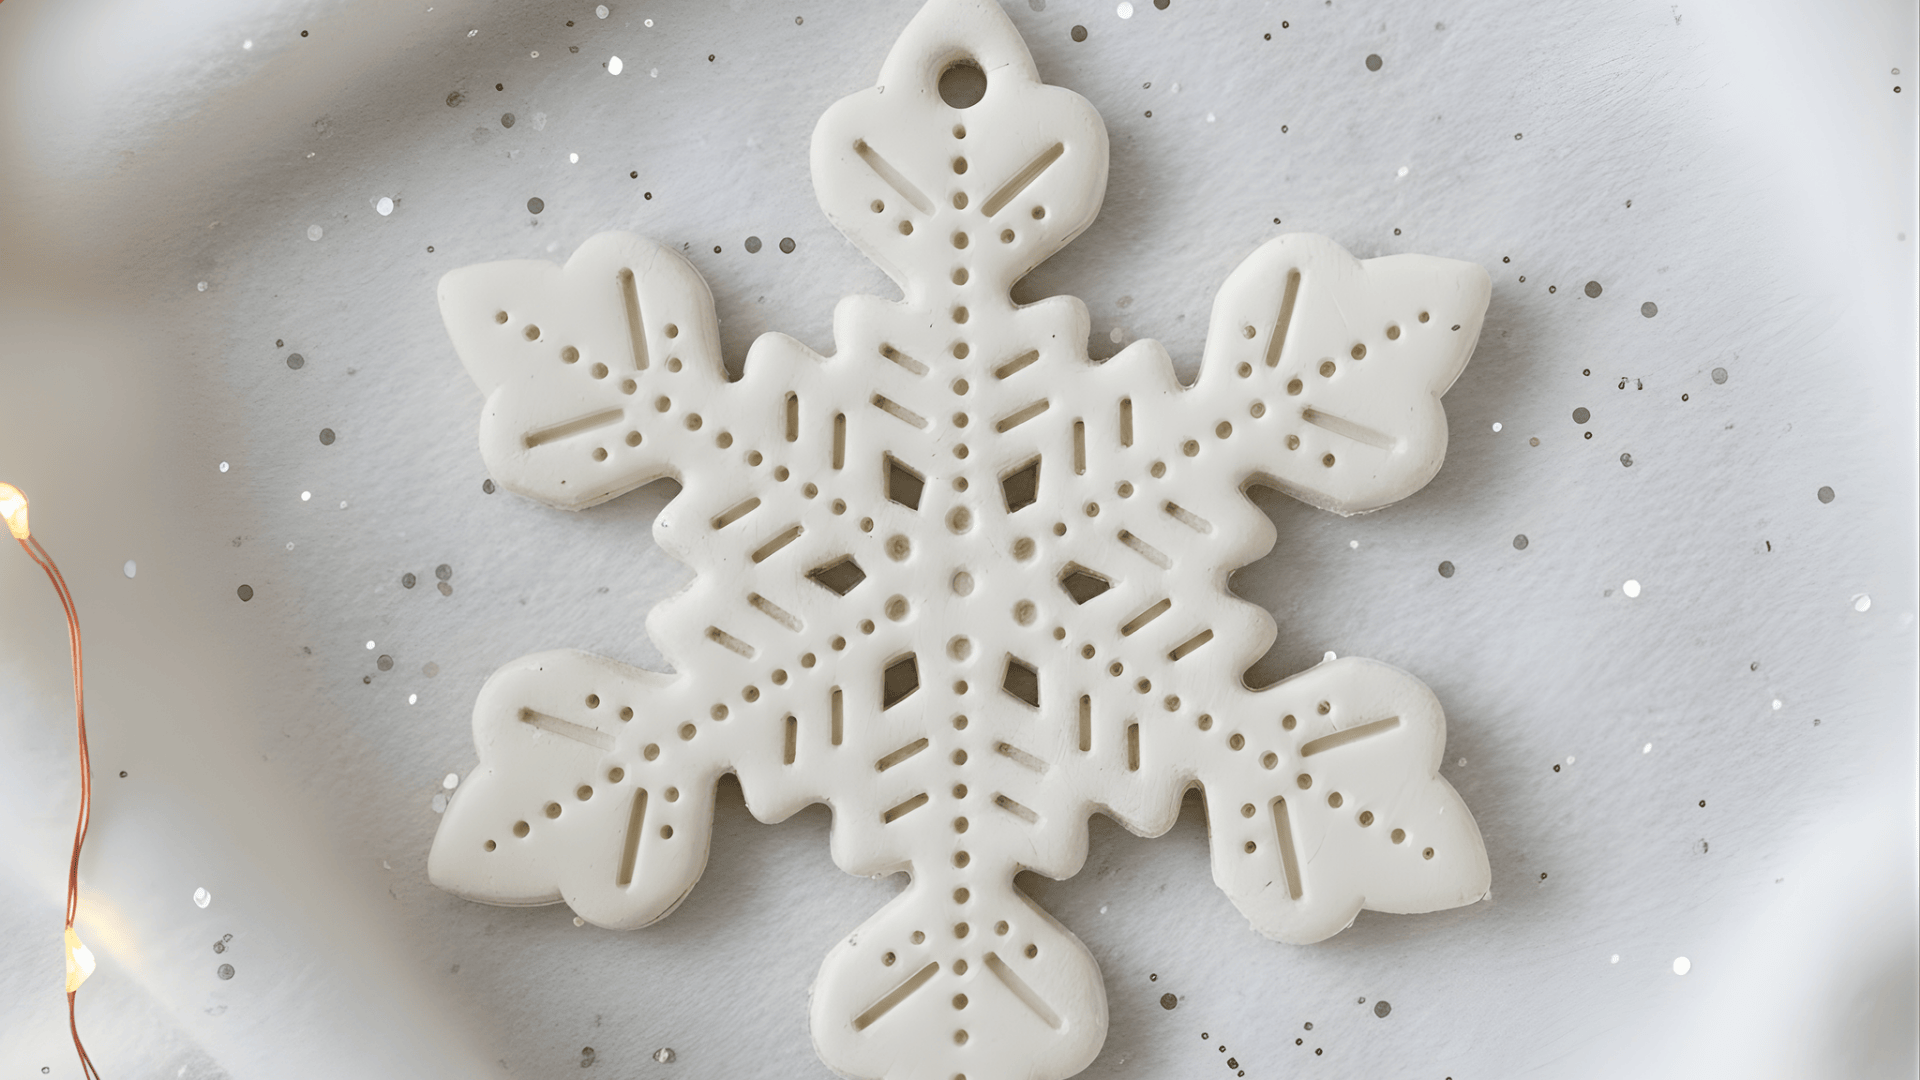
3. Paper Snowflake Medallion Ornament
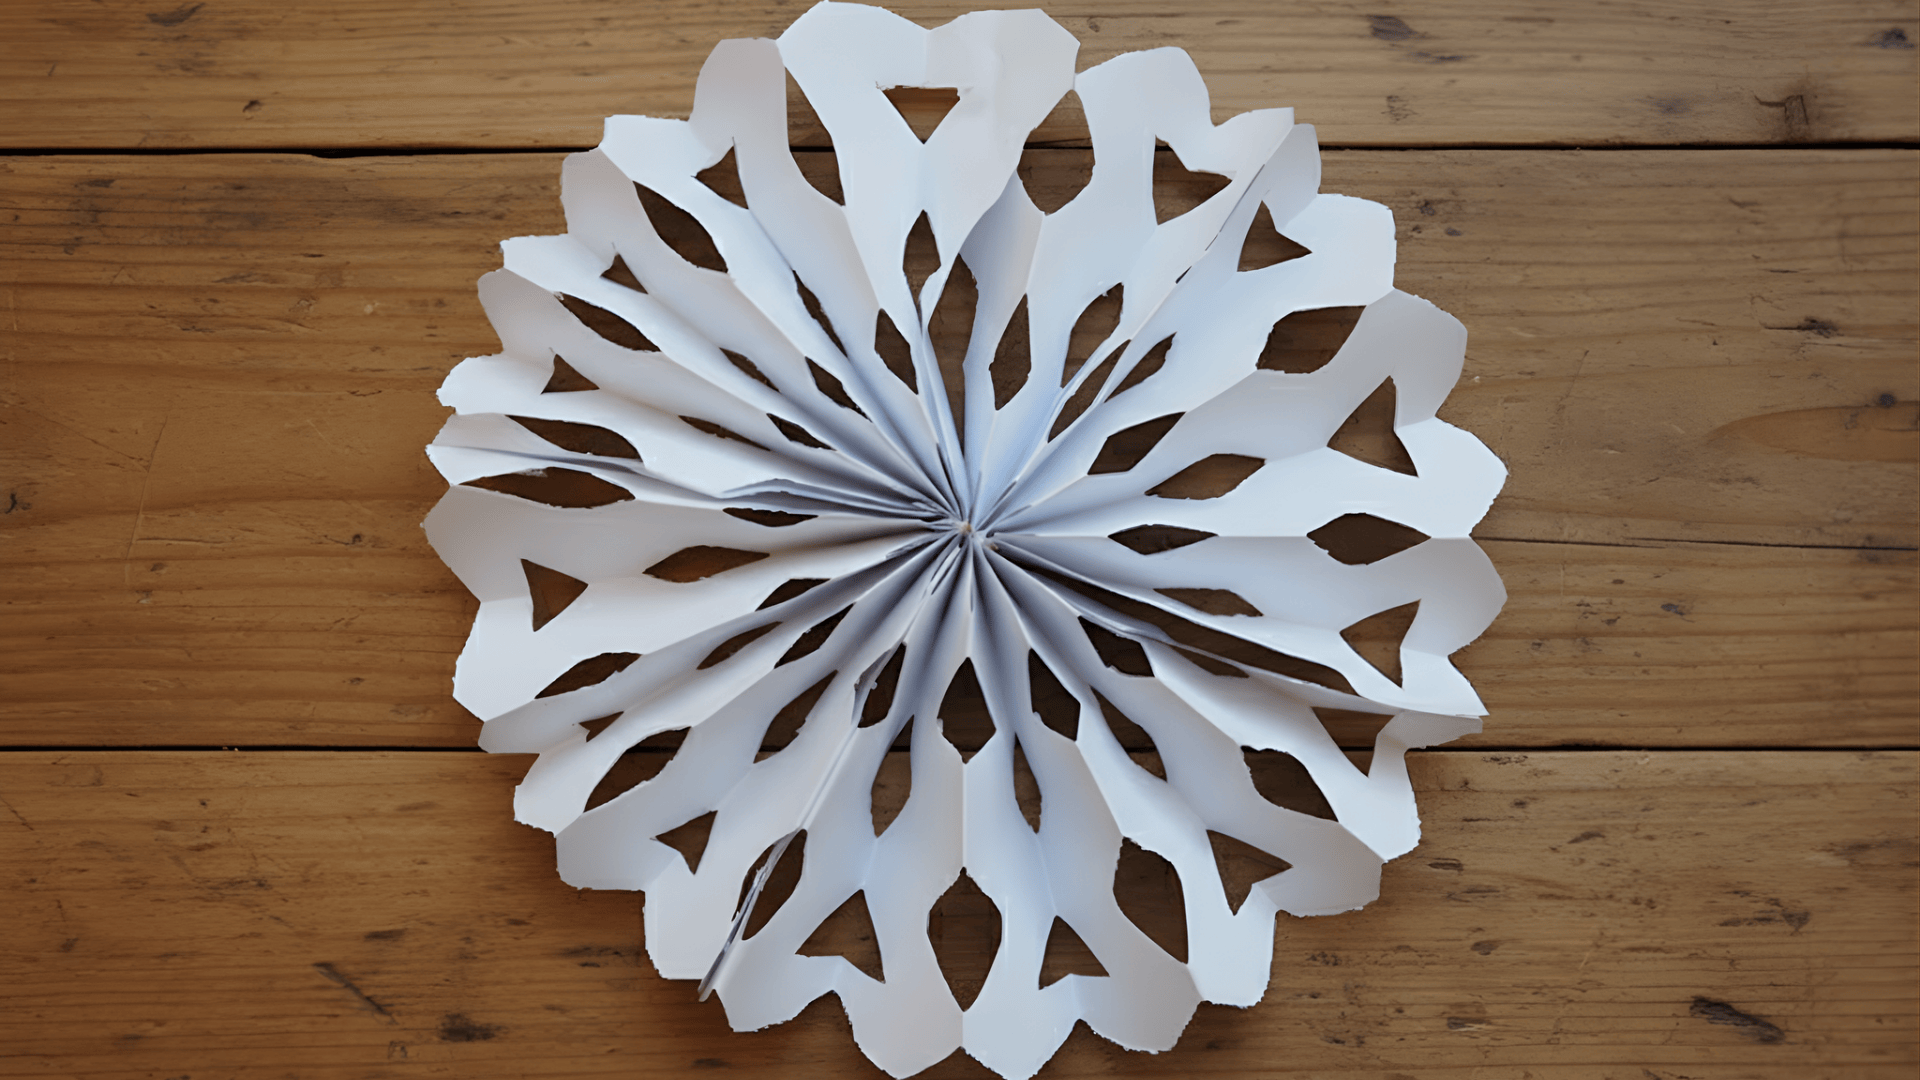
This medallion opens into a full circle and looks delicate, but it is easy to make. Kids can create lots of patterns by changing their cuts.
Materials Needed:
- Paper squares
- Glue stick
- Thin string or thread
Process:
- Fold each sheet into a fan.
- Cut small shapes along the folded edges.
- Fold each fan in half and glue the centers.
- Join four or more fans into a full circle.
- Attach a loop for hanging.
4. 3D Paper Star Ornament
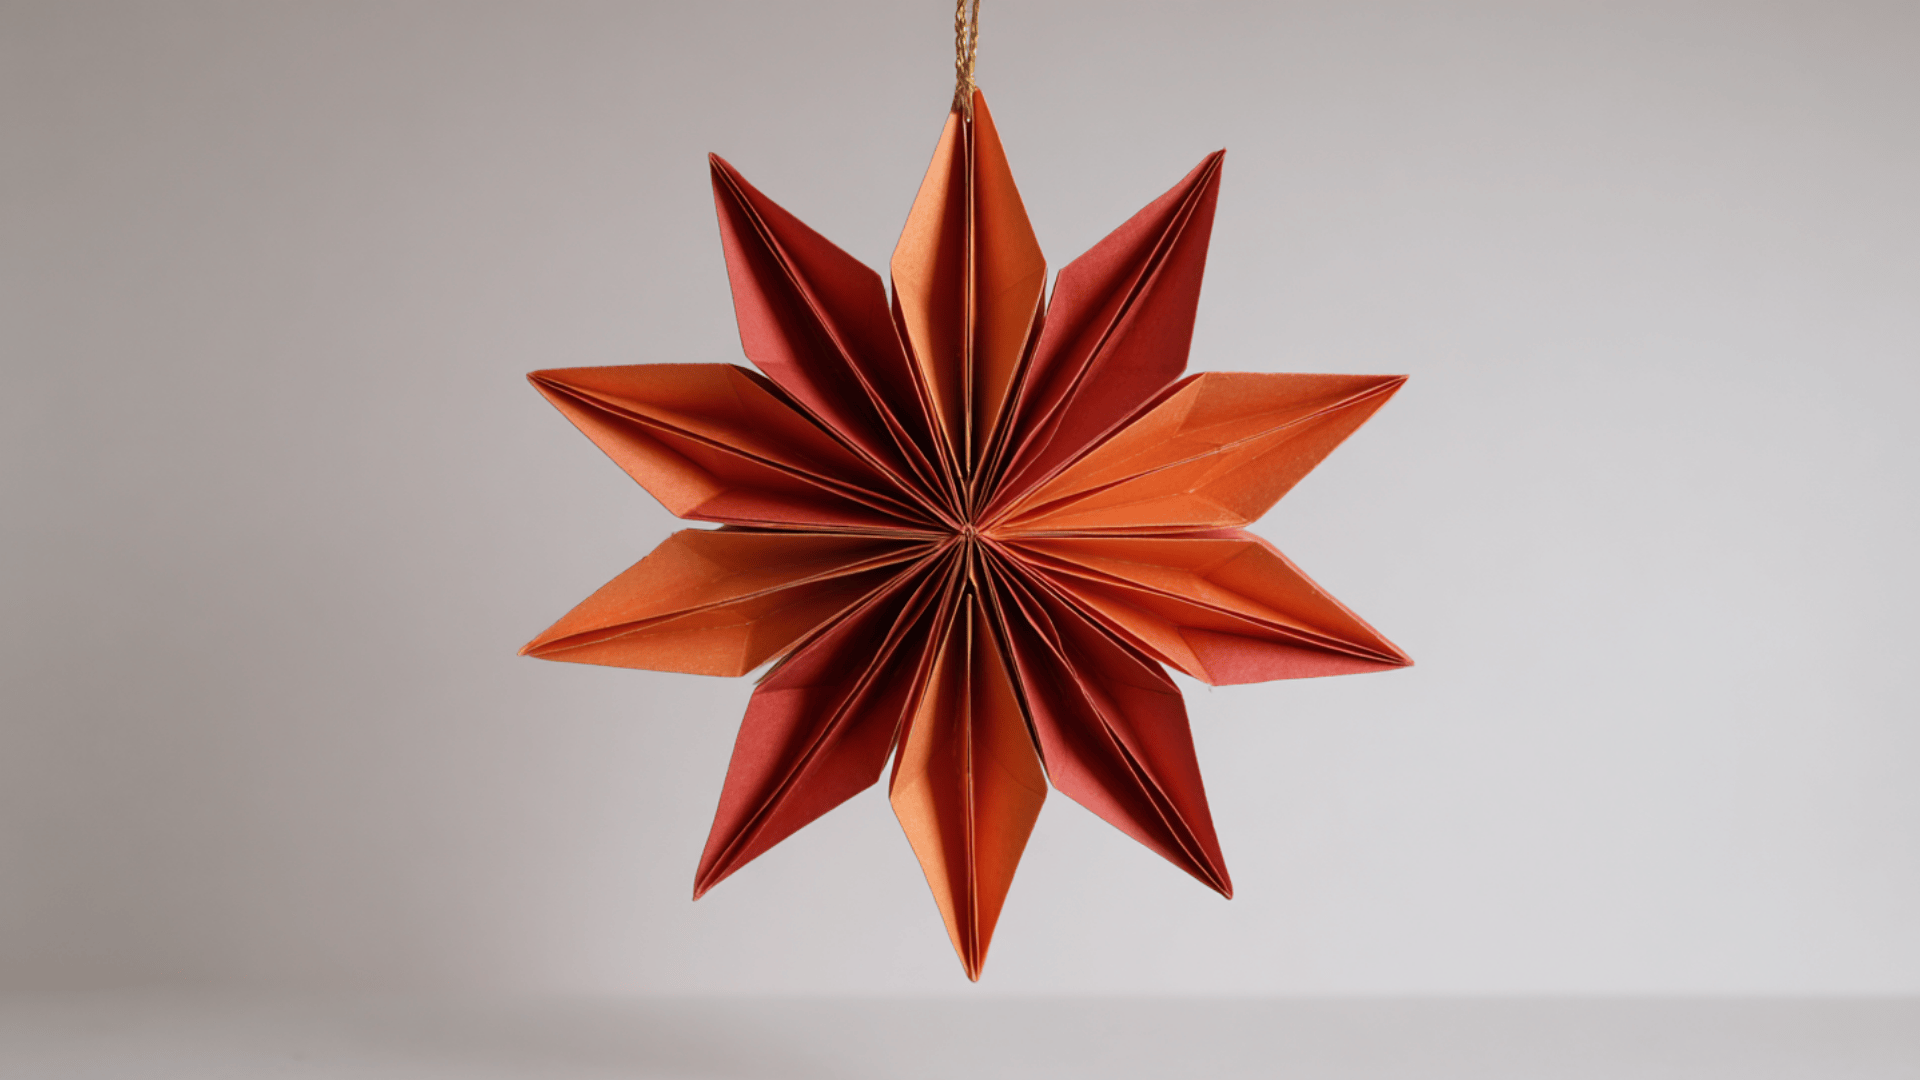
This star looks fancy, but it only needs a few folds and layers. Kids enjoy shaping the raised points to give it a three-dimensional look.
Materials Needed:
- Cardstock star shapes
- Glue
- Ribbon or thread
Process:
- Cut two matching star shapes.
- Fold each star gently along its center lines.
- Glue the stars together at an angle for a 3D effect.
- Press the center to shape the points.
5. Paper Cone Angel Ornament
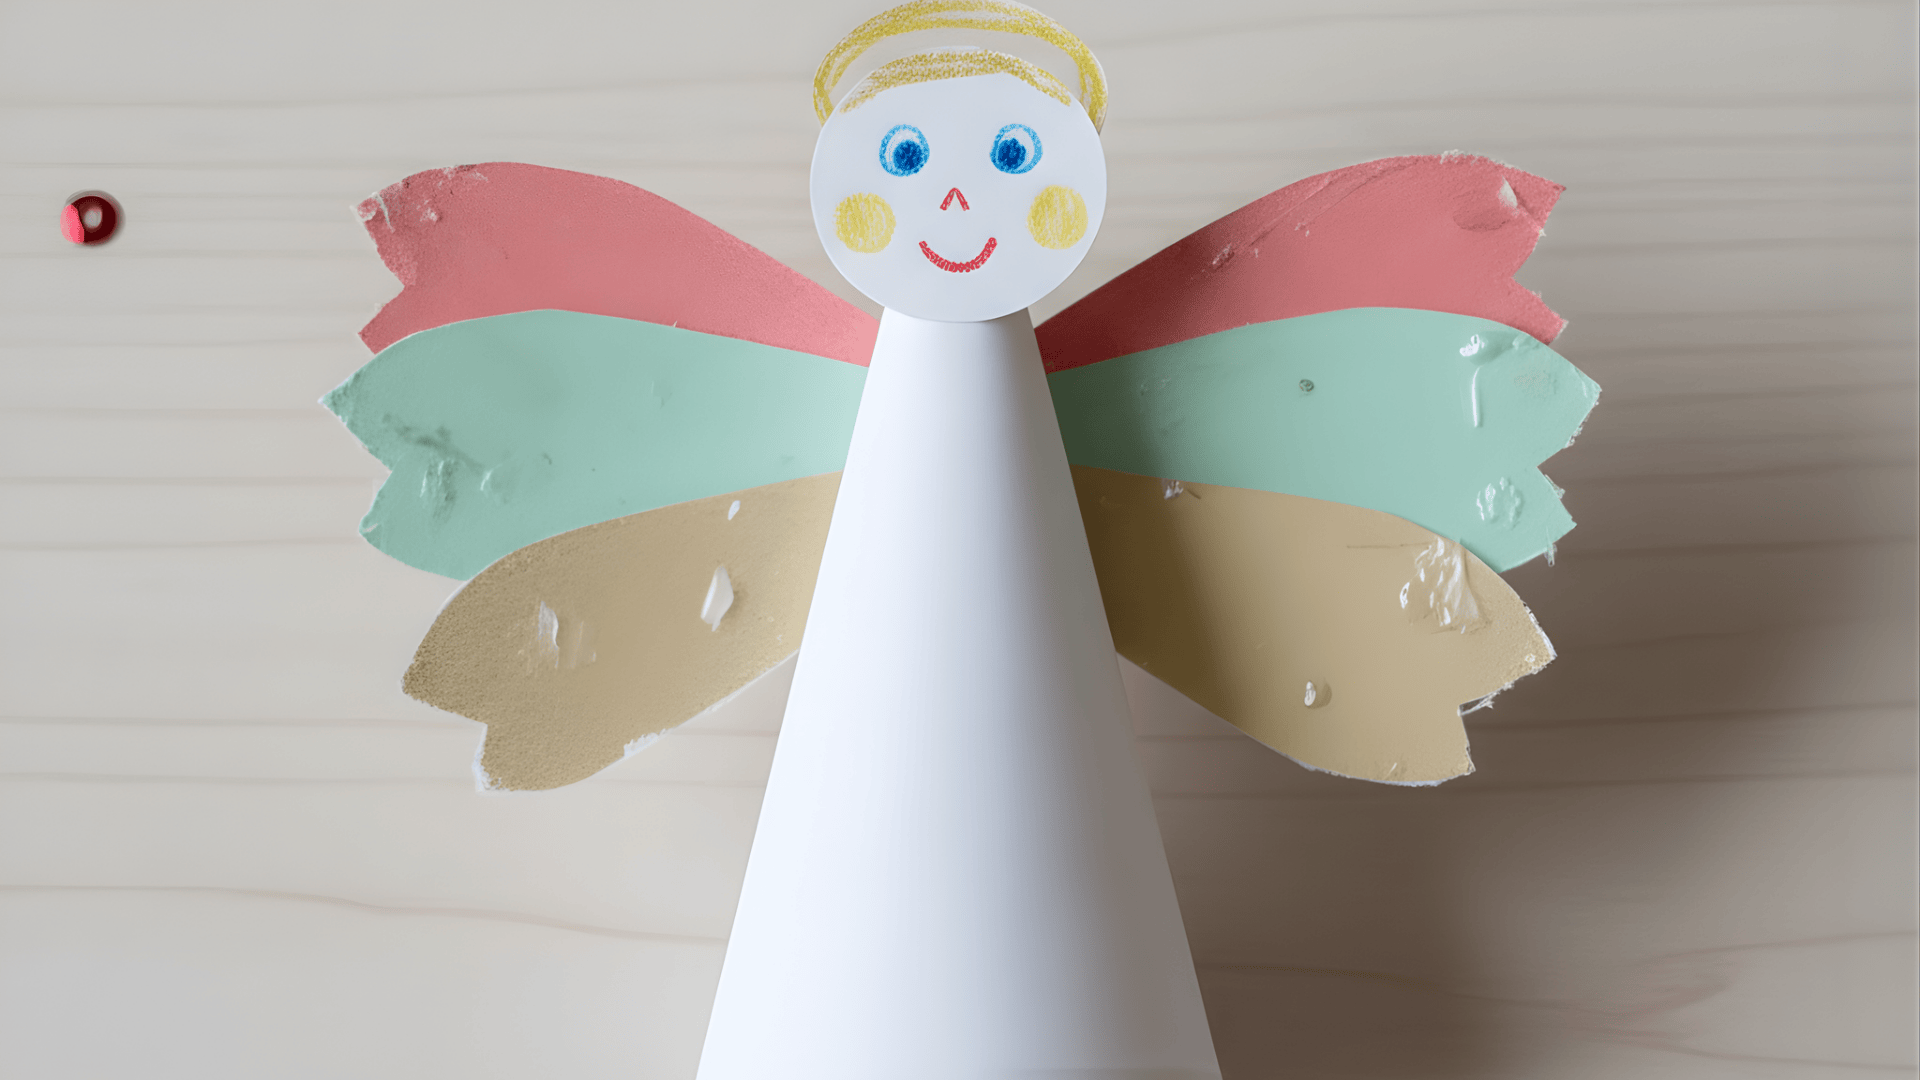
This cone angel is simple, sturdy, and makes a sweet keepsake. Kids can decorate the dress, wings, and face however they like.
Materials Needed:
- White or pastel cardstock
- Scissors
- Glue
- Markers
- Ribbon
Process:
- Cut a large circle and roll it into a cone.
- Create wing shapes and glue them to the back.
- Add a small circle for the head.
- Draw a simple face.
- Tie a ribbon loop for hanging.
6. Watercolor Paper Circle Ornament
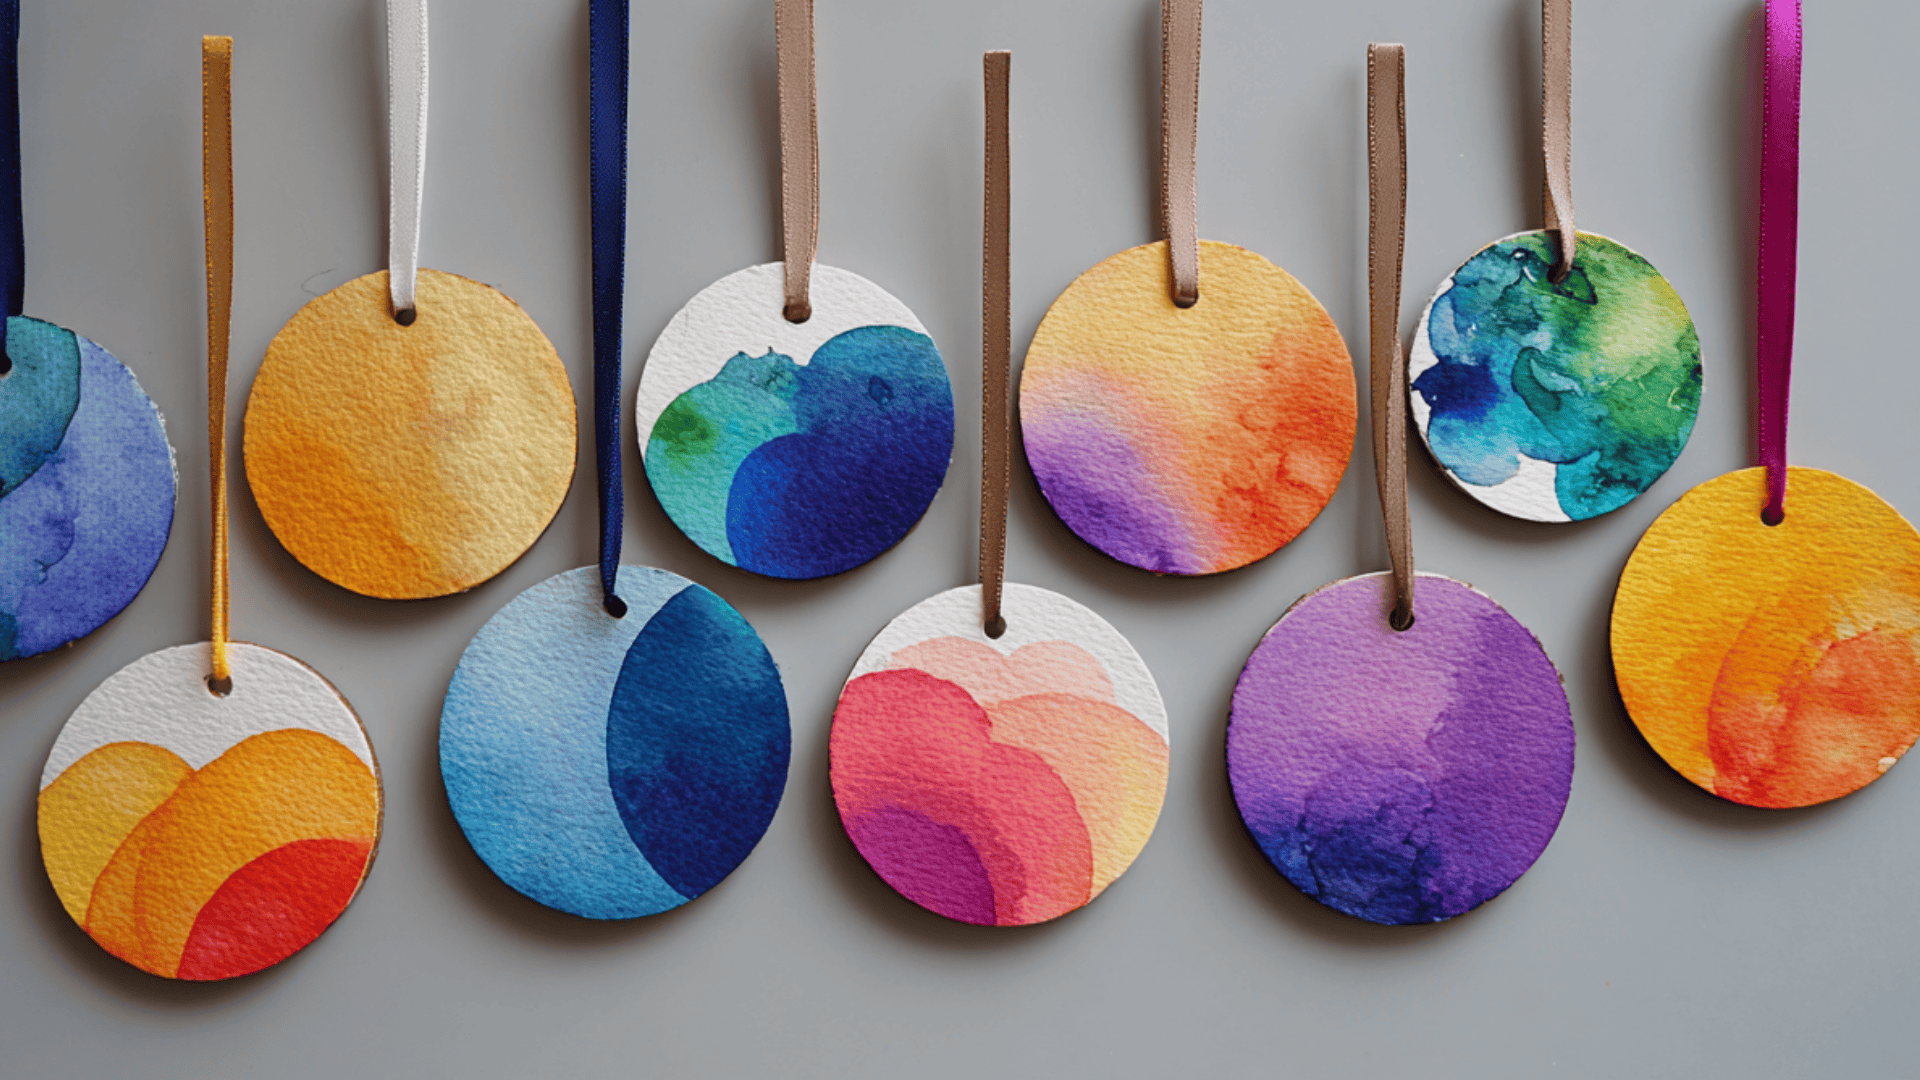
This soft watercolor ornament looks bright and dreamy on the tree. Kids enjoy painting the colors and watching them blend on the paper.
Materials Needed:
- Watercolor paints
- Thick paper or watercolor paper
- A cup of water
- Scissors
- Ribbon
Process:
- Let kids paint simple washes of color on the paper.
- Allow the sheet to dry completely.
- Cut out several circles in different sizes.
- Glue two circles together, back-to-back.
- Punch a hole and tie a ribbon loop.
7. Quilled Paper Swirl Ornament

This ornament teaches kids how to roll thin strips into fun shapes. The swirls look fancy, but they’re simple once kids learn the basic roll.
Materials Needed:
- Thin paper strips
- Glue
- Toothpick or quilling tool
- Ribbon
Process:
- Roll paper strips tightly around a toothpick.
- Let the rolls loosen slightly to form spirals.
- Shape them into teardrops, circles, or hearts.
- Glue several shapes together into a round ornament.
- Add a ribbon at the top.
8. Tissue Paper Mosaic Bauble

This ornament is easy and colorful, and kids love choosing the little pieces. The mosaic look makes every ornament different and bright.
Materials Needed:
- Tissue paper squares
- Clear glue
- Cardboard circle
- Ribbon
Process:
- Cut or prepare small tissue paper squares.
- Brush glue onto the cardboard circle.
- Place the tissue pieces one by one to make a mosaic.
- Seal with a thin layer of glue on top.
- Punch a hole and add a ribbon.
9. Paper Chain Mini Wreath Ornament
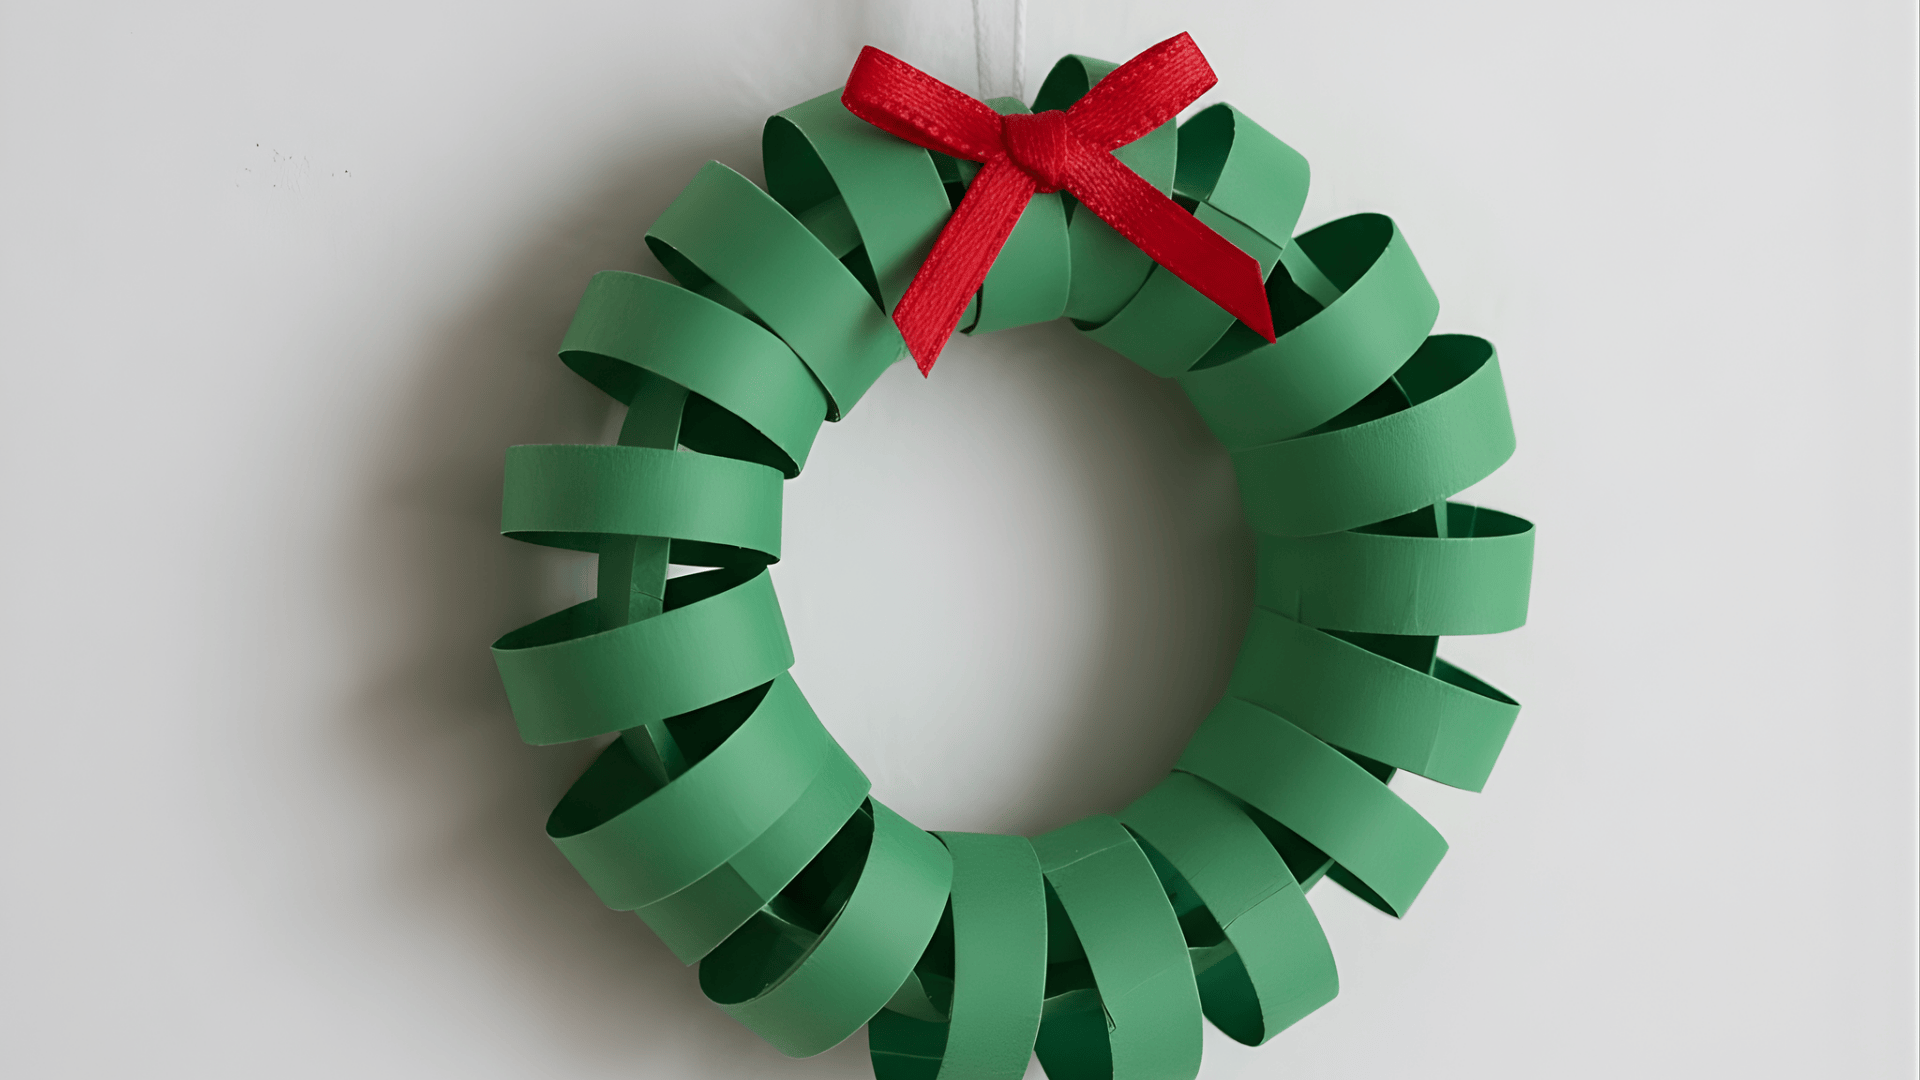
This small wreath uses tiny paper loops linked together. Kids enjoy repeating the simple pattern to build the round shape.
Materials Needed:
- Green paper strips
- Glue or tape
- Small bow or ribbon
Process:
- Make a loop with the first strip and secure it.
- Link the next strip through the loop and secure it.
- Keep joining strips until you form a small chain.
- Shape the chain into a circle and glue the ends.
- Add a bow at the top.
10. Origami Diamond Ornament

This ornament folds into a neat diamond shape that looks elegant and light. Kids can pick bright or metallic paper to make it stand out.
Materials Needed:
- Square craft paper
- Glue (optional)
- String or thread
Process:
- Fold the square paper into triangle and diamond shapes.
- Follow simple origami steps to form a hollow diamond.
- Press the edges to shape it evenly.
- Add a bit of glue inside if you want it sturdier.
- Tie a string through the top corner.
11. Paper Gingerbread House Cutout Ornament
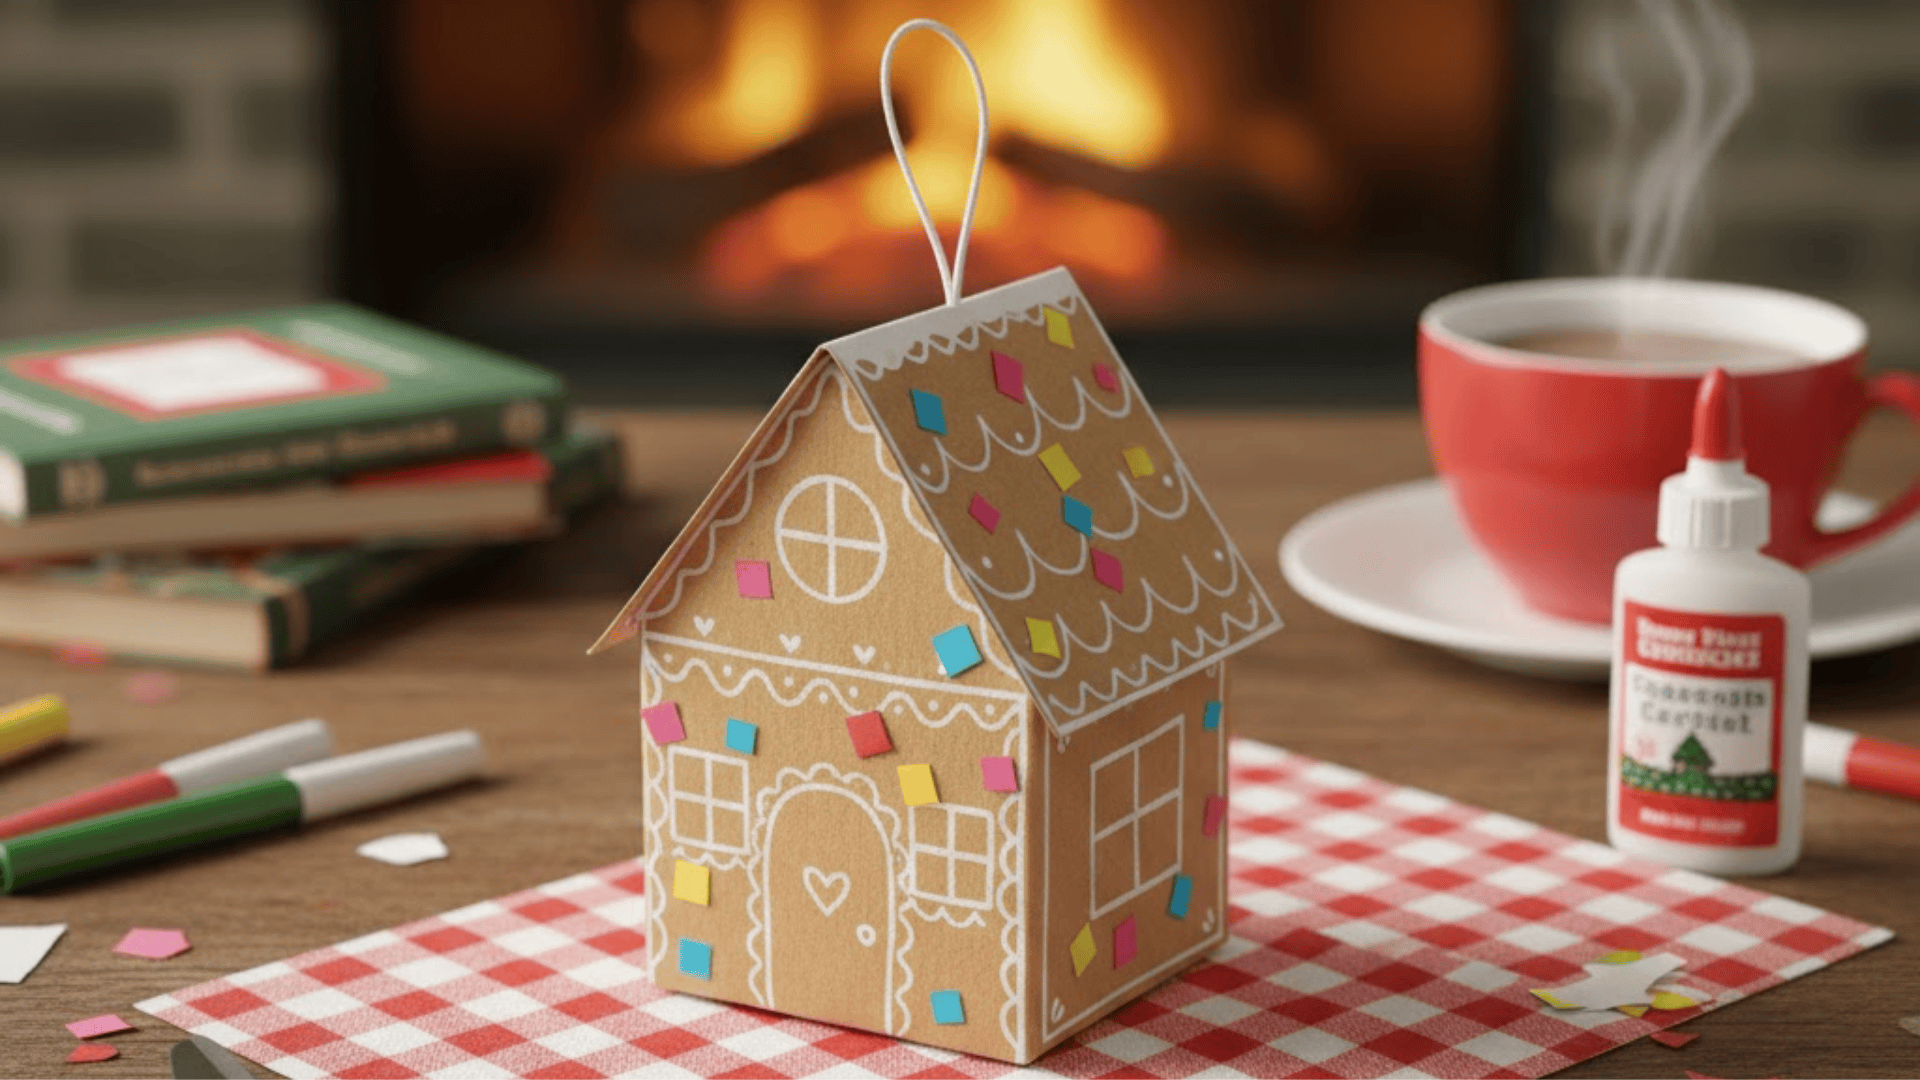
This sweet little house lets kids decorate with windows, doors, and candy details. It’s simple to cut out and fun to personalize.
Materials Needed:
- Brown cardstock
- Scissors
- Markers or crayons
- Glue
- Ribbon
Process:
- Draw a simple outline of a gingerbread house on the cardstock.
- Cut out the house shape.
- Add windows, doors, and candy decorations with markers.
- Glue on small paper “candies” if kids want more detail.
- Attach a ribbon loop at the top.
Popsicle Stick & Craft Stick Ornaments
Popsicle stick ornaments are sturdy and easy for kids to handle. They’re great for simple shapes and give kids lots of room to decorate.
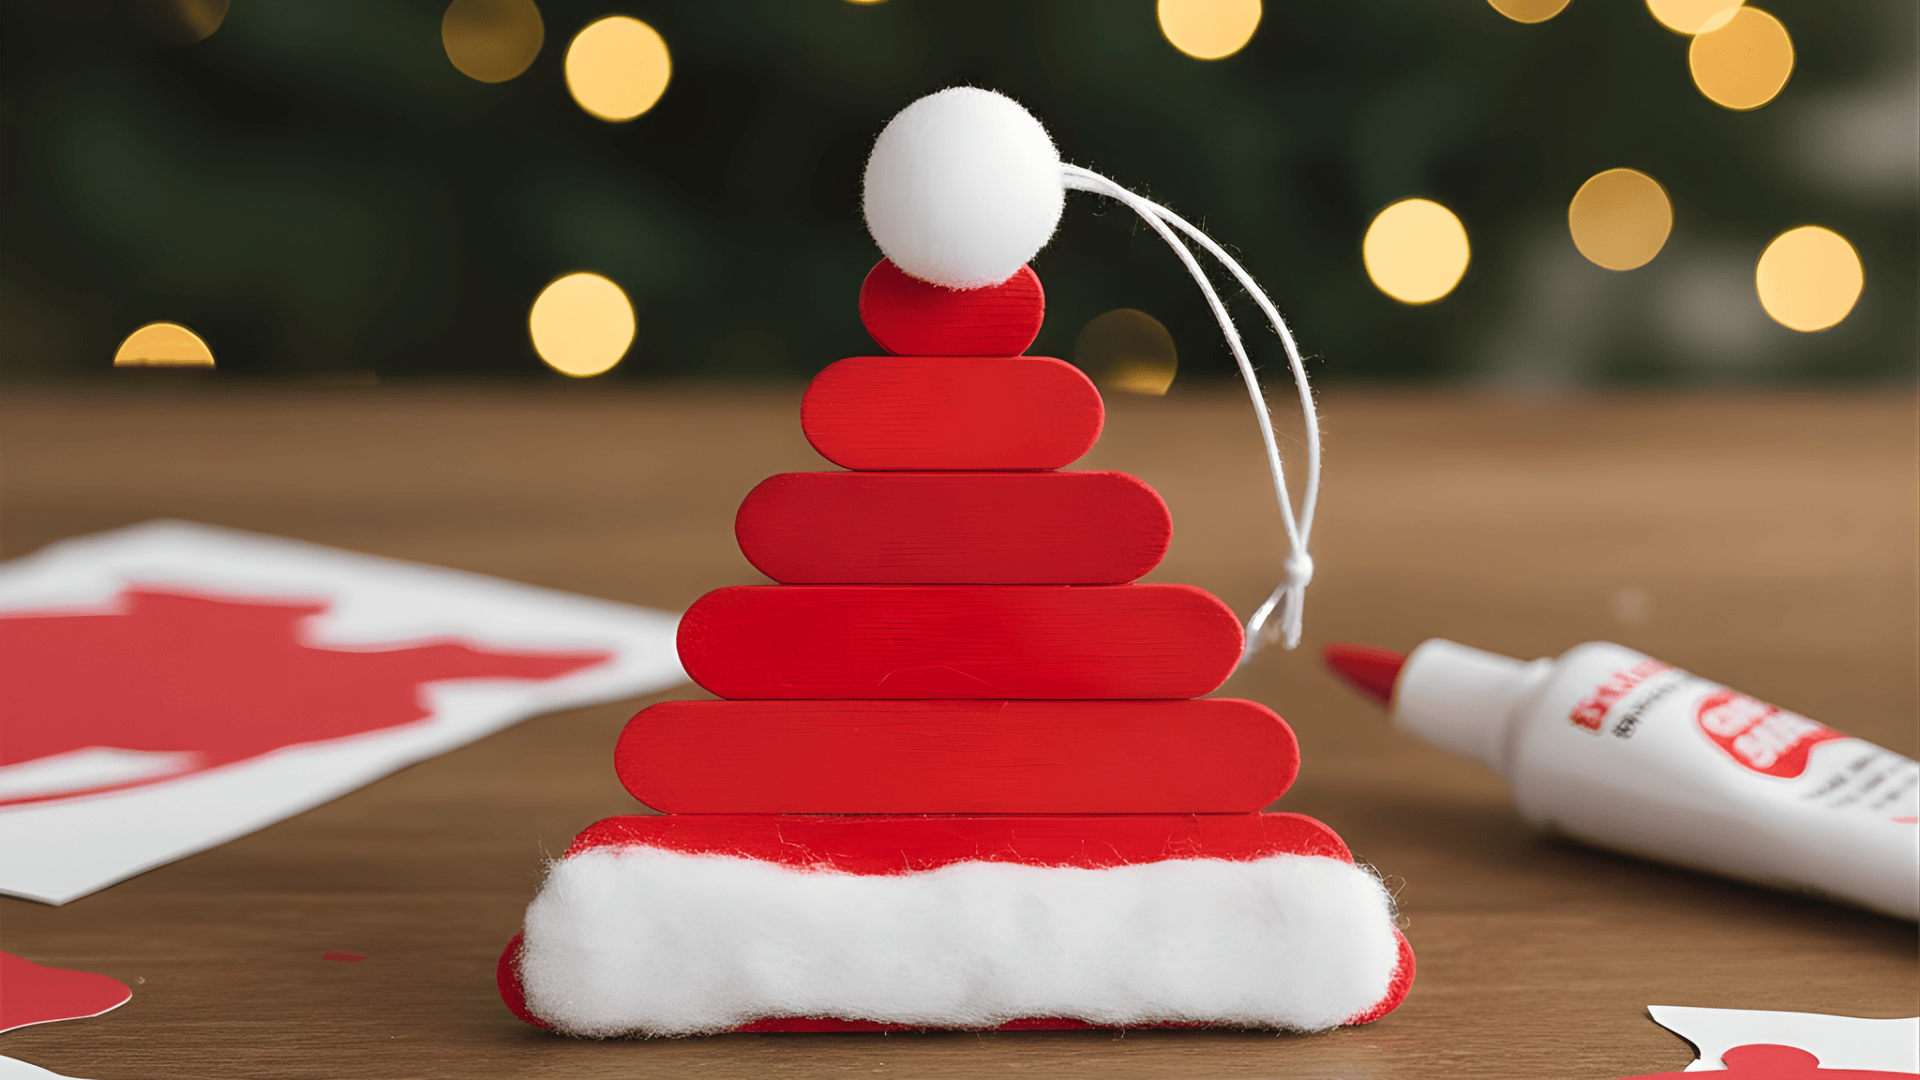
12. Popsicle Stick Christmas Tree Ornament

This small tree is easy for kids to build and decorate. They enjoy adding tiny “ornaments” to make it look festive.
Materials Needed:
- Popsicle sticks
- Green paint or markers
- Glue
- Stickers or buttons
- Ribbon
Process:
- Paint the popsicle sticks green and let them dry.
- Glue sticks into a triangle shape.
- Add a short stick at the bottom or behind for the trunk.
- Decorate the tree with stickers or buttons.
- Tie a ribbon at the top for hanging.
13. Popsicle Stick Reindeer Ornament

This reindeer is cute, simple, and great for kids who enjoy character crafts. The little face gives it personality, and kids can choose any colors they like.
Materials Needed:
- Popsicle sticks
- Brown paint or markers
- Googly eyes
- Red pom-pom
- Glue
- String
Process:
- Color the sticks brown and let them dry.
- Glue three sticks side by side for the face shape.
- Add googly eyes to the face shape.
- Adjust more sticks behind to create the body.
- Glue the red pom-pom at the bottom as the nose.
- Tie a string at the top to hang the reindeer.
14. Mini Popsicle Stick Snowflake Ornament
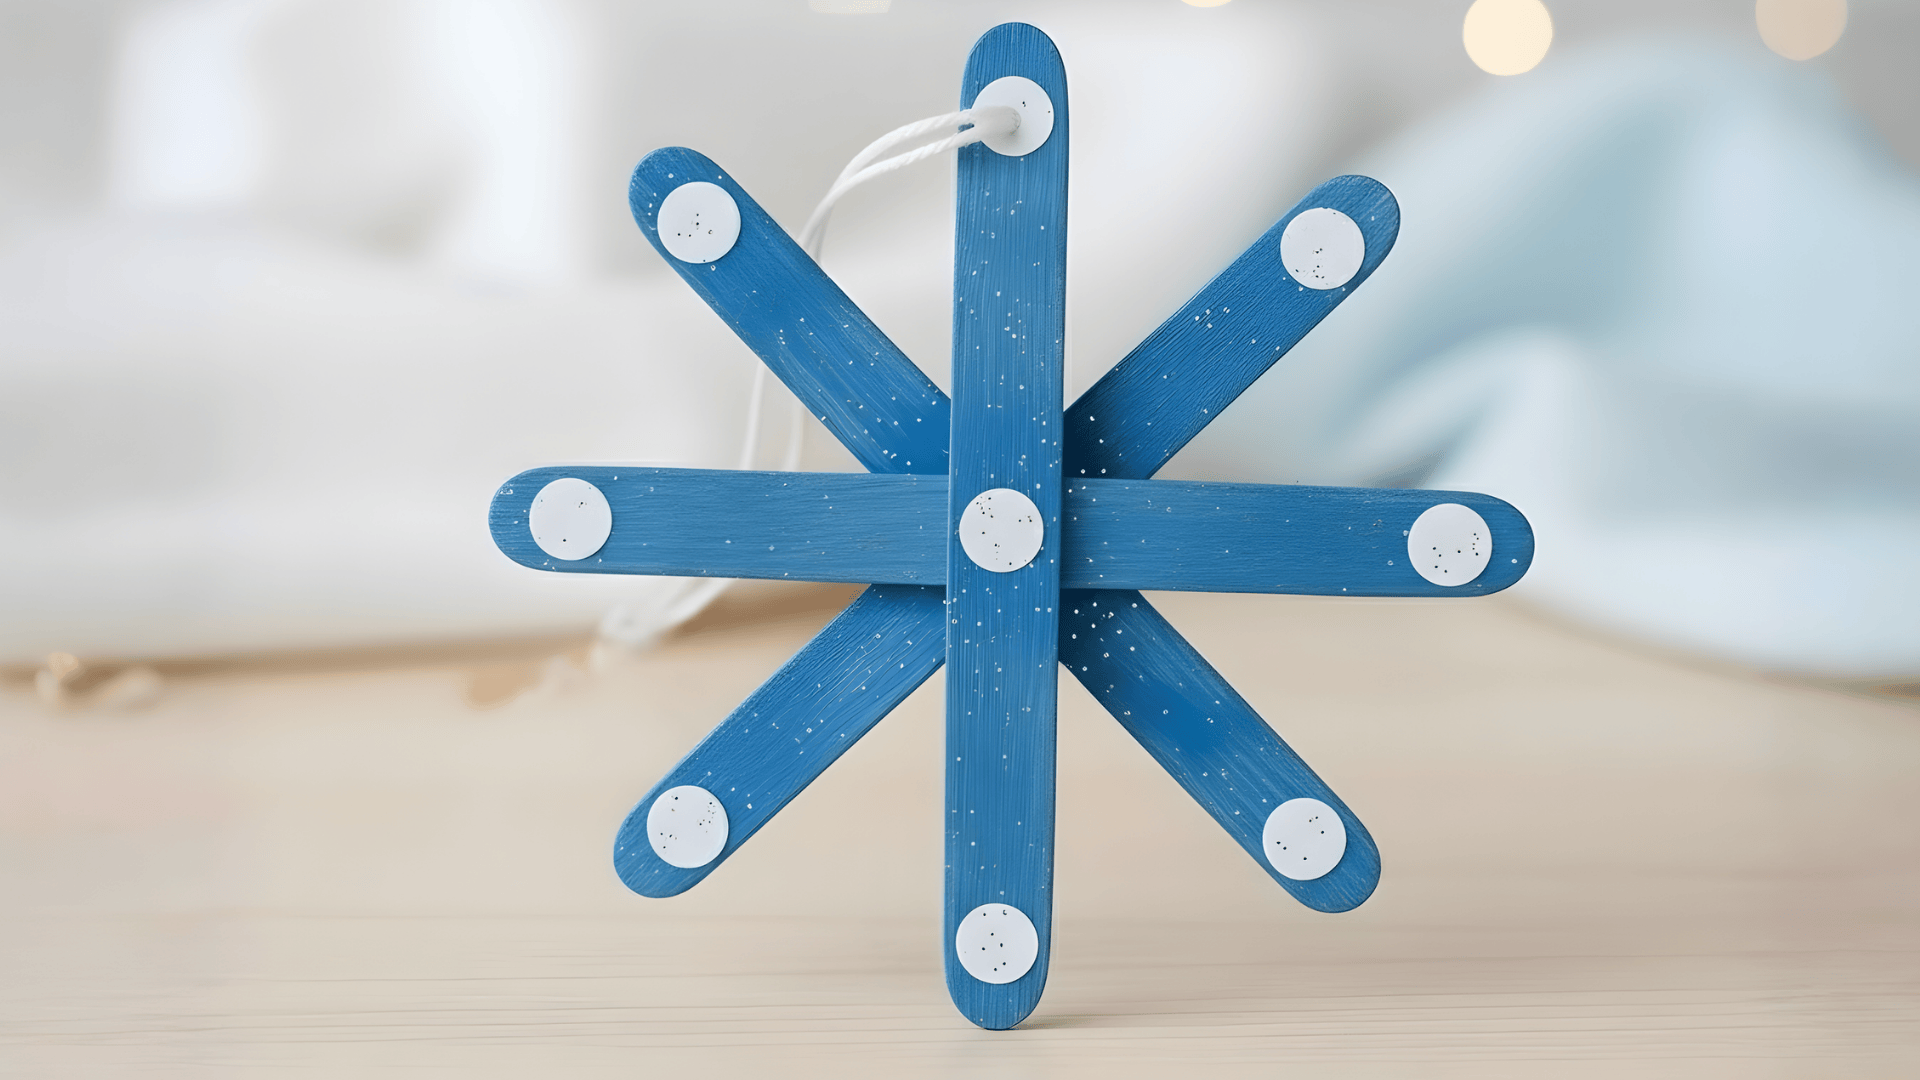
This snowflake is light, sturdy, and fun to decorate. Kids enjoy choosing colors and adding small sparkles.
Materials Needed:
- Mini popsicle sticks
- White or blue paint
- Glue
- Glitter (optional)
- Ribbon
Process:
- Arrange the sticks in a snowflake shape.
- Glue the sticks together at the center.
- Paint the snowflake and let it dry.
- Add a bit of glitter for extra shine.
- Tie a ribbon loop to one stick.
15. Triangle Santa Hat Ornament
This Santa hat uses simple shapes and bright colors. Kids love adding the fluffy white trim at the bottom.
Materials Needed:
- Popsicle sticks
- Red paint
- Cotton balls or white felt
- Glue
- Ribbon
Process:
- Paint the sticks red and let them dry.
- Glue them together to form a triangle.
- Add cotton along the bottom edge.
- Glue a small cotton ball to the tip.
- Tie a ribbon at the top.
16. Craft Stick Sleigh Ornament
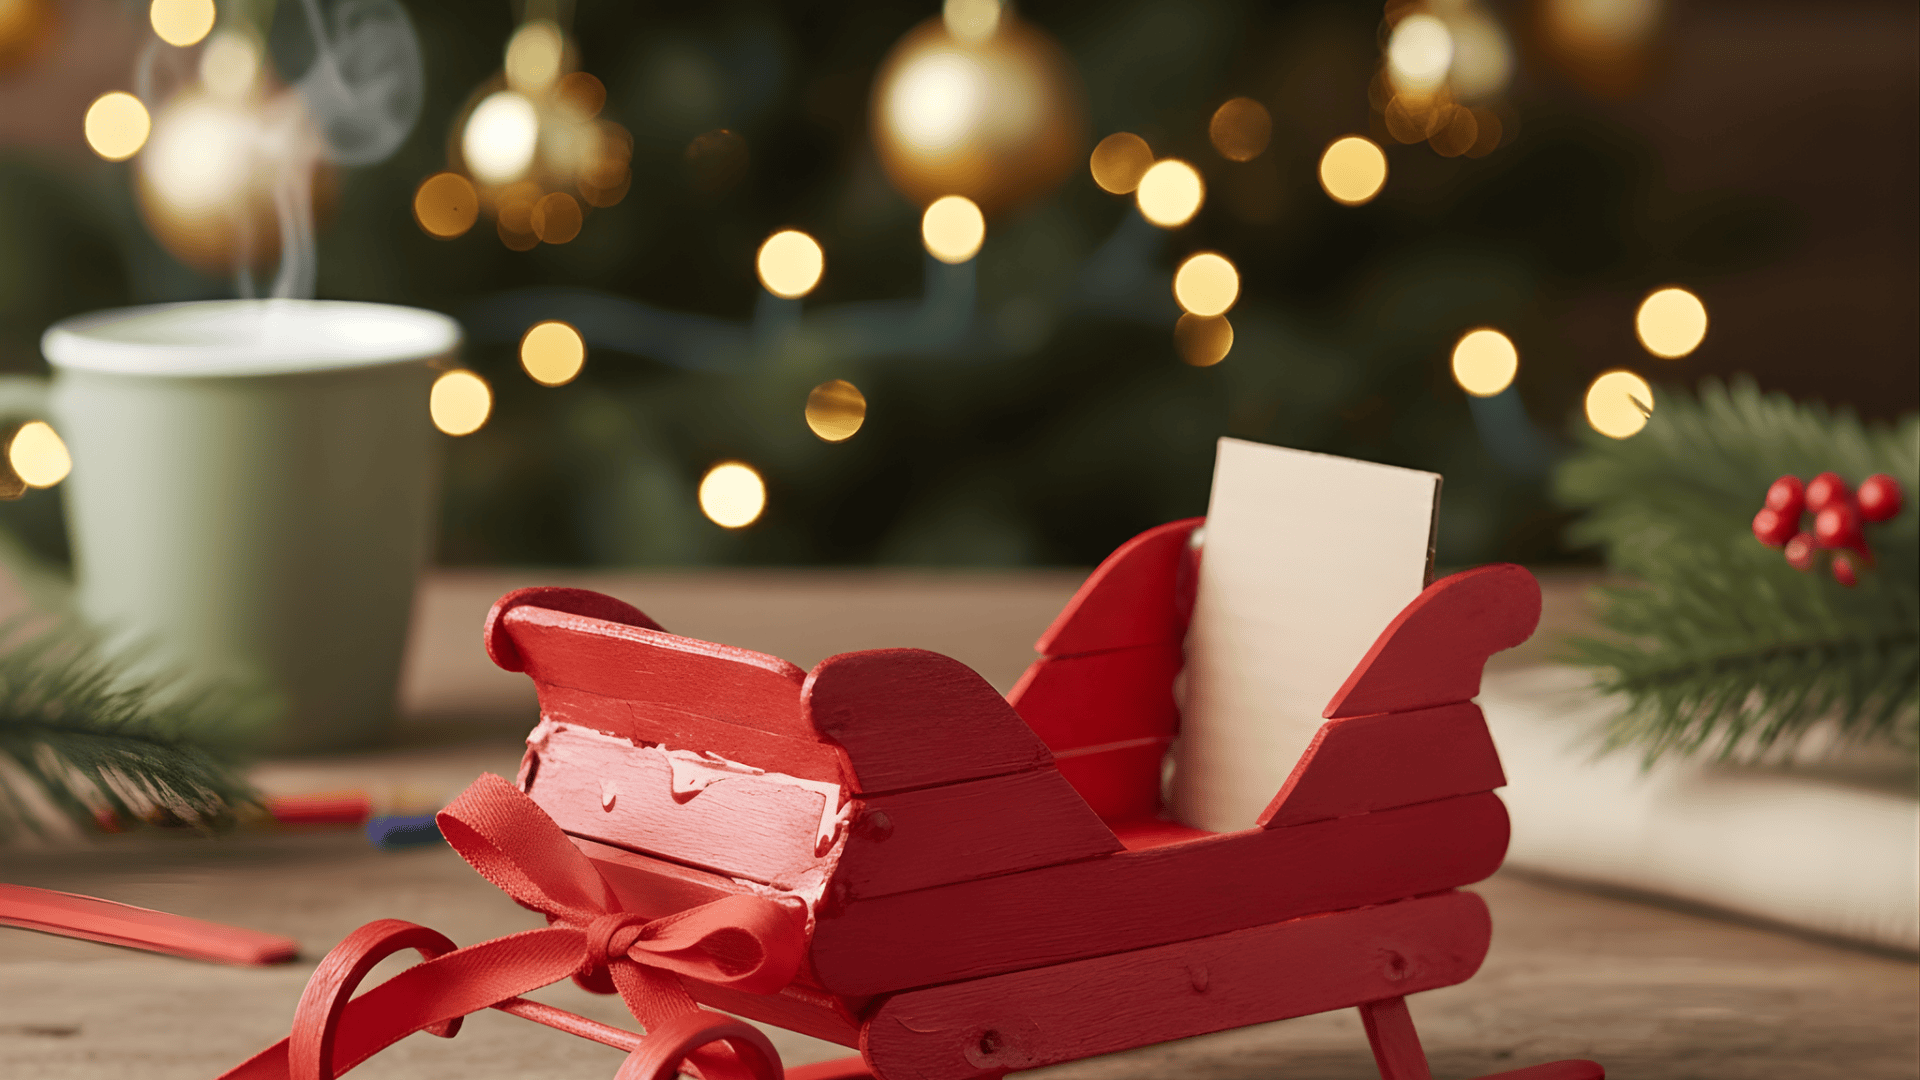
This tiny sleigh is sturdy and easy for kids to handle. They enjoy picking colors and adding small holiday details.
Materials Needed:
- Popsicle sticks
- Paint or markers
- Glue
- Ribbon
- Small cardboard piece
Process:
- Color the sticks in simple holiday shades.
- Glue two sticks side by side for the sleigh base.
- Add two sticks underneath as rails.
- Glue a small cardboard seat on top.
- Add a ready-made base to balance.
- Tie a ribbon to the front.
17. Popsicle Stick Star Ornament
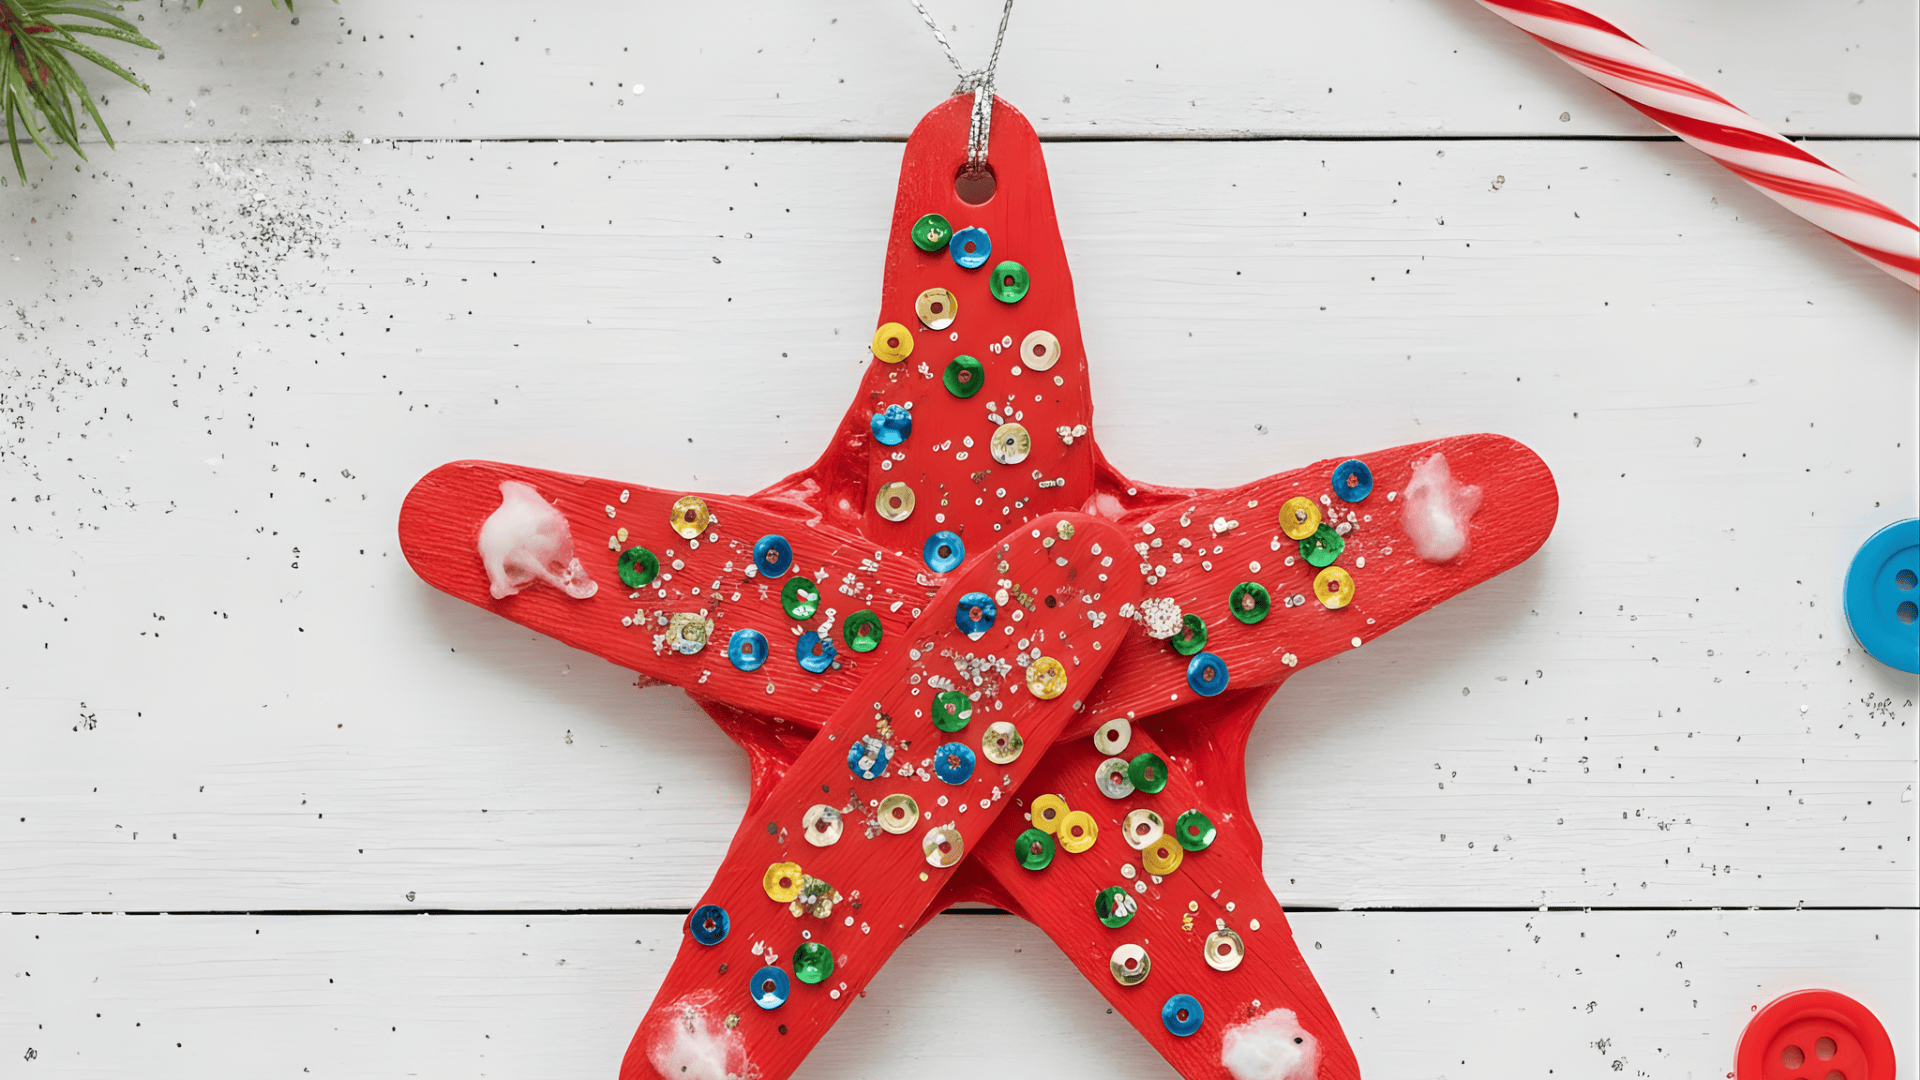
This star has a bold shape that kids love decorating. They can paint it, add stickers, or leave it natural.
Materials Needed:
- Popsicle sticks
- Paint
- Glue
- Stickers or sequins
- String
Process:
- Paint the sticks and let them dry.
- Arrange them into a five-point star.
- Glue each point where the sticks meet.
- Add stickers or sequins for sparkle.
- Tie a string to the top point.
- Can also add a base behind
18. Craft Stick Christmas Window Frame Ornament
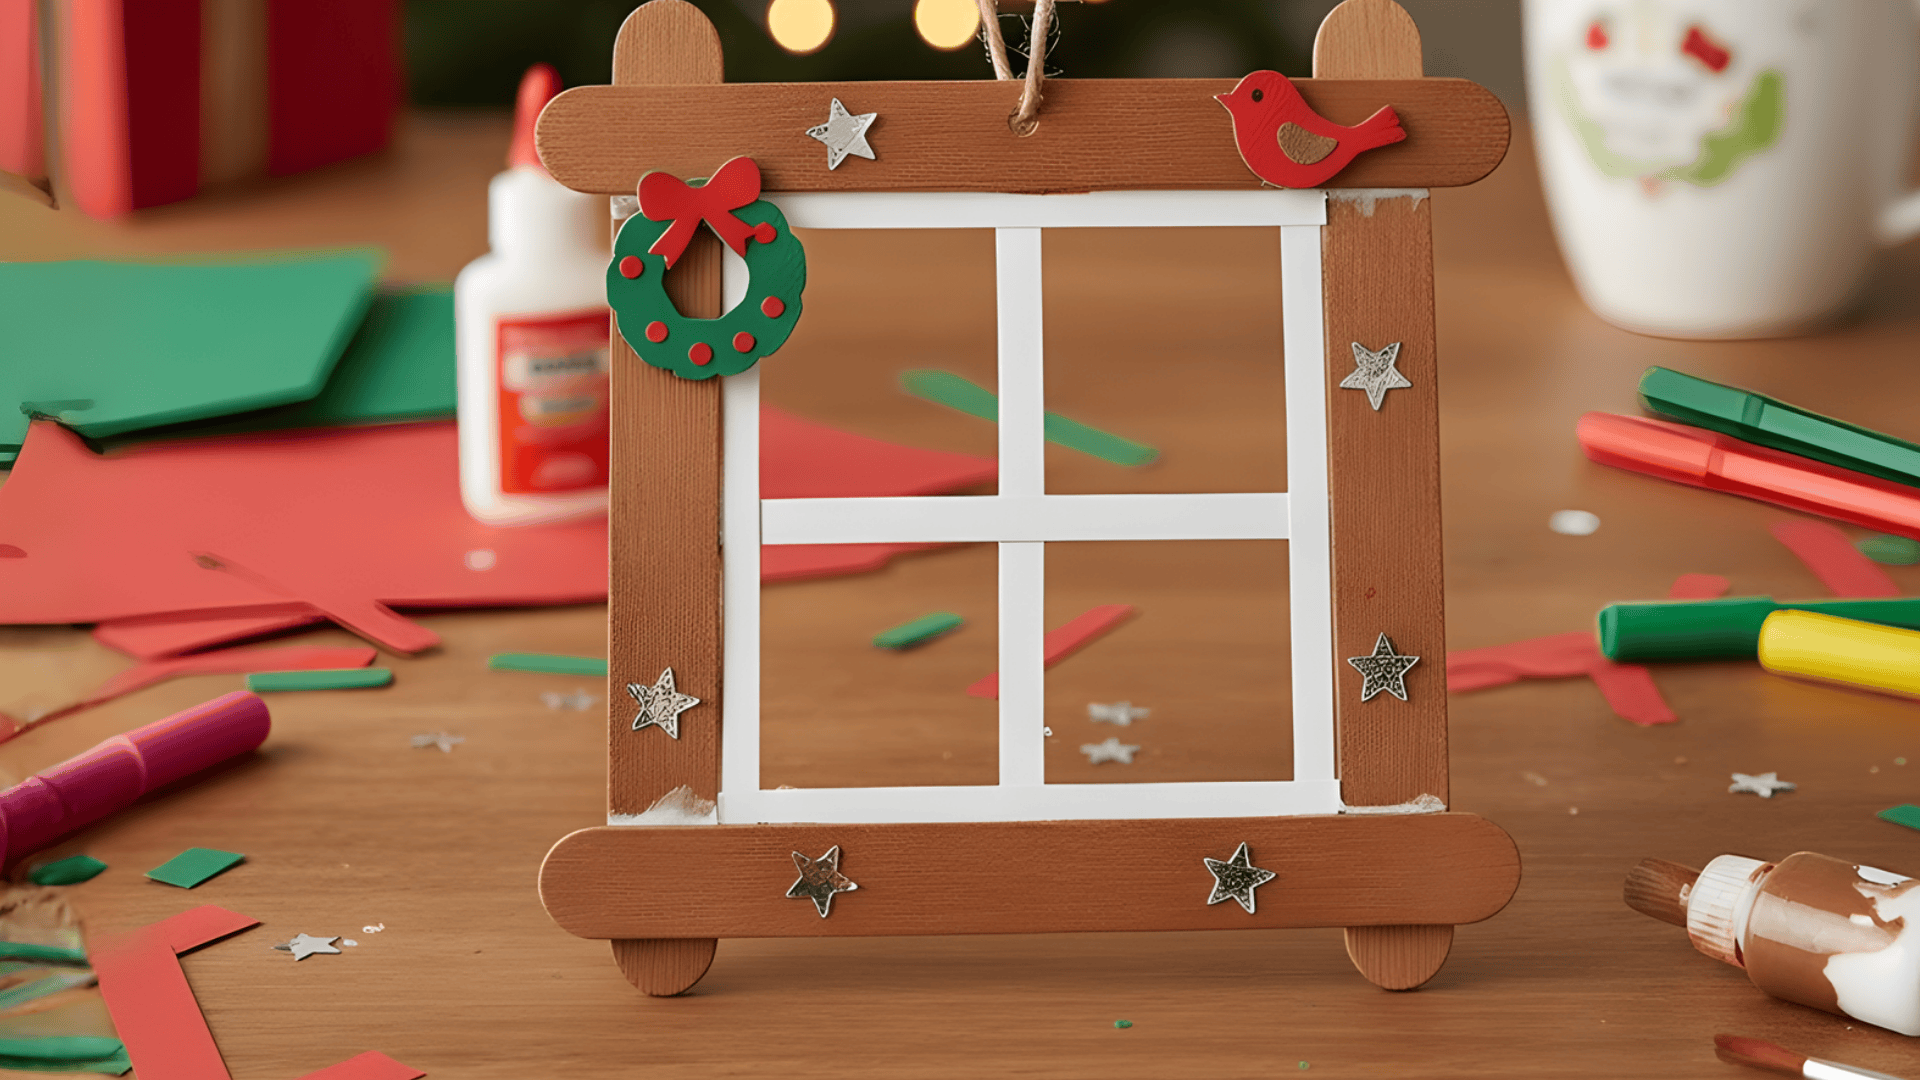
This ornament looks like a tiny Christmas window. Kids enjoy adding small details like wreaths or “snow.”
Materials Needed:
- Popsicle sticks
- Paint
- Glue
- Small decorations
- Ribbon
Process:
- Glue the sticks into a square frame.
- Paint the frame and let it dry.
- Add crossbars using thin paper strips.
- Decorate the frame with small accents.
- Tie a ribbon at the top for hanging.
Clay, Dough & Salt Dough Ornaments
Clay and dough ornaments are perfect for keepsakes because they last for years. Kids enjoy pressing, shaping, and decorating them with simple tools.
19. Salt Dough Handprint Ornament
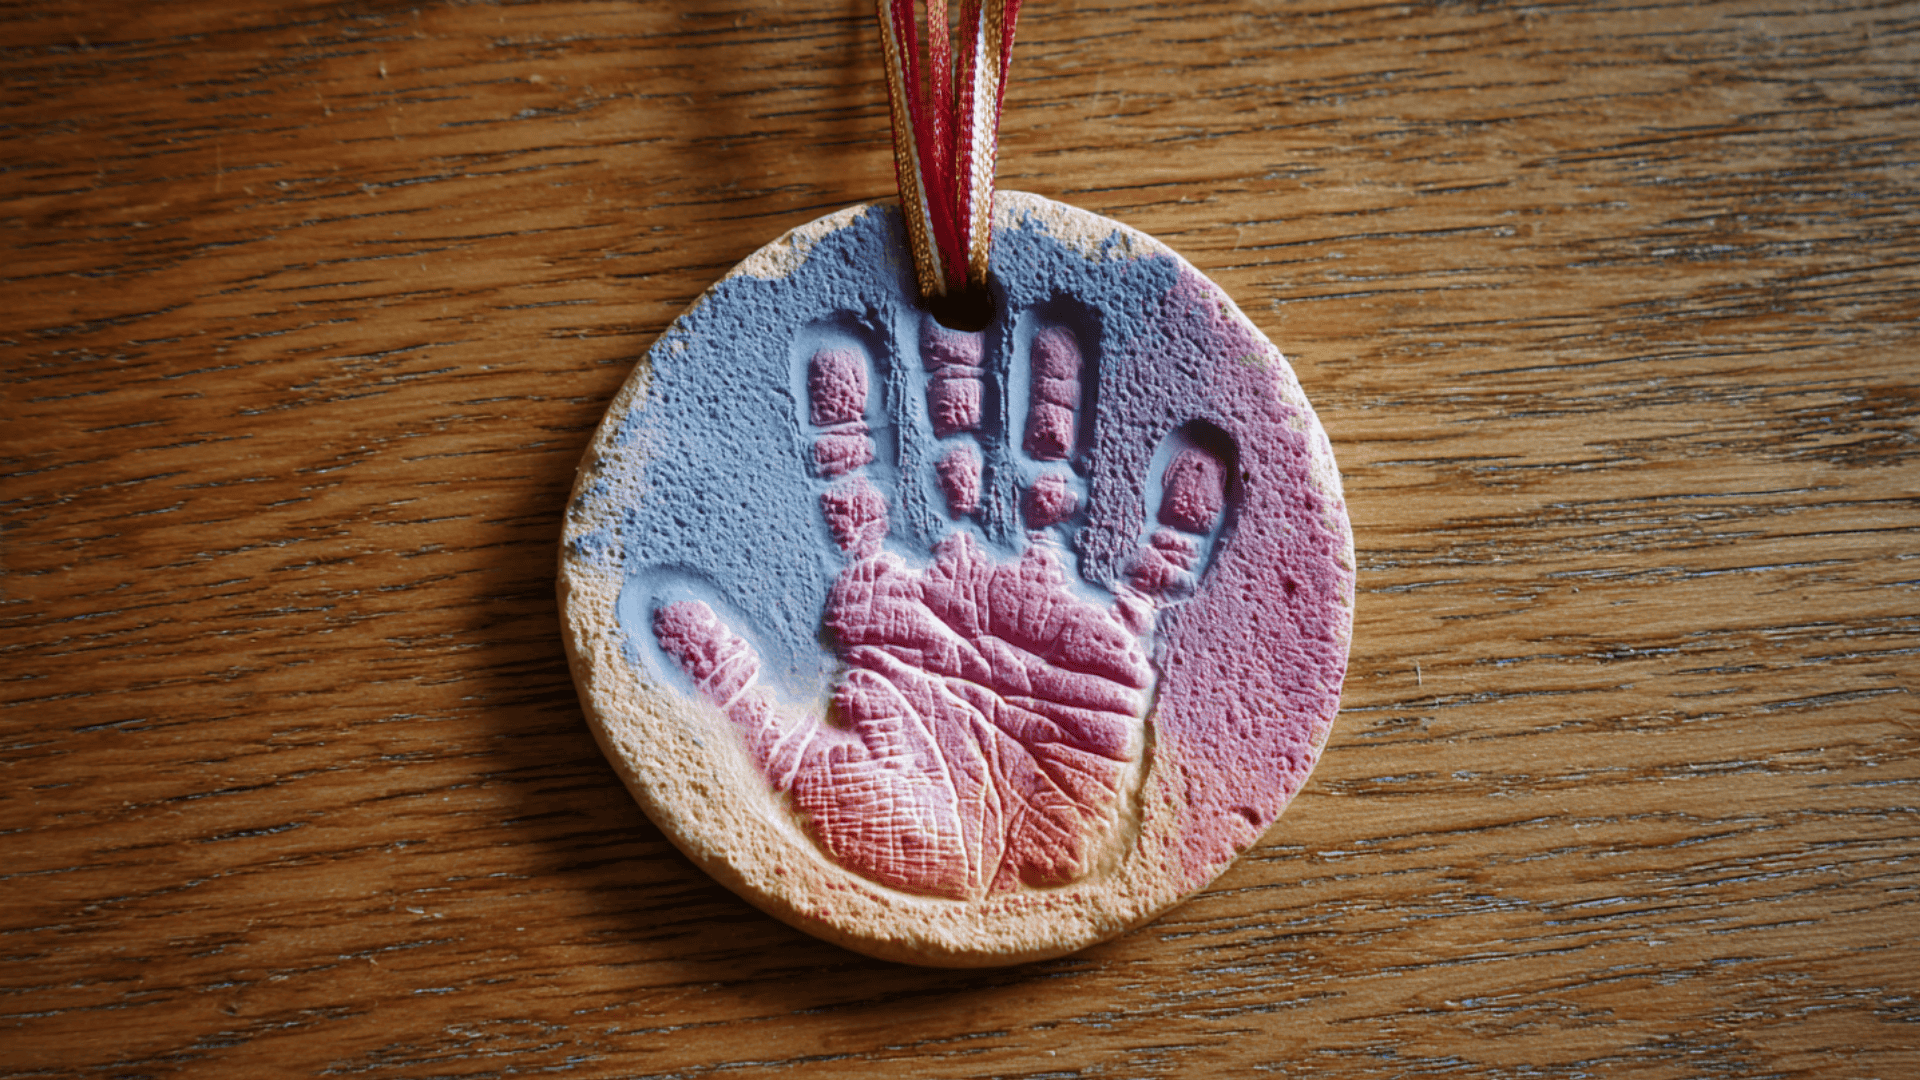
This keepsake captures a child’s handprint in a long-lasting way. Kids enjoy pressing their hands into the soft dough and painting it when dry.
Materials Needed:
- Salt
- Flour
- Warm water
- Rolling pin
- Paint
- Ribbon
Process:
- Mix equal parts salt and flour, then add water to form dough.
- Roll it out to a medium thickness.
- Press the child’s hand firmly into the dough.
- Cut around the print in a circle or a heart shape.
- Make a hole for hanging and bake at low heat.
- Paint and add ribbon when dry.
20. Salt Dough Thumbprint Reindeer Ornament
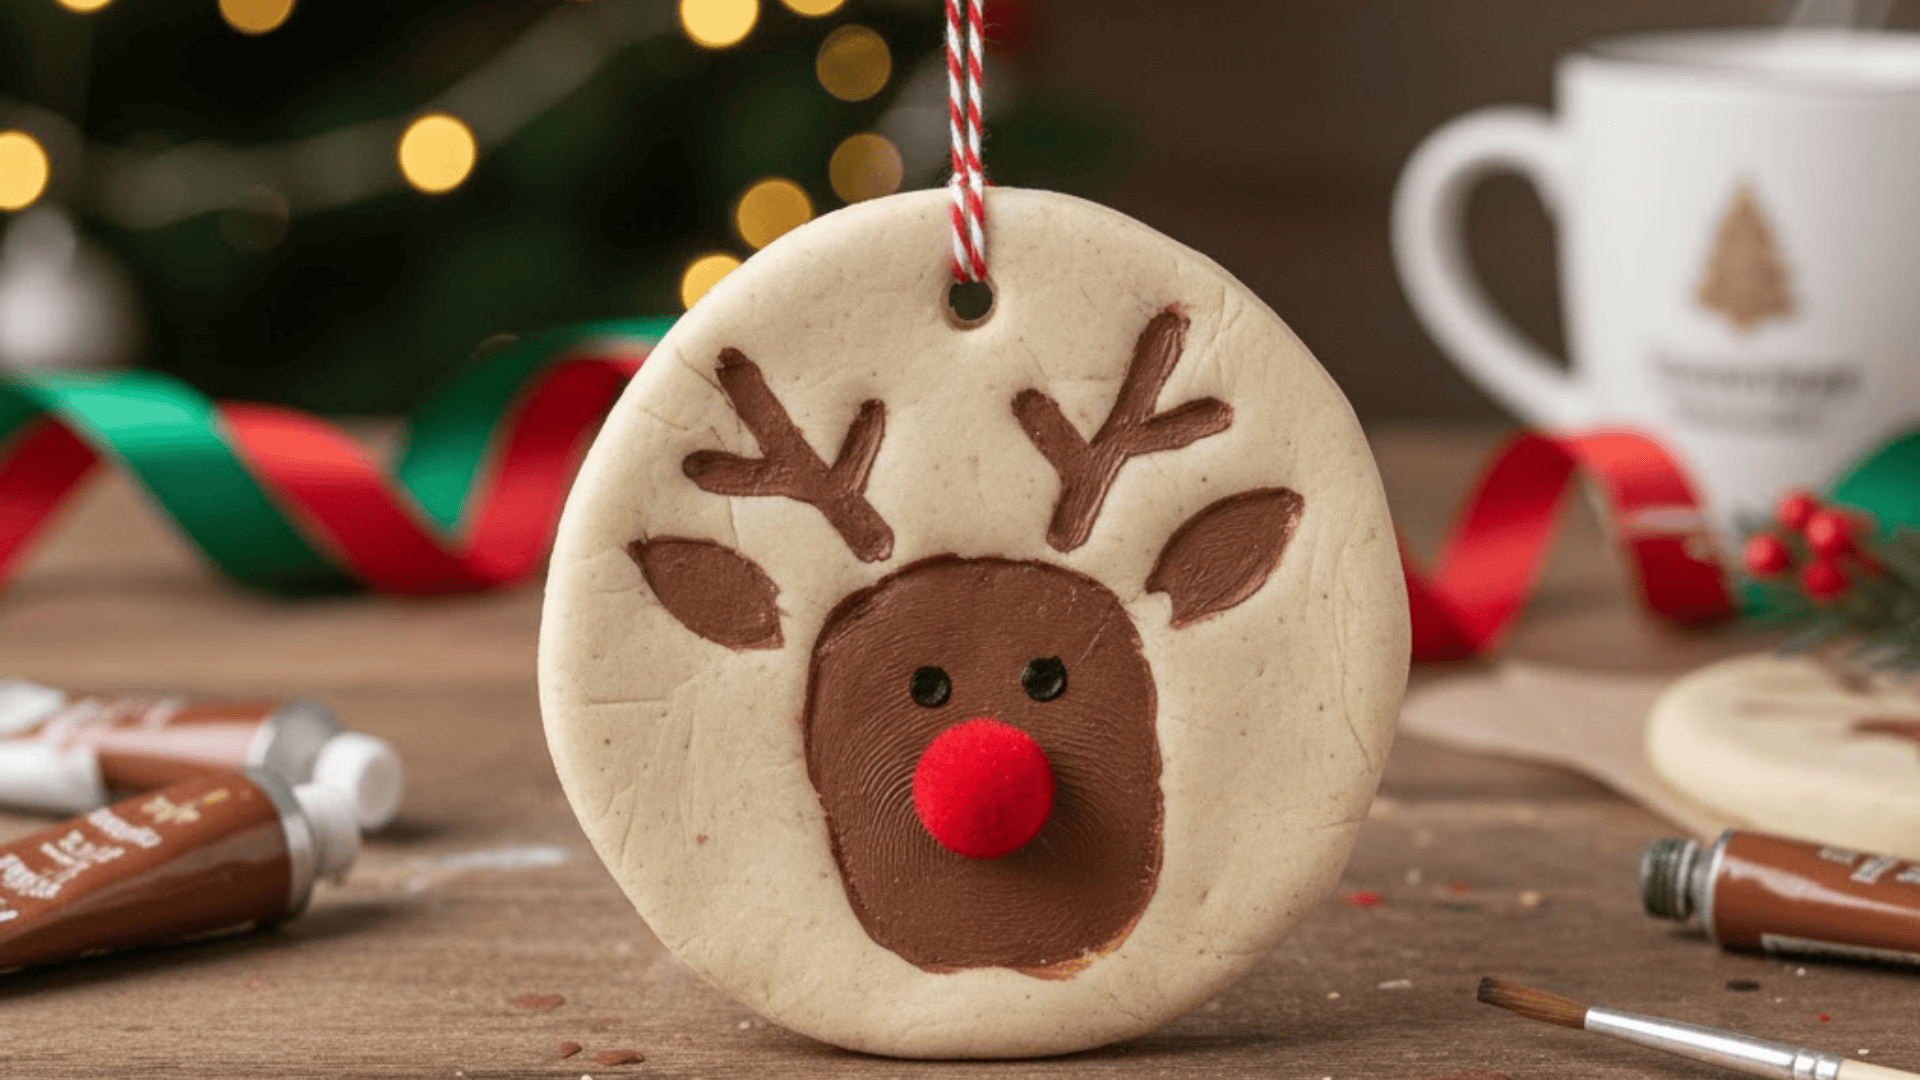
This ornament turns small thumbprints into a cute reindeer face. Kids love seeing how their tiny prints become a holiday character.
Materials Needed:
- Salt dough
- Brown paint
- Red paint or red pom-pom
- Black marker
- Ribbon
Process:
- Shape the dough into a small circle.
- Press thumbprints where the reindeer head will be.
- Bake the dough until dry.
- Paint the thumbprint brown.
- Add eyes, a mouth, and a red nose.
- Thread the ribbon through the hole.
21. Air-Dry Clay Stamped Ornament

This ornament uses simple stamps or leaves to make pretty textures. Kids enjoy pressing shapes into the clay and seeing the patterns appear.
Materials Needed:
- Air-dry clay
- Rolling pin
- Stamps or leaves
- Straw for making a hole
- Ribbon
Process:
- Roll out the clay evenly.
- Cut out shapes with cookie cutters.
- Press stamps or leaves gently to add texture.
- Make a small hole at the top.
- Let the ornament dry fully.
- Add ribbon.
22. Baking Soda Clay Snowflake Ornament
This white clay makes bright, smooth snowflakes that look crisp. Kids enjoy adding tiny lines or dots before the clay dries.
Materials Needed:
- Baking soda
- Cornstarch
- Water
- Snowflake cookie cutters
- Toothpick
- Ribbon
Process:
- Prepare the baking soda clay and roll it out.
- Cut snowflake shapes with the cookie cutter.
- Add small details using a toothpick.
- Make a hole for hanging.
- Let the snowflakes dry or bake on low heat.
23. Cinnamon Dough Gingerbread Man Ornament
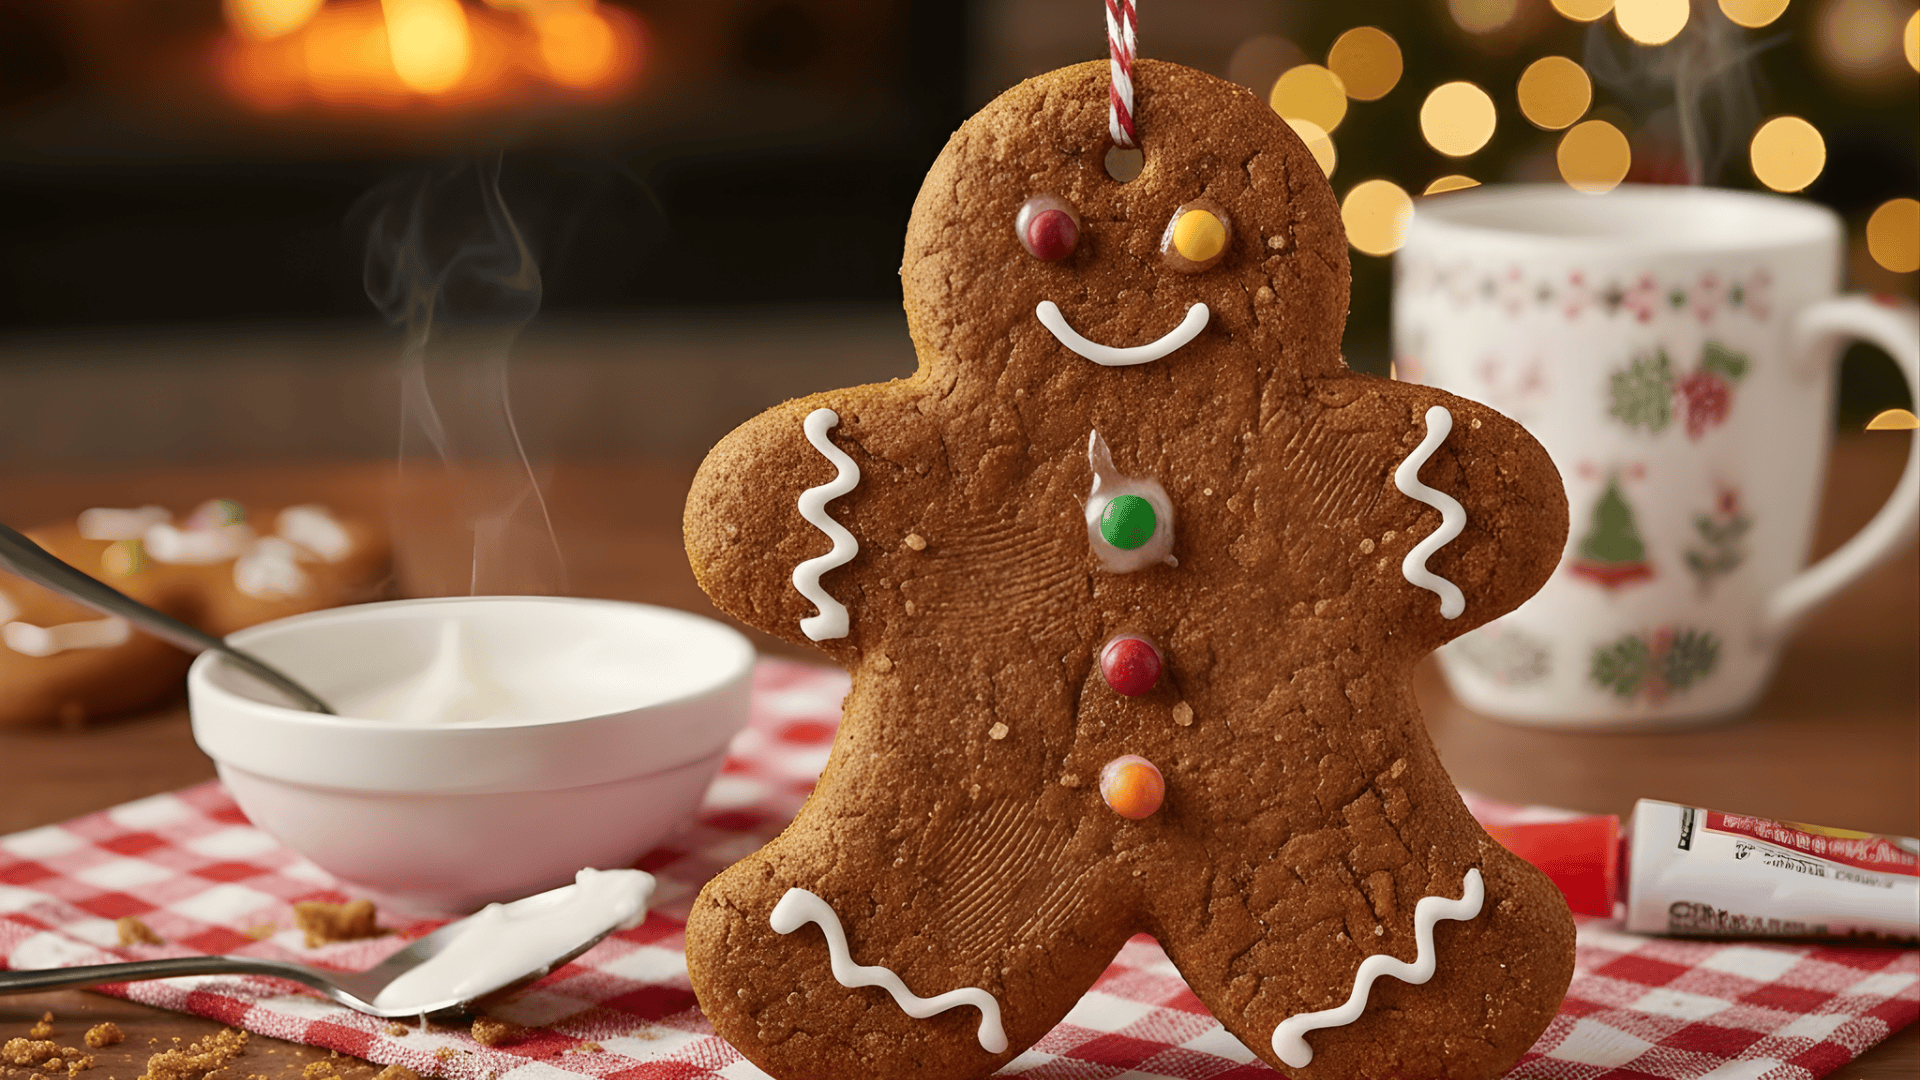
This ornament smells warm and festive, and kids love shaping it. The dough dries hard and keeps its cinnamon scent for years.
Materials Needed:
- Ground cinnamon
- Applesauce
- Craft glue (optional)
- Gingerbread man cutter
- Ribbon
Process:
- Mix cinnamon and applesauce until the dough forms.
- Roll out the dough gently.
- Cut gingerbread shapes.
- Make a hole for the ribbon.
- Let dry for one to two days.
24. Air-Dry Clay Name Tag Ornament
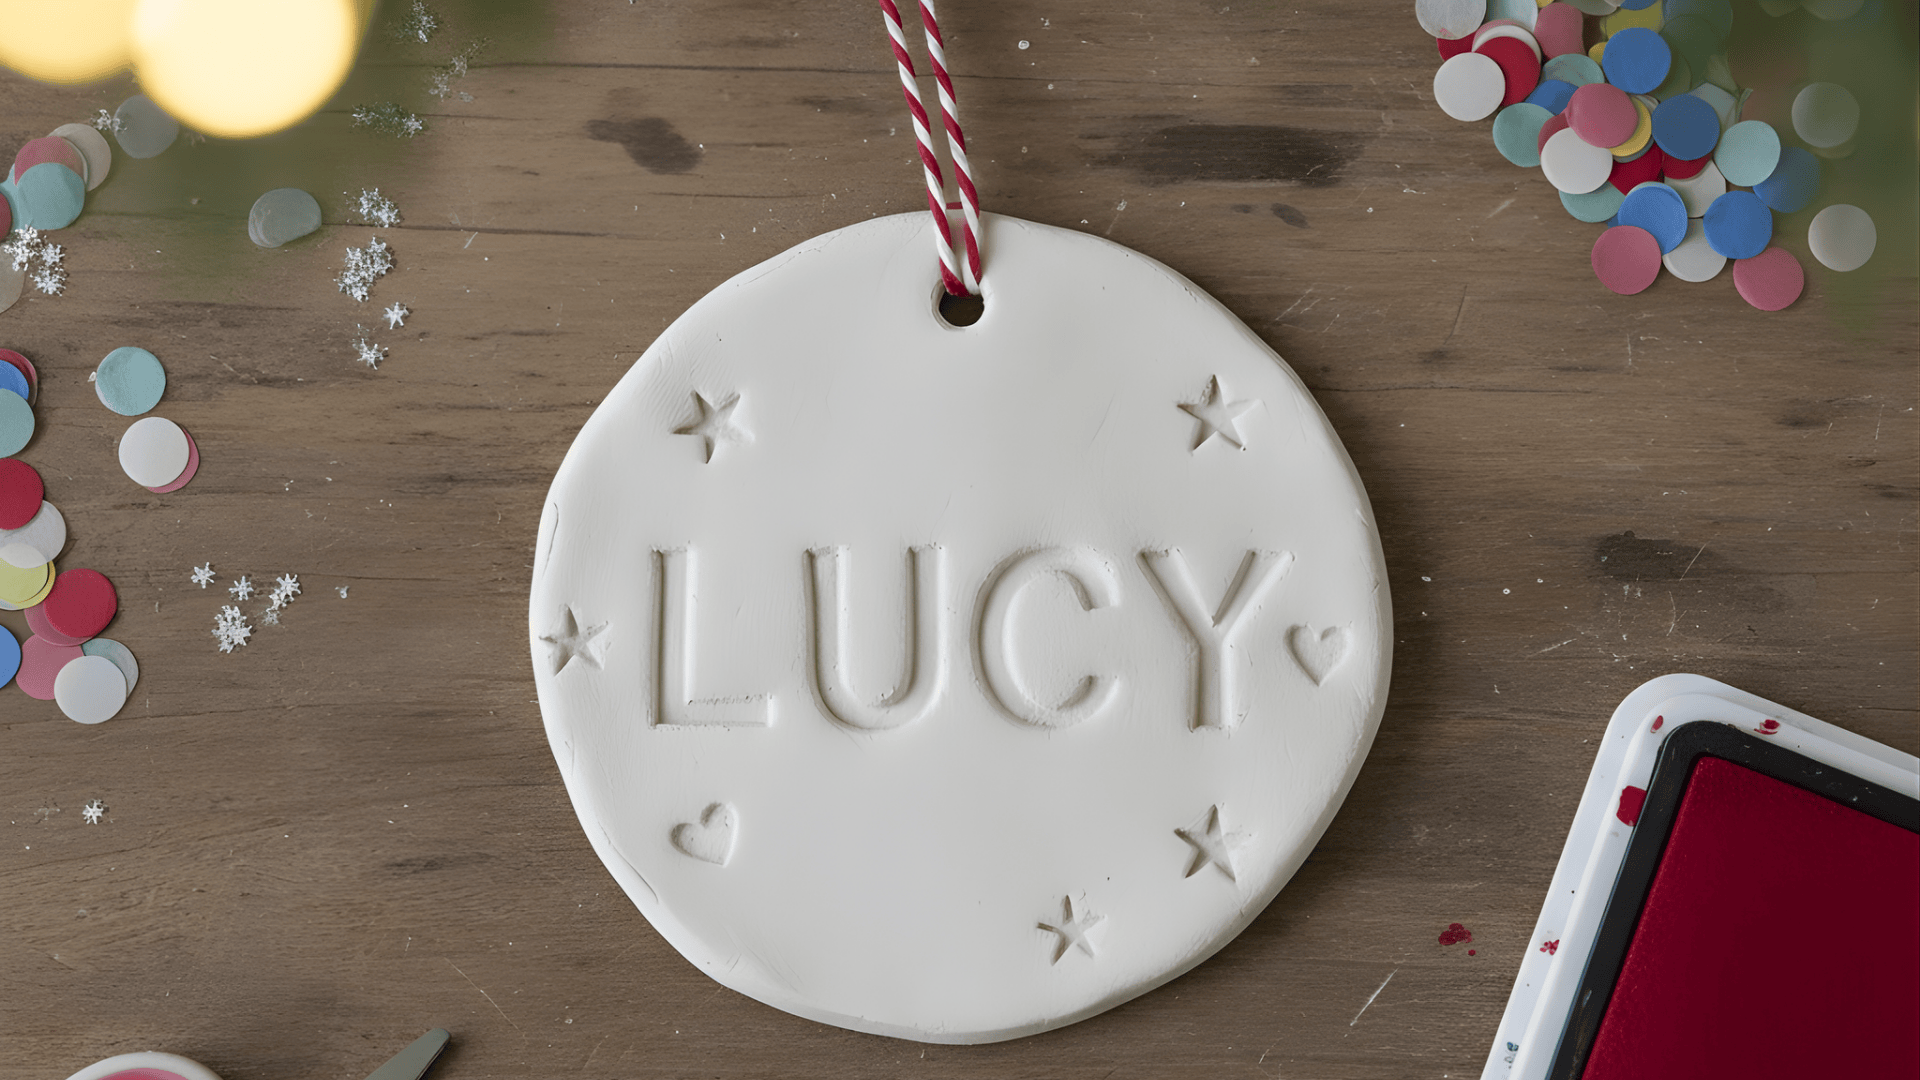
Kids love making these personal name ornaments. They’re simple, clean, and perfect as gifts or keepsakes.
Materials Needed:
- Air-dry clay
- Letter stamps or a toothpick
- Cookie cutters
- Straw for a hole
- Ribbon
Process:
- Roll the clay to an even thickness.
- Cut out a circle, star, or tag shape.
- Press the child’s name into the clay.
- Make a hanging hole.
- Let dry fully before adding ribbon.
25. Painted Clay Star Garland Ornament
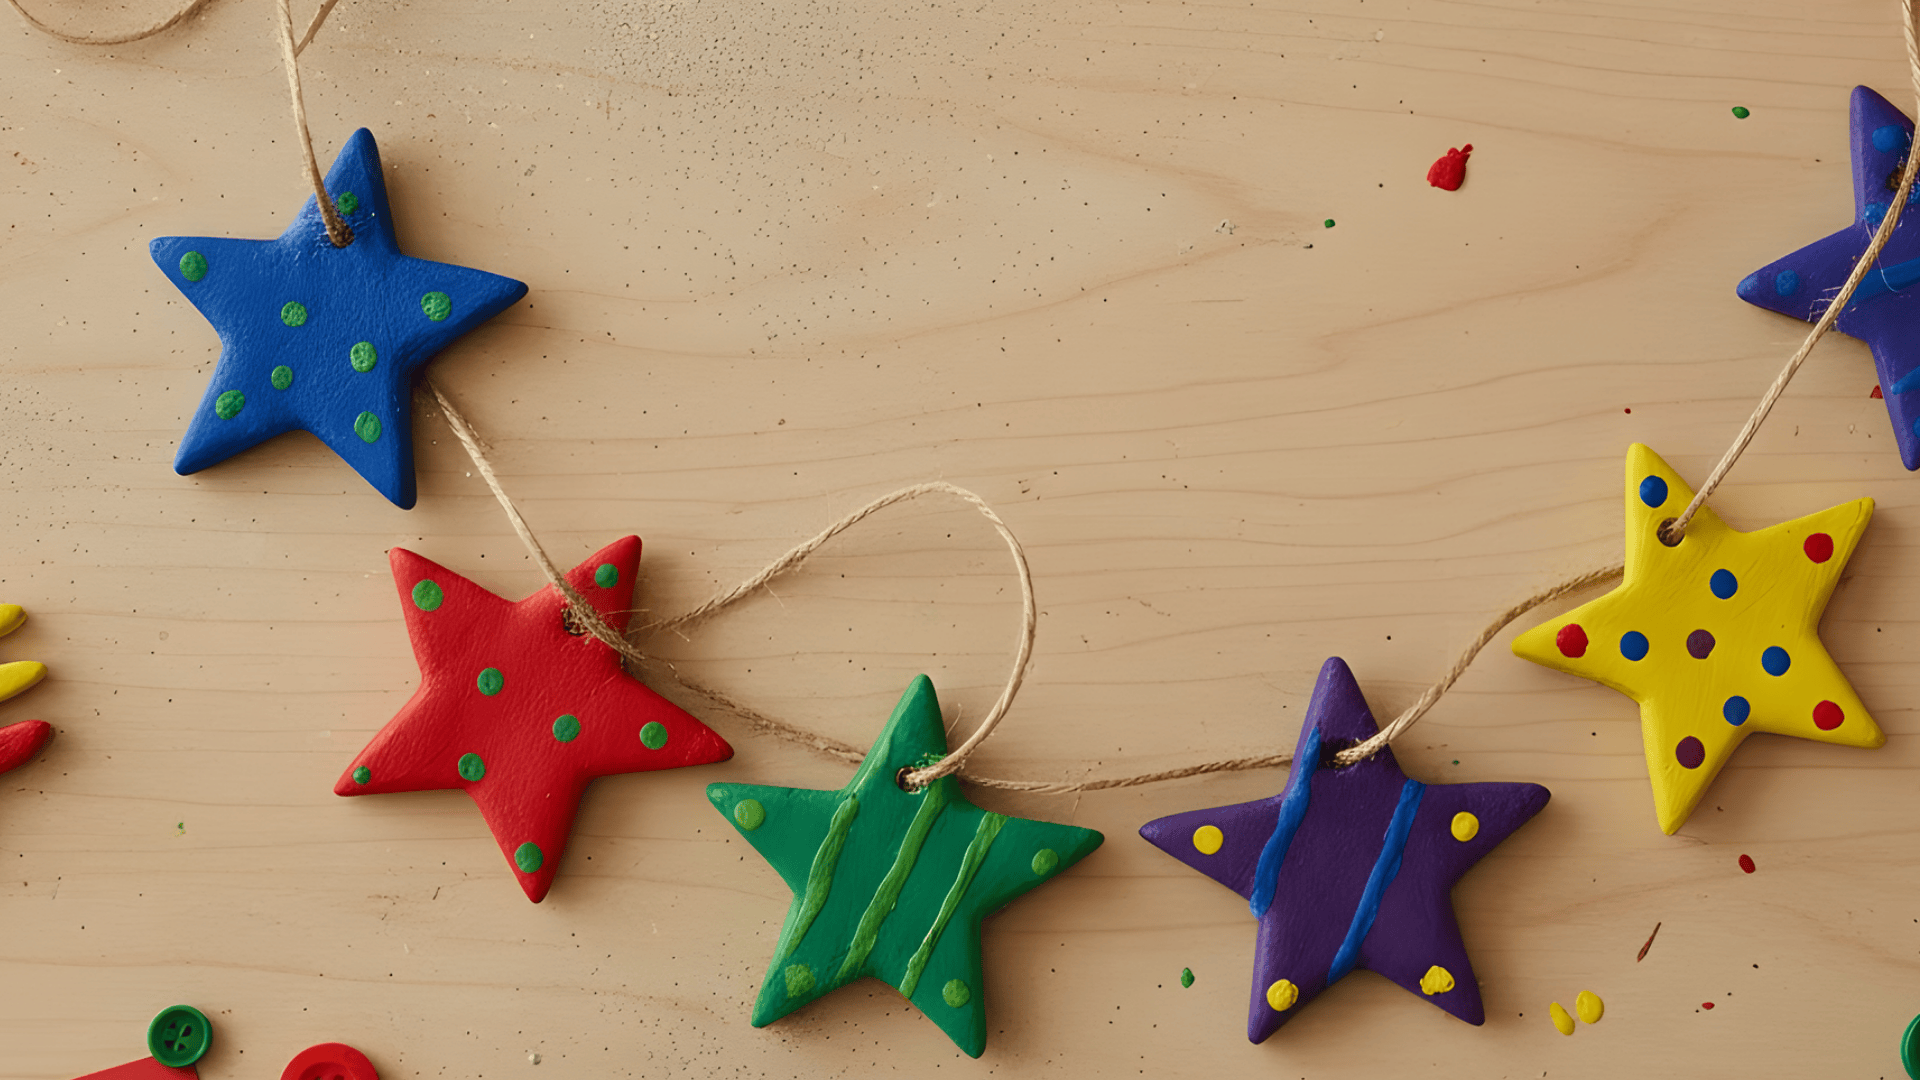
These clay stars look bright once painted and can be strung into a small garland. Kids enjoy choosing colors and decorating each star.
Materials Needed:
- Air-dry or oven-bake clay
- Star cookie cutters
- Paint
- Twine
- Small brush
Process:
- Roll out the clay and cut several stars.
- Make small holes near the tops.
- Let the stars dry completely.
- Paint them in holiday colors.
- String them onto twine.
26. Clay Leaf-Press Texture Ornament

Kids love pressing real leaves into clay to see the natural patterns. The texture makes every ornament unique and detailed.
Materials Needed:
- Air-dry clay
- Fresh leaves
- Rolling pin
- Cookie cutters
- Ribbon
Process:
- Roll the clay flat on the table.
- Press a leaf onto the clay to create texture.
- Lift the leaf and cut a shape around the print.
- Make a hole for ribbon.
- Let the ornament dry.
Yarn, String & Fabric Ornaments
Yarn and fabric ornaments feel soft and warm, which makes them great for kids. They’re simple to shape and give kids plenty of freedom to decorate.
27. Yarn-Wrapped Mini Christmas Trees
These mini trees are easy for kids to hold and wrap with yarn. The wrapping feels relaxing, and each tree comes out a little different.
Materials Needed:
- Cardboard triangle shapes
- Green yarn
- Glue
- Small beads or buttons
- Ribbon
Process:
- Cut triangle shapes from cardboard.
- Add a bit of glue to one corner and attach the yarn.
- Wrap the yarn around the triangle until it’s covered.
- Glue the end of the yarn at the back.
- Add beads or buttons as ornaments and tie a ribbon.
28. String Art Snowflake Ornament
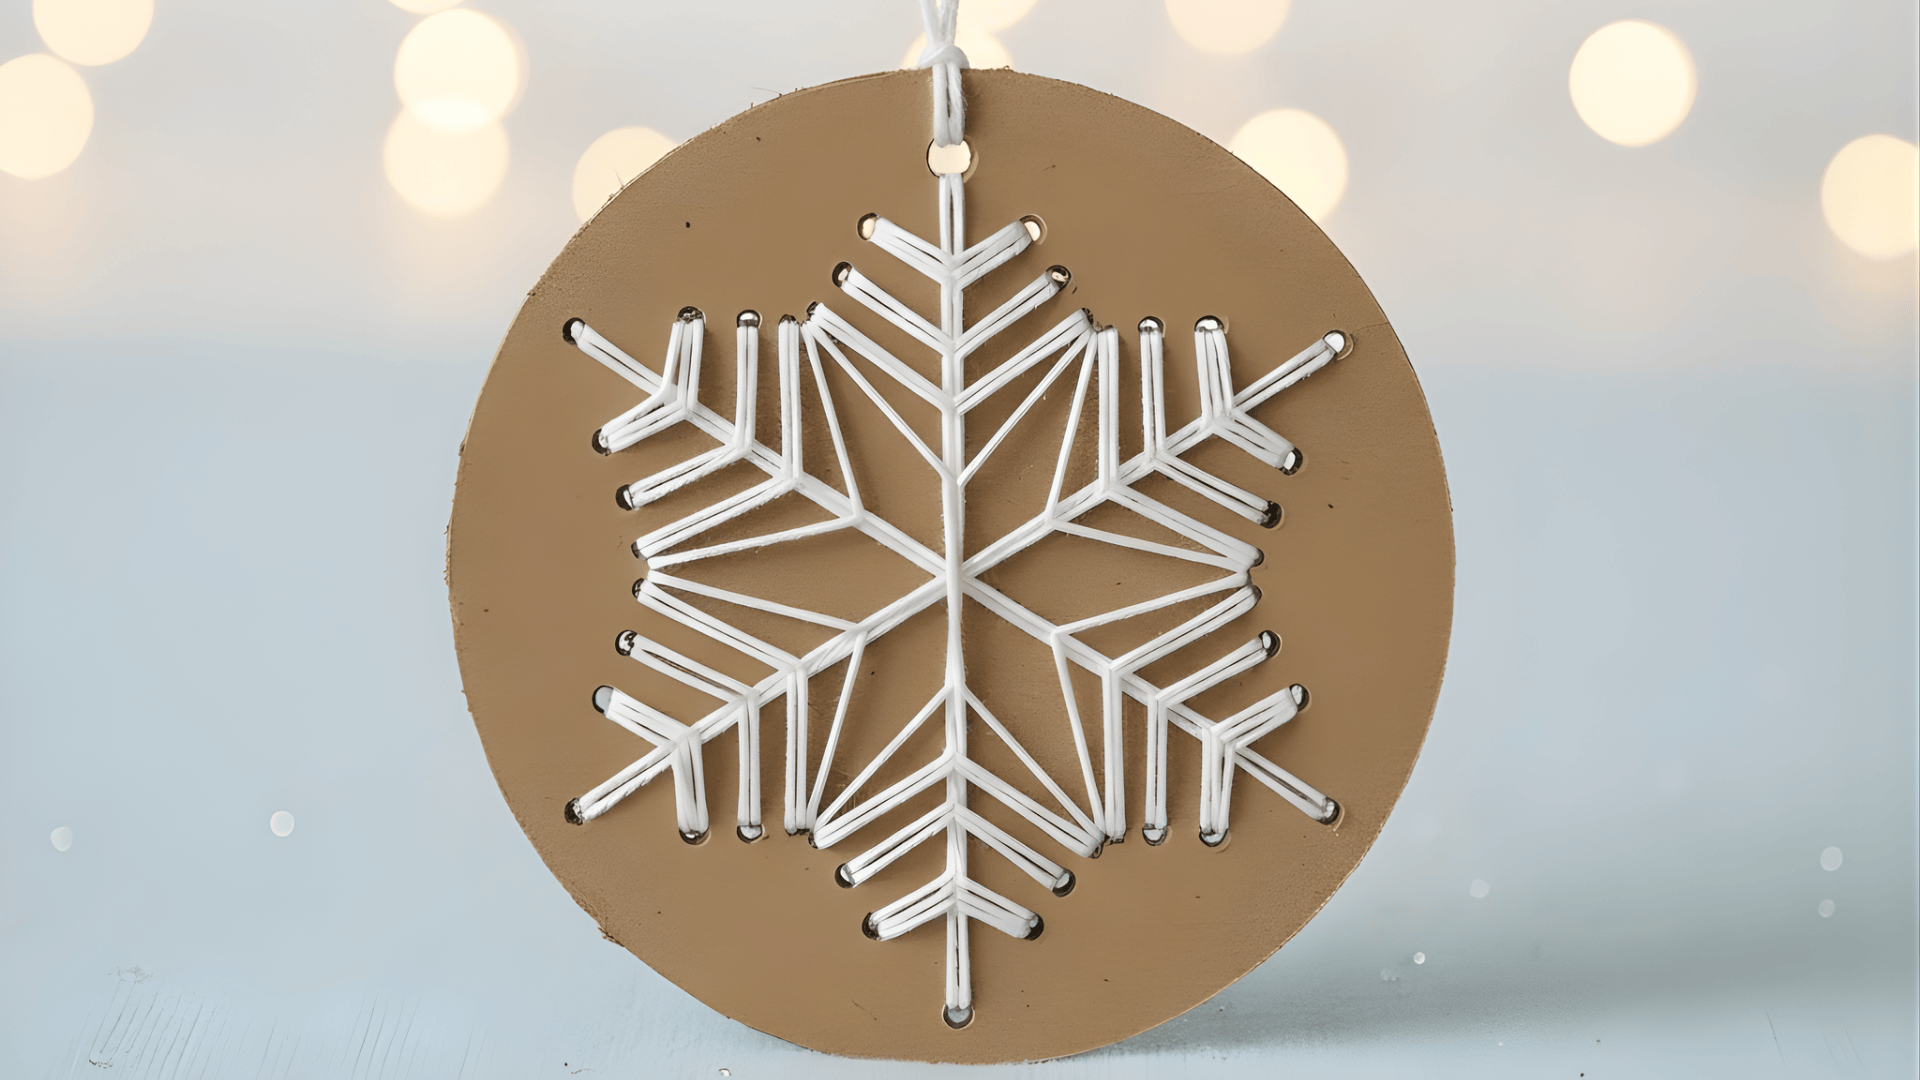
Kids enjoy placing the string across the points to make a simple snowflake pattern. It teaches them how to create shapes with lines and gentle pressure.
Materials Needed:
- Small cardboard circle
- White or blue string
- Glue
- Hole punch
- Ribbon
Process:
- Punch small holes around the edge of the cardboard.
- Thread the string back and forth through the holes.
- Gently pull the string to form a snowflake pattern.
- Secure the end of the string at the back.
- Add a ribbon loop for hanging.
29. Felt Circle Layered Ornament
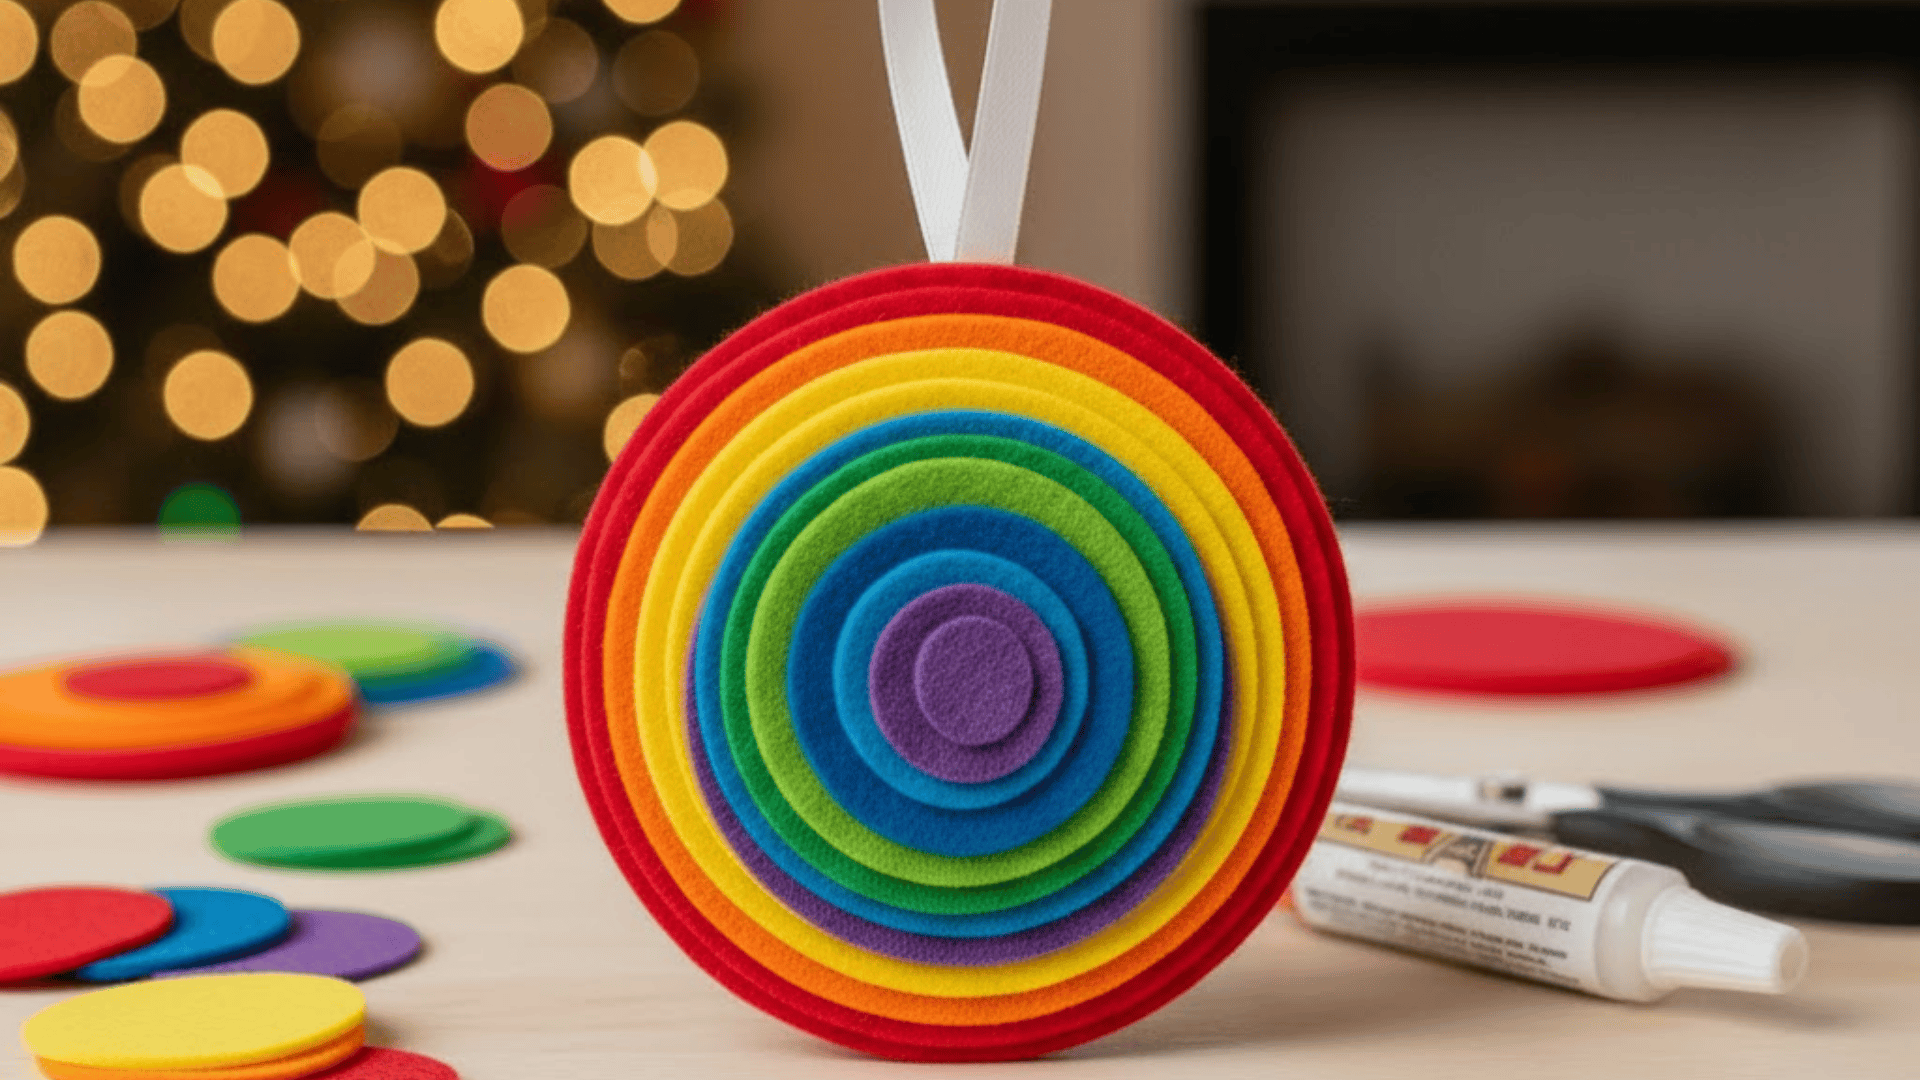
This soft ornament stacks simple felt circles into a layered shape. Kids like choosing the colors and seeing the layers build up.
Materials Needed:
- Craft felt in different colors
- Scissors
- Glue
- Needle and thread (optional)
- Ribbon
Process:
- Cut several felt circles in different sizes.
- Layer the circles from largest to smallest.
- Glue the layers together or stitch once through the center.
- Add a small decoration on top if you want.
- Attach a ribbon for hanging.
30. Mini Pom-Pom Wreath Ornament
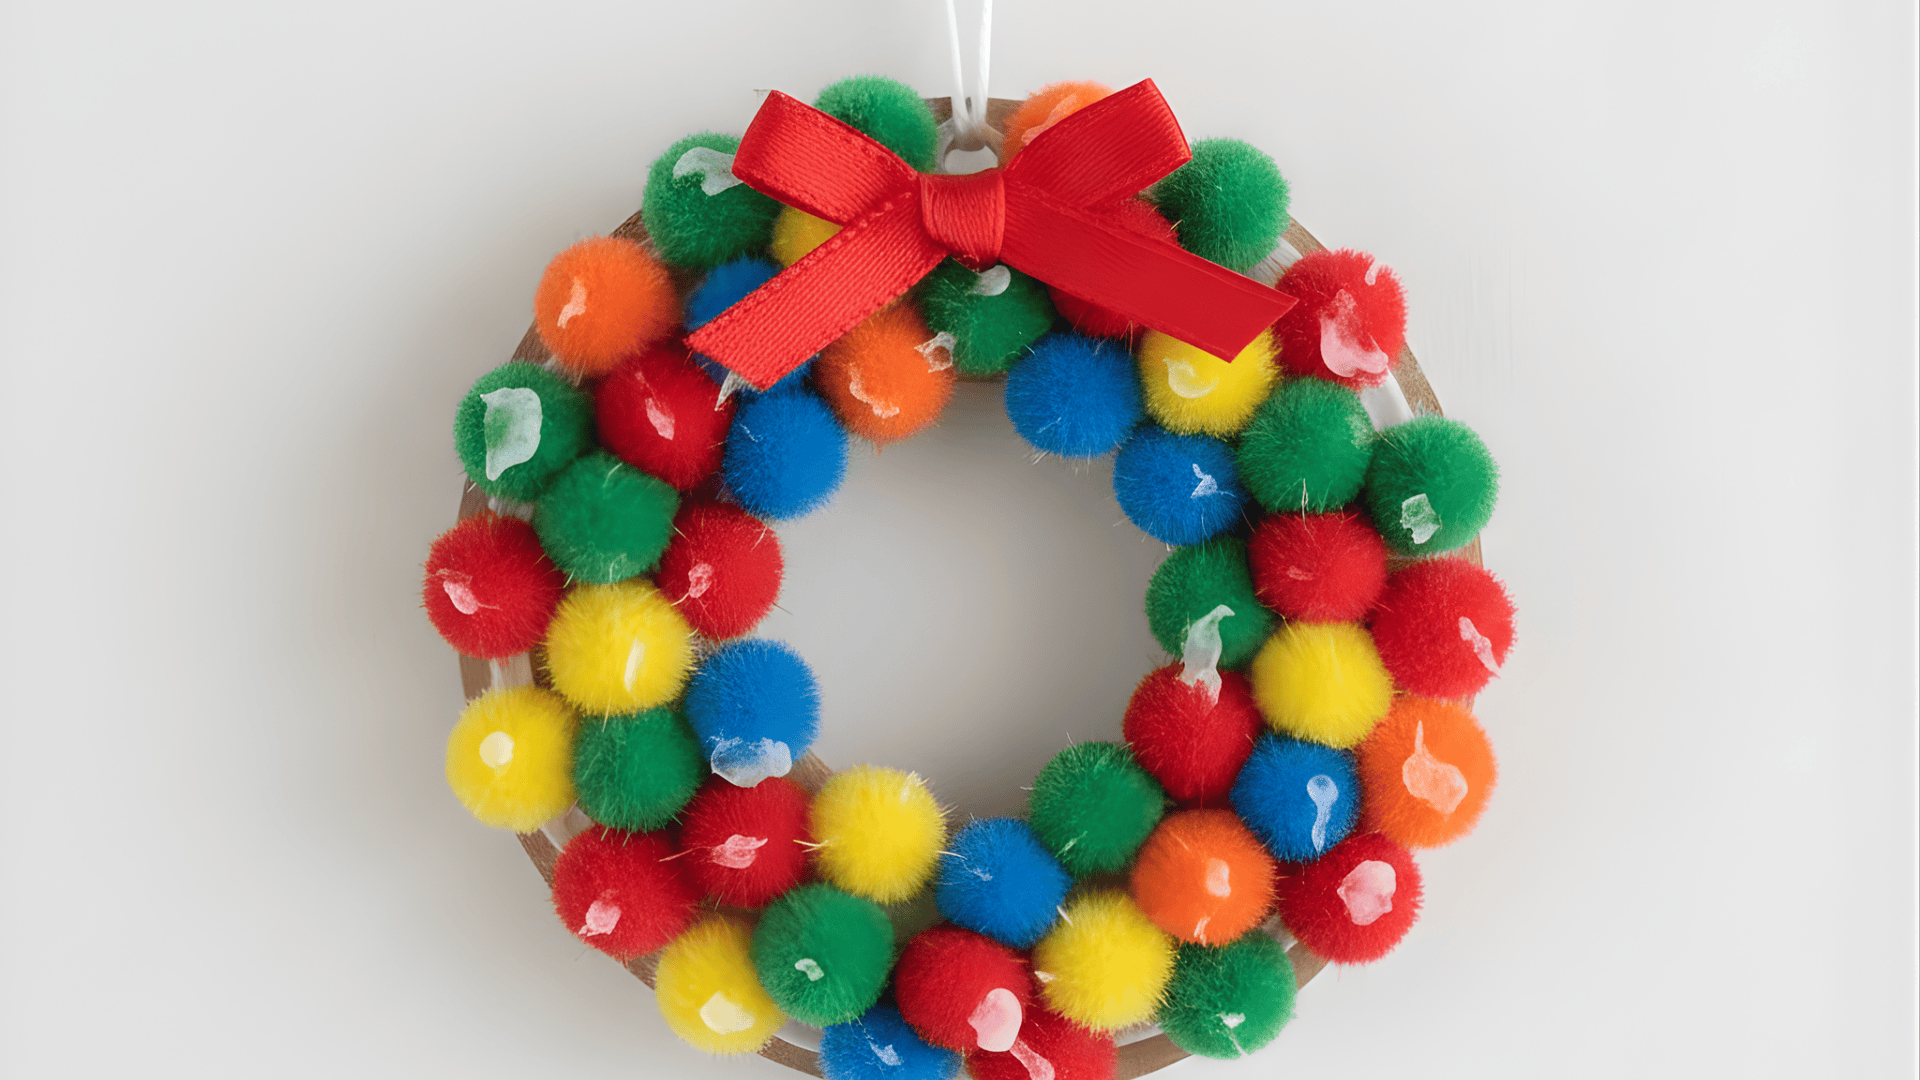
This tiny wreath looks bright and cheerful with all the little pom-poms. Kids enjoy choosing the colors and placing each pom-pom around the circle.
Materials Needed:
- Small pom-poms
- Cardboard ring
- Glue
- Ribbon
Process:
- Cut a small ring from cardboard.
- Glue pom-poms all around the ring.
- Fill in any gaps with extra pom-poms.
- Tie a ribbon at the top for hanging.
31. Fabric Scrap Ball Ornament
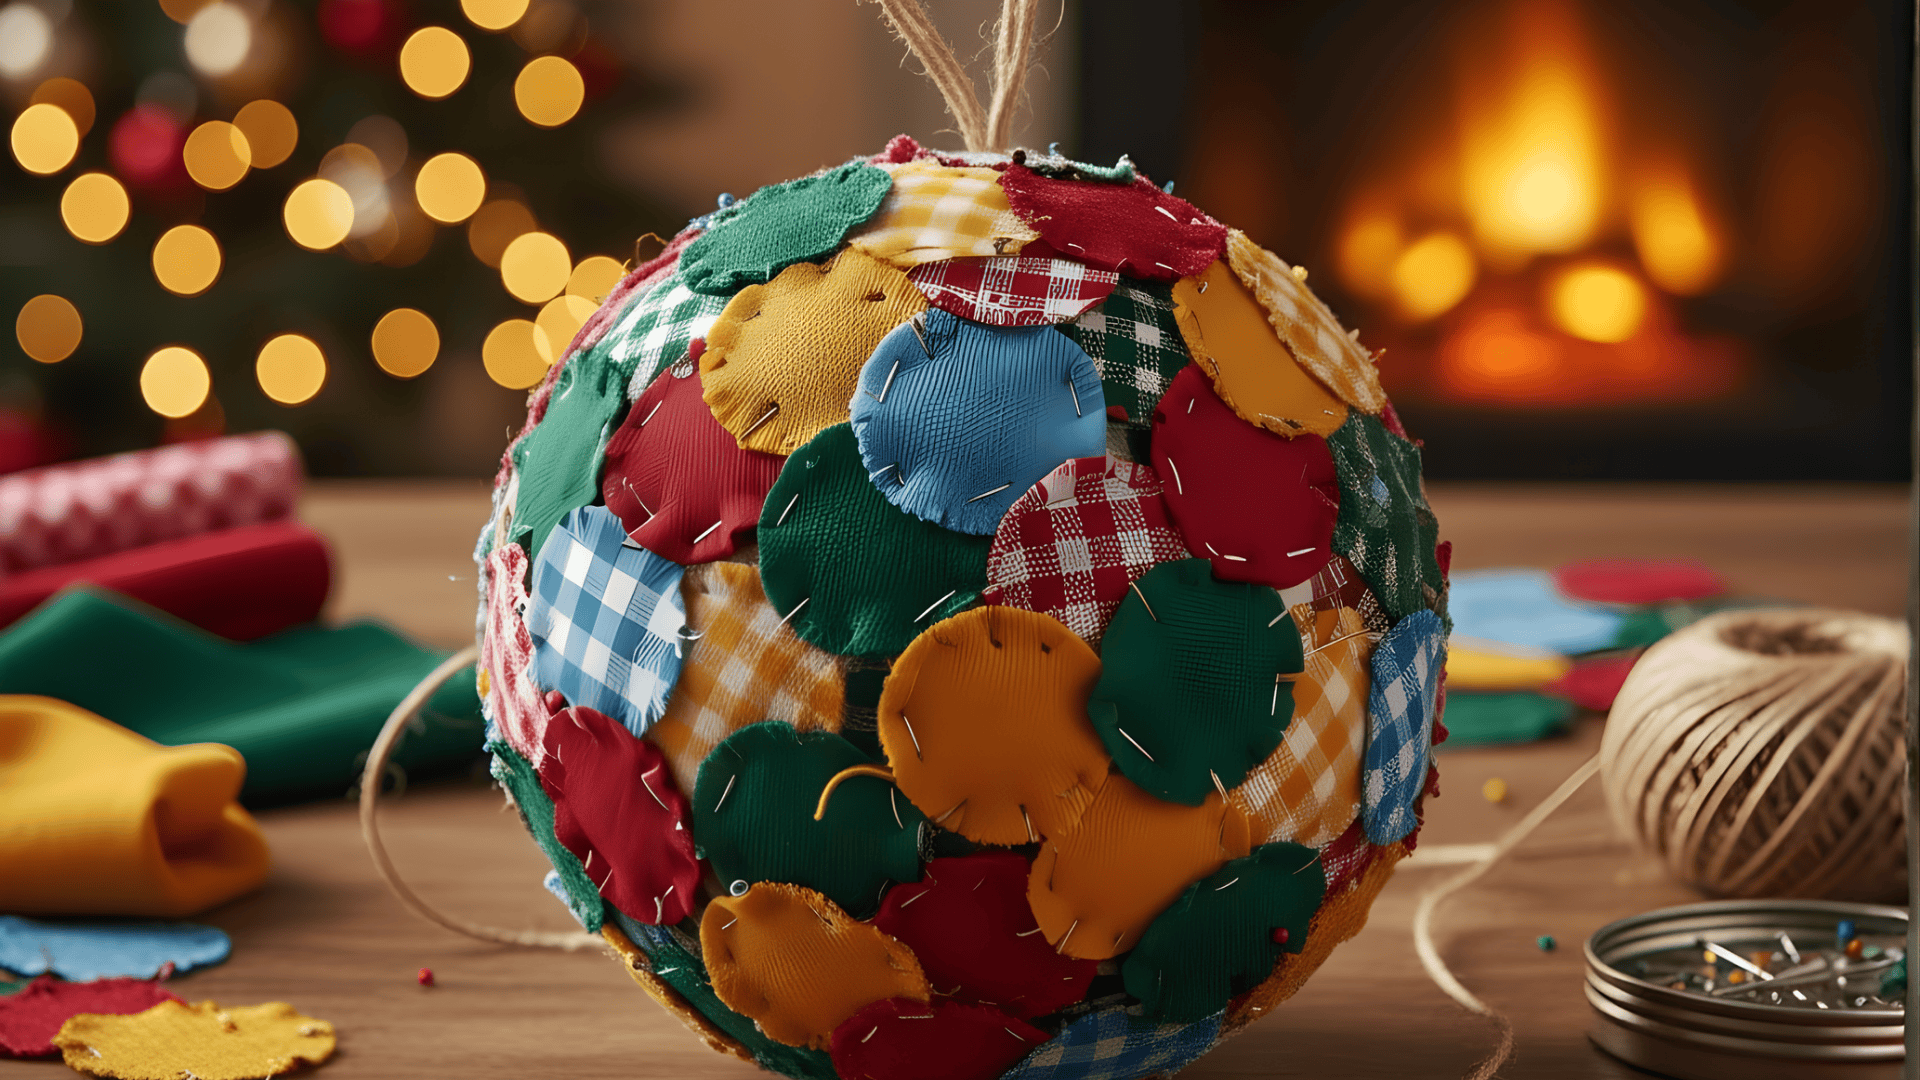
This ornament is a great way to use leftover fabric pieces. Kids enjoy pushing the scraps into the ball to make a soft patchwork look.
Materials Needed:
- Foam ball
- Fabric scraps
- Pencil or blunt stick
- Ribbon
Process:
- Cut fabric scraps into small squares.
- Press each square into the foam ball using the pencil tip.
- Keep adding pieces until the ball is fully covered.
- Attach a ribbon loop for hanging.
32. Yarn-Wrapped Candy Cane Ornament
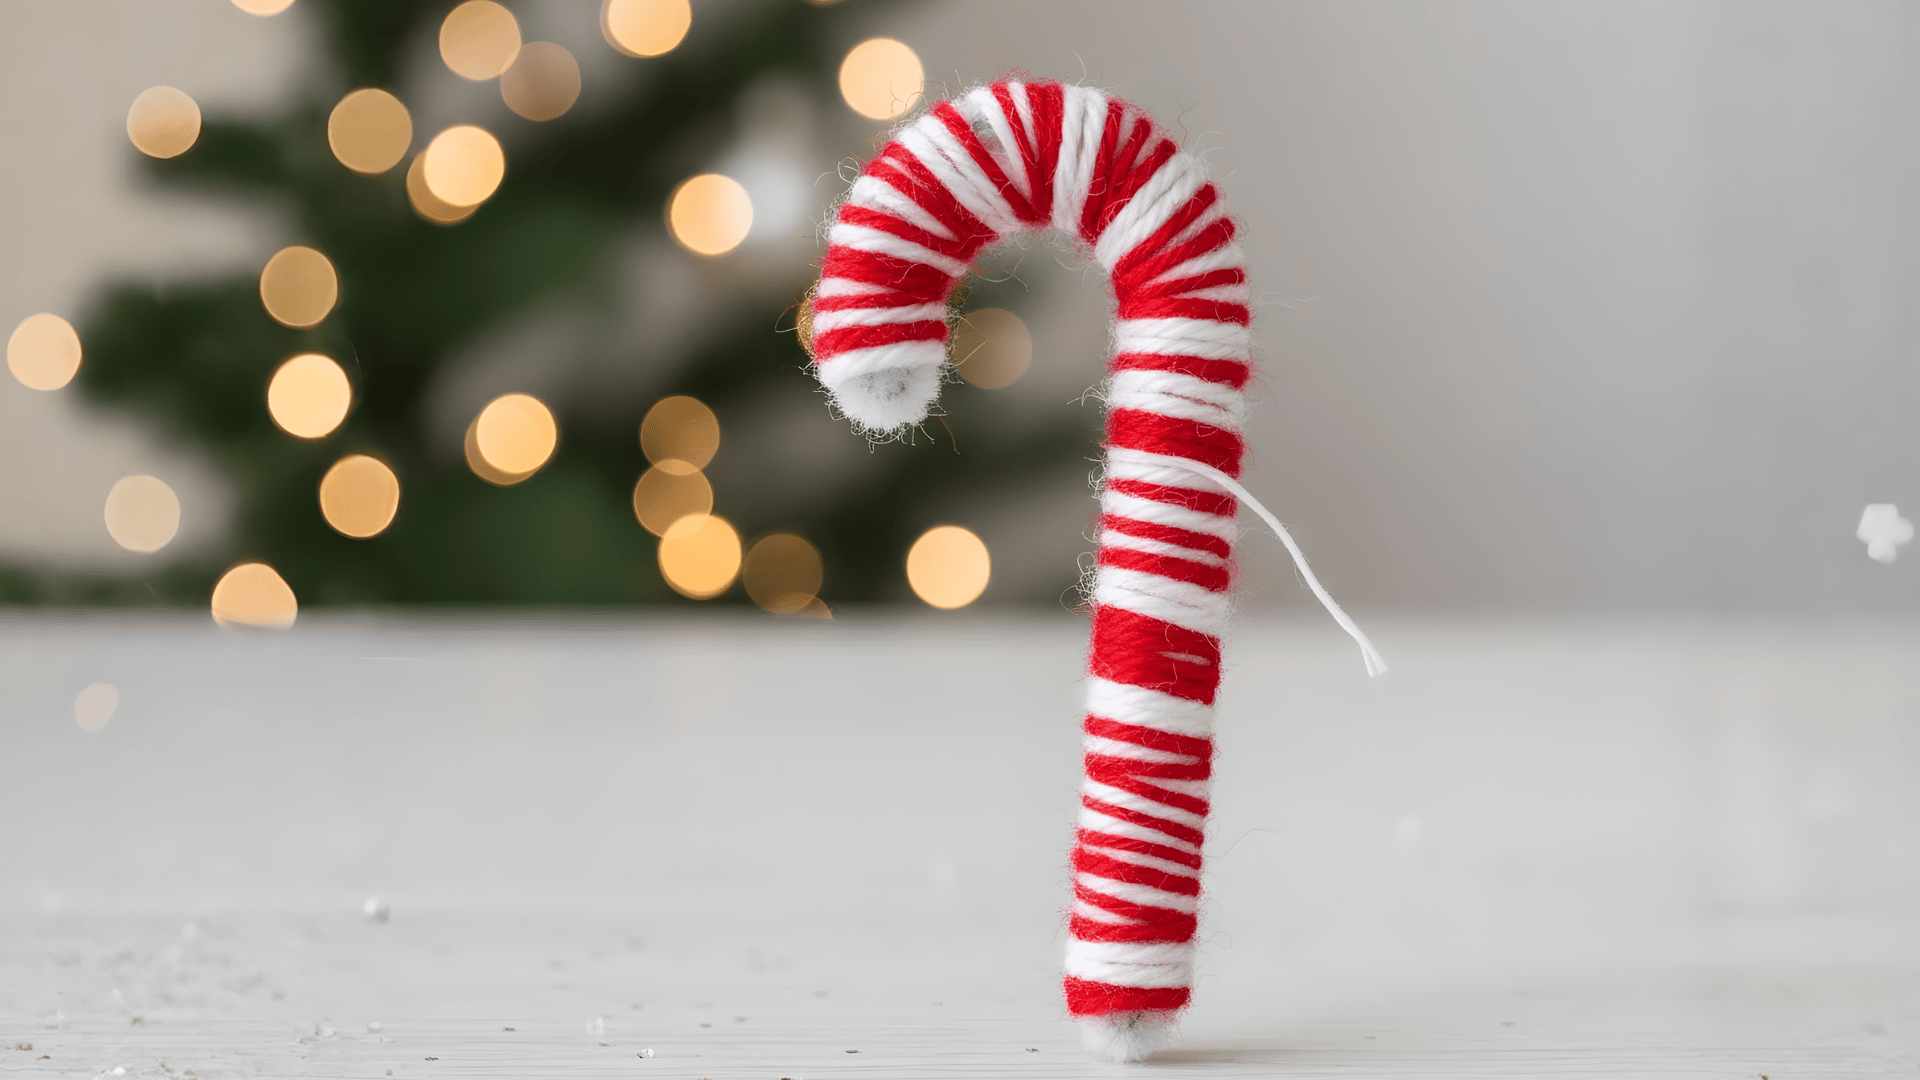
This candy cane is simple and uses soft yarn instead of real sweets. Kids enjoy wrapping the yarn and making the curved top look neat.
Materials Needed:
- Pipe cleaner or cardboard candy cane shape
- Red and white yarn
- Glue
- Ribbon
Process:
- Bend a pipe cleaner into a candy cane shape.
- Wrap red yarn around part of the cane.
- Wrap white yarn around the next section.
- Keep alternating until the cane is covered.
- Tie a ribbon at the top.
33. No-Sew Felt Gingerbread Ornament
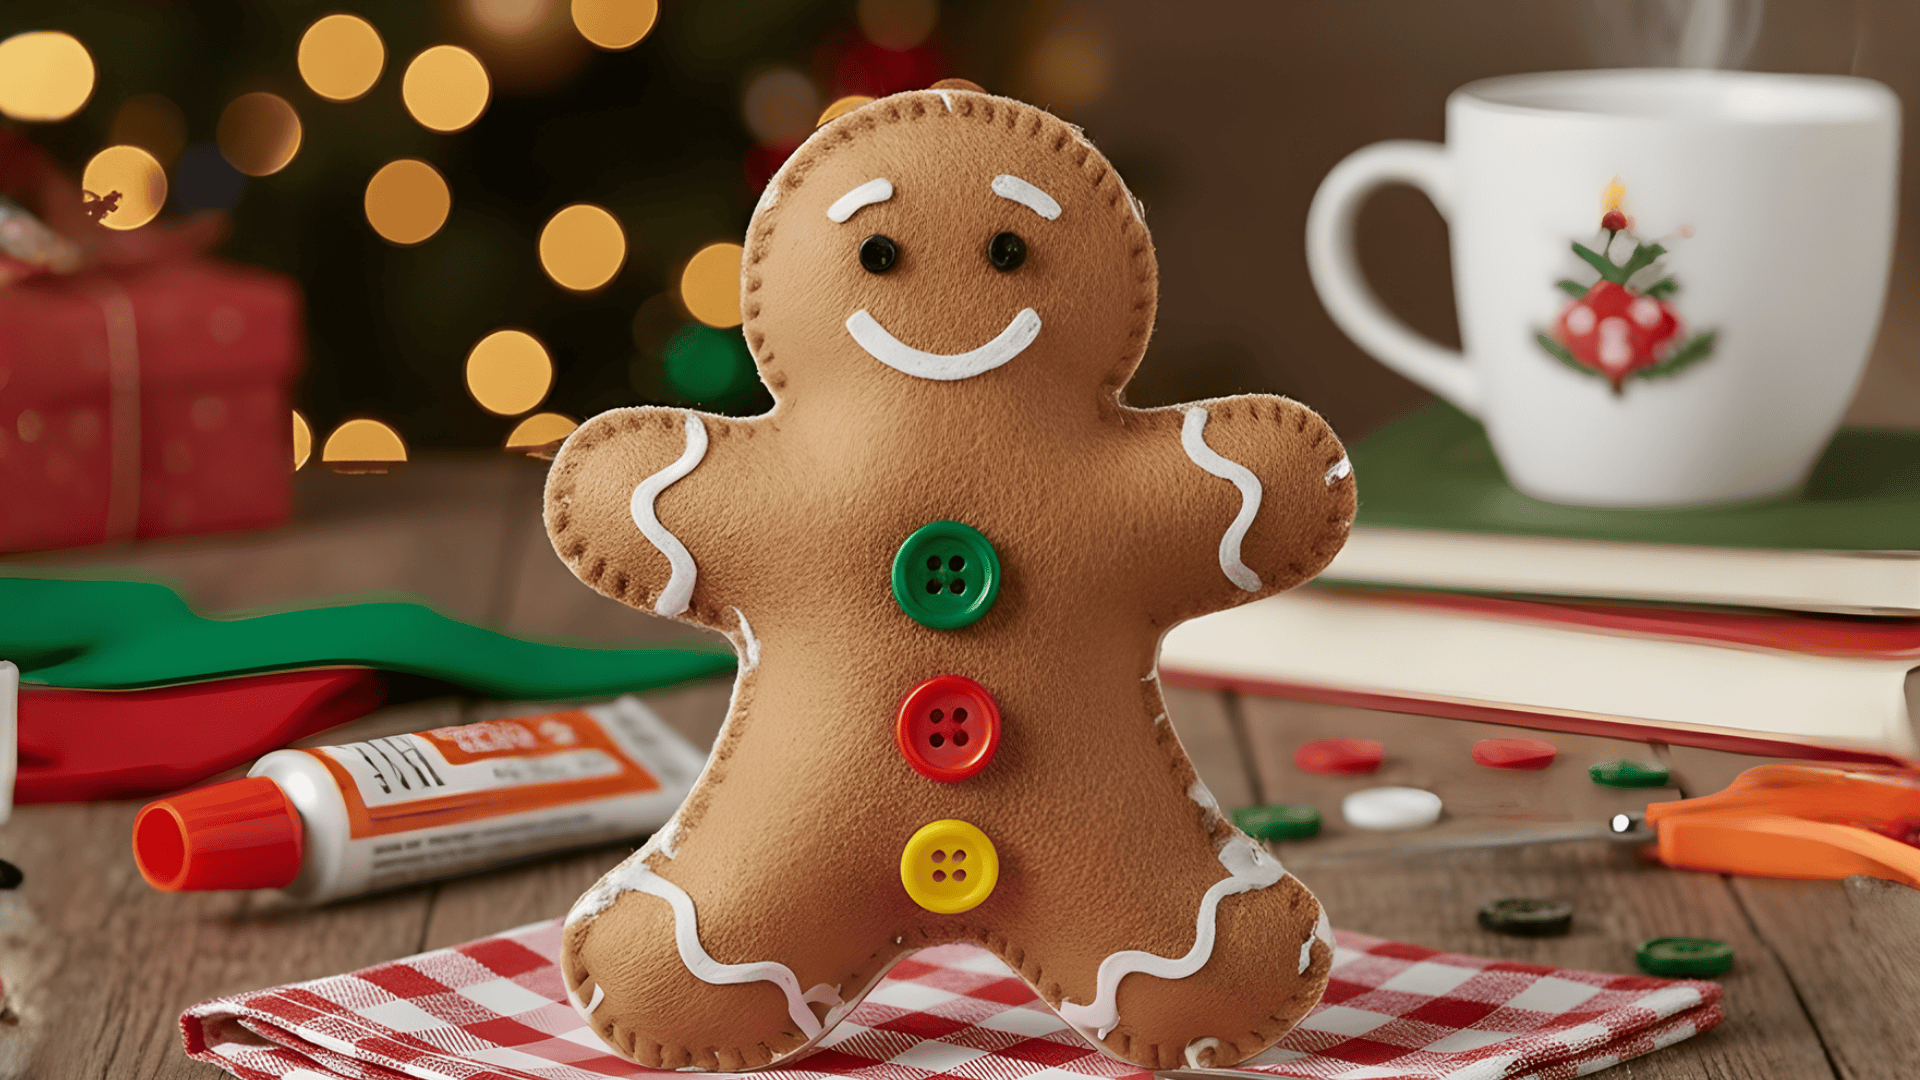
This gingerbread ornament is soft, cute, and easy to decorate. Kids enjoy adding eyes, buttons, and simple details without any sewing.
Materials Needed:
- Brown felt
- Scissors
- Glue
- Small buttons or beads
- Ribbon
Process:
- Cut two gingerbread shapes from felt.
- Glue them together around the edges, leaving a small opening.
- Add a bit of stuffing or scrap felt inside.
- Seal the opening with glue.
- Decorate the face and buttons, then add ribbon.
Natural Material Ornaments
Natural ornaments feel warm and rustic, and they’re easy for kids to work with. They also smell great and use materials you may already have at home.
34. Pinecone Gnome Ornament
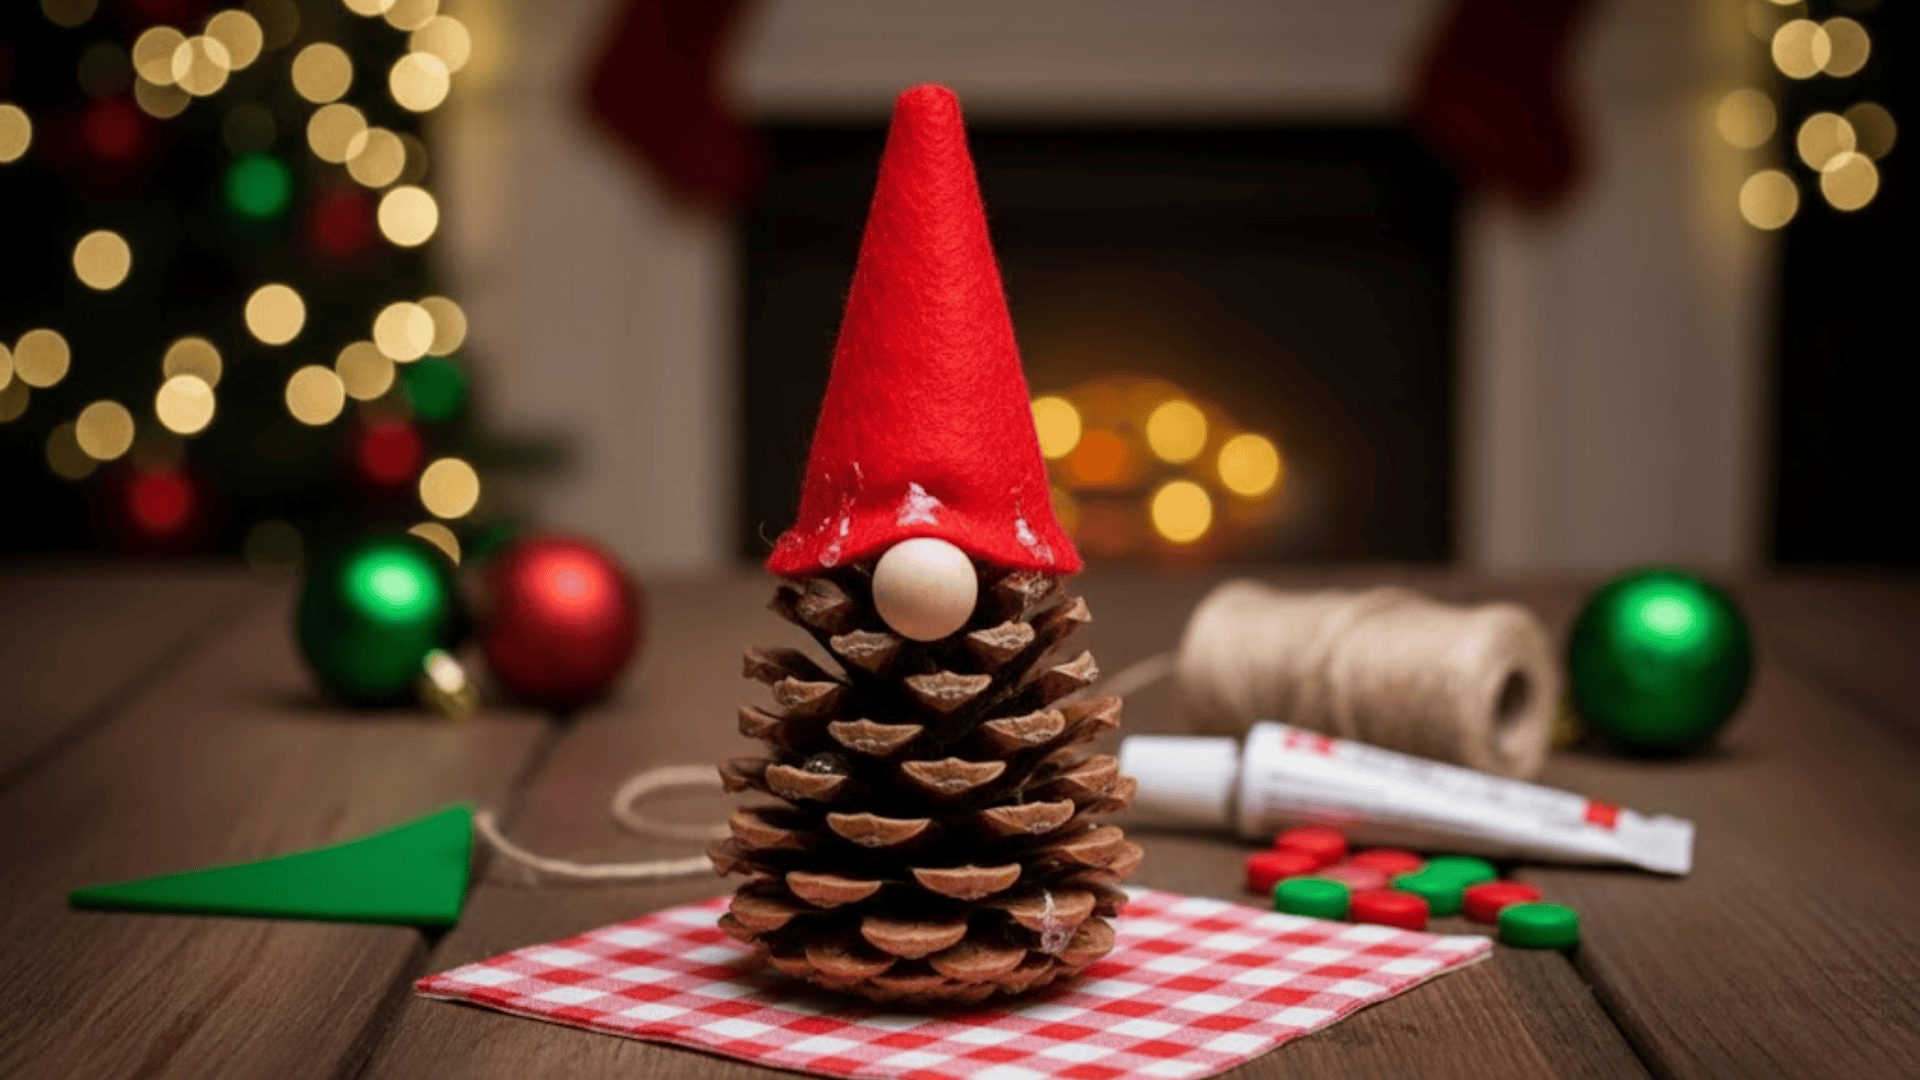
This little gnome looks cute and has a fun mix of textures. Kids enjoy adding the tiny hat and face to bring the gnome to life.
Materials Needed:
- Pinecone
- Felt for a hat
- Small wooden bead or pom-pom
- Glue
- Ribbon
Process:
- Cut a small felt triangle and roll it into a cone hat.
- Glue the hat to the top of the pinecone.
- Add the wooden bead or pom-pom as the nose.
- Tie a ribbon to the back for hanging.
35. Cinnamon Stick Tree Ornament
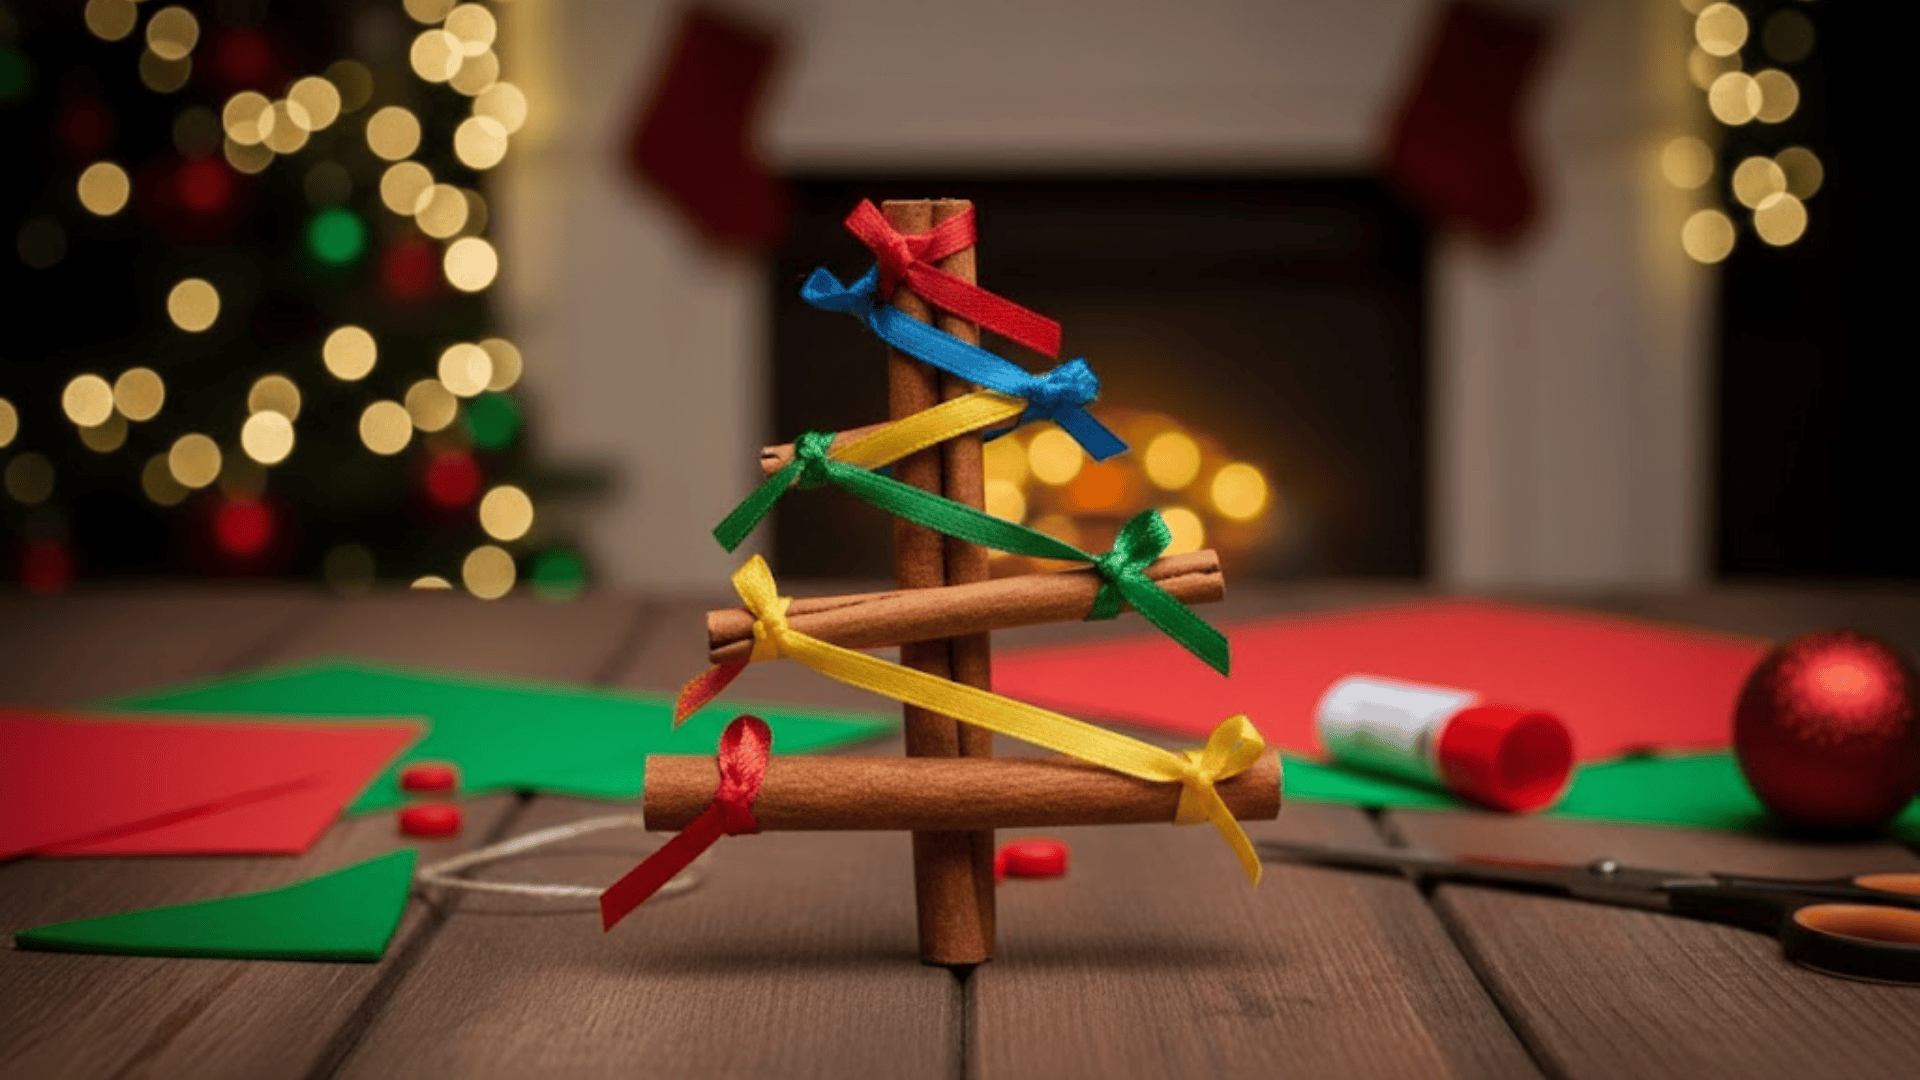
This simple ornament smells great and looks like a tiny rustic tree. Kids enjoy tying on the ribbon “branches” in different colors.
Materials Needed:
- Cinnamon stick
- Small ribbon pieces
- Scissors
- Glue
- String for hanging
Process:
- Cut ribbon pieces in different lengths.
- Tie the ribbons across the cinnamon stick like branches.
- Trim the sides to shape the tree.
- Add a small dab of glue to hold each ribbon.
- Tie a string at the top.
36. Dried Orange Slice Ornament
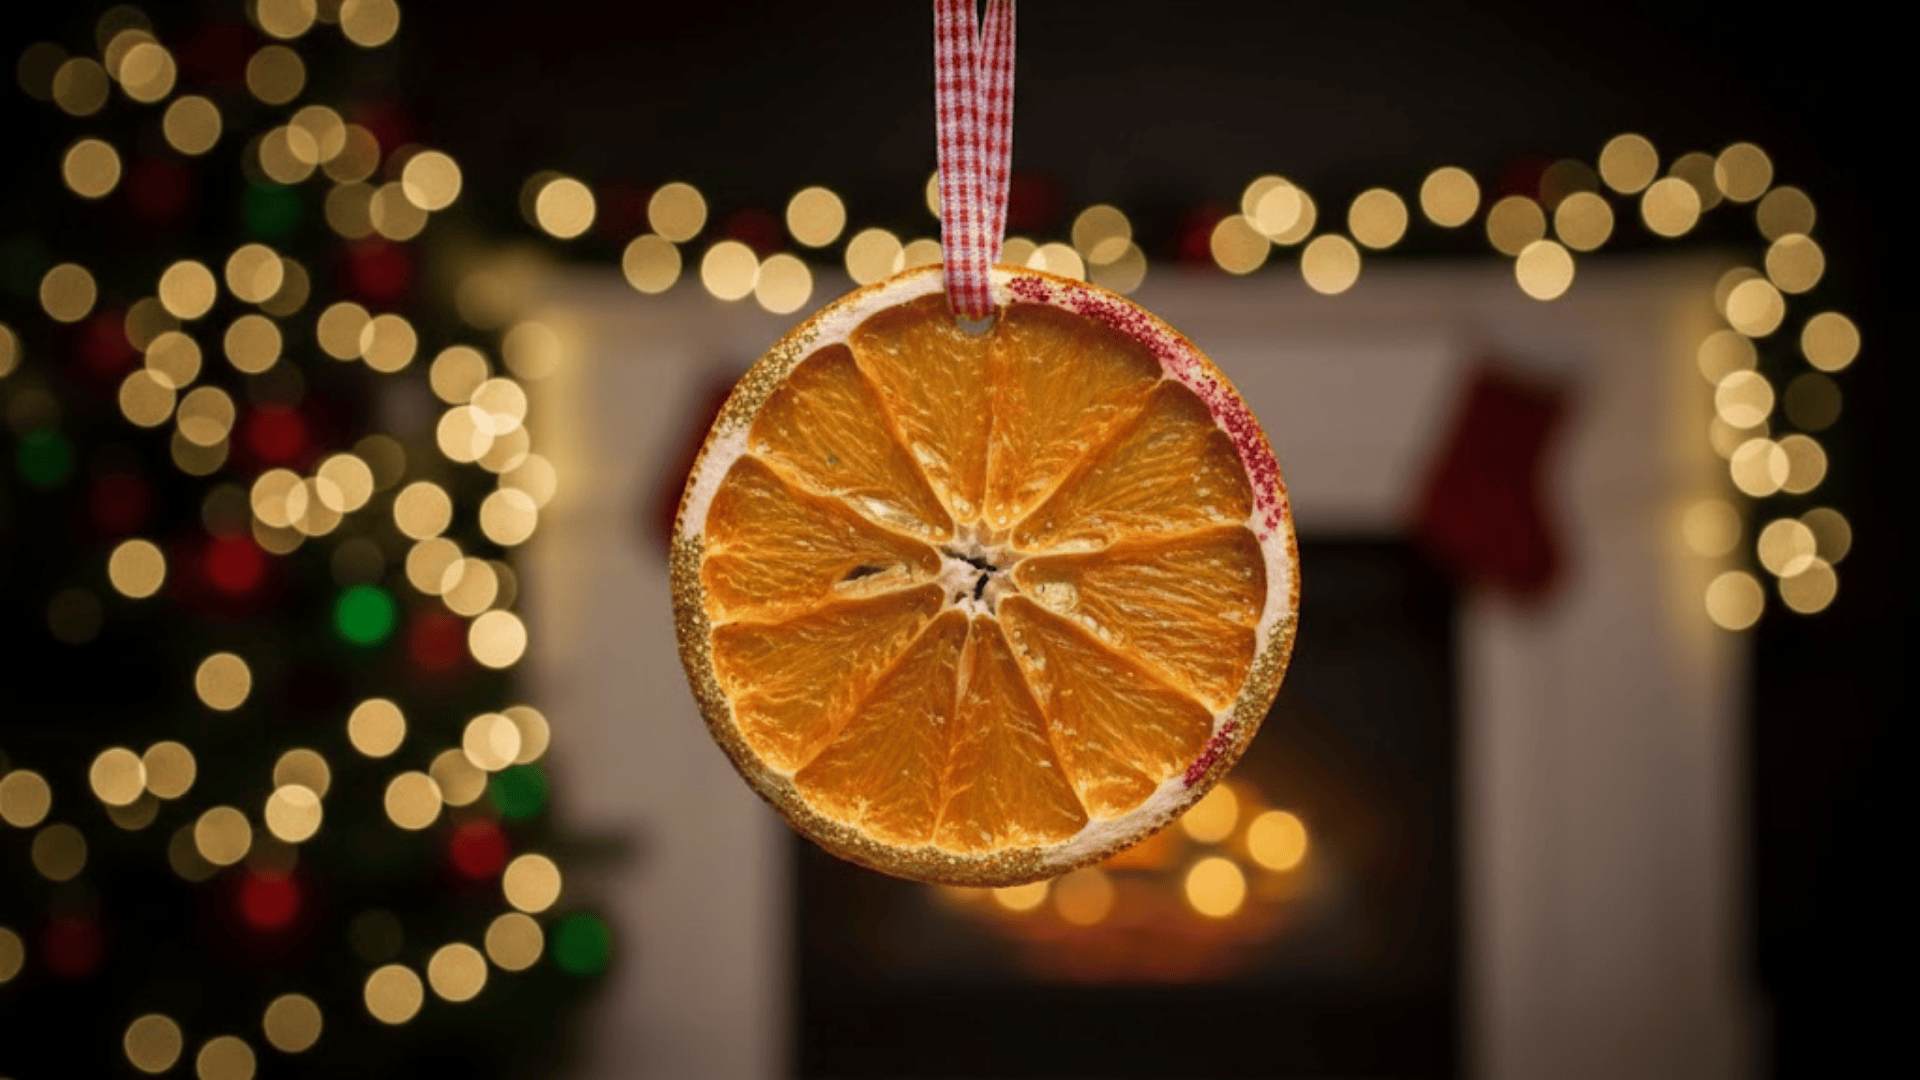
This ornament looks bright and smells fresh, making it perfect for the tree. Kids enjoy painting the edges to give each slice a colorful glow.
Materials Needed:
- Dried orange slices
- Paint
- Small brush
- Ribbon
- Toothpick
Process:
- Paint the edges of the dried orange slice.
- Let the paint dry completely.
- Use a toothpick to poke a small hole near the top.
- Thread the ribbon through the hole.
- Hang it on the tree.
37. Twig Star Ornament

This twig star has a natural, rustic look that feels perfect for the holidays. Kids enjoy picking twigs and watching them form a simple star shape.
Materials Needed:
- Small twigs
- Scissors or pruners
- Glue
- String
- Ribbon
Process:
- Cut the twigs into five equal pieces.
- Arrange them into a star shape.
- Glue each point where the twigs meet.
- Wrap the string around a few corners for extra strength.
- Tie a ribbon to the top.
38. Acorn Bell Ornament
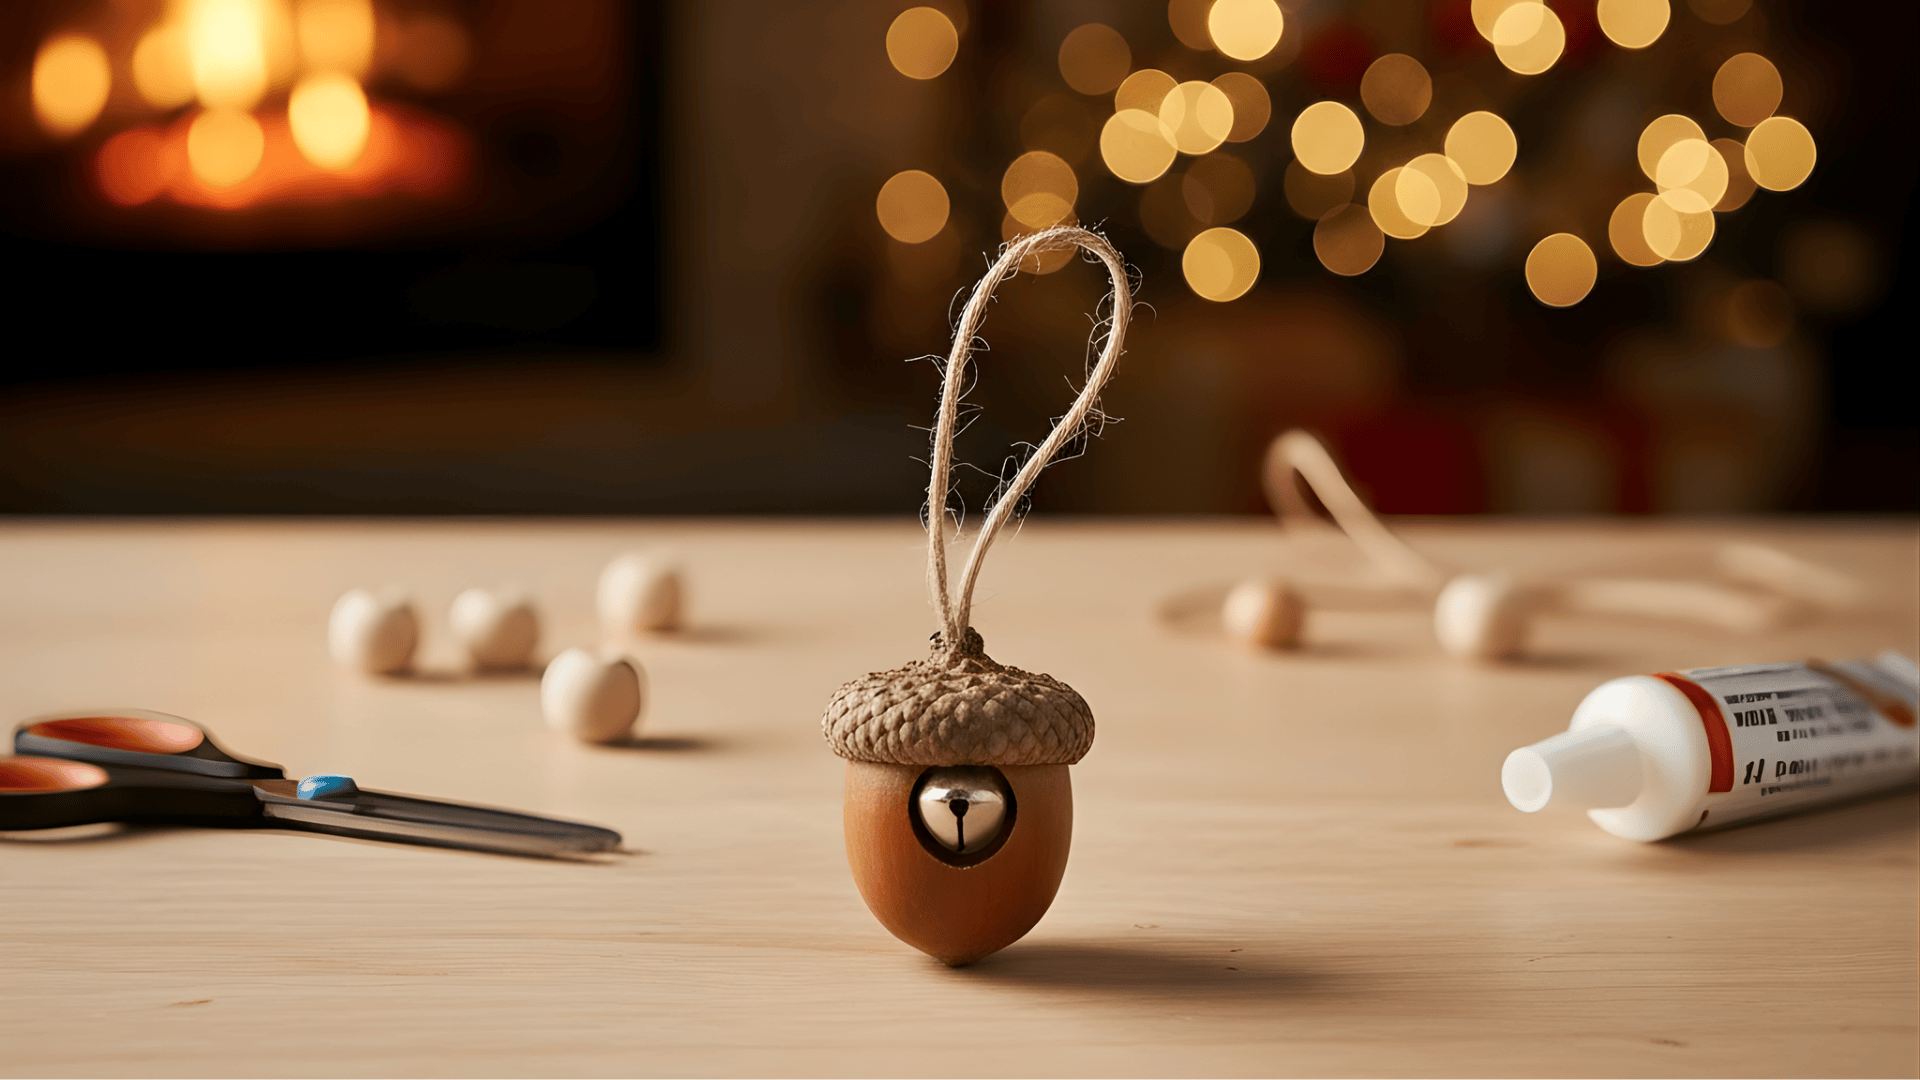
This tiny bell ornament uses acorn caps to make a cute nature craft. Kids love adding the little bead inside to make a soft jingle sound.
Materials Needed:
- Acorn caps
- Small bead or jingle bell
- String
- Glue
- Ribbon
Process:
- Thread the string through the bead or bell.
- Glue the bead inside the acorn cap.
- Tie the string tightly so it hangs in the center.
- Add a ribbon loop for hanging.
39. Mini Branch Snowman Ornament
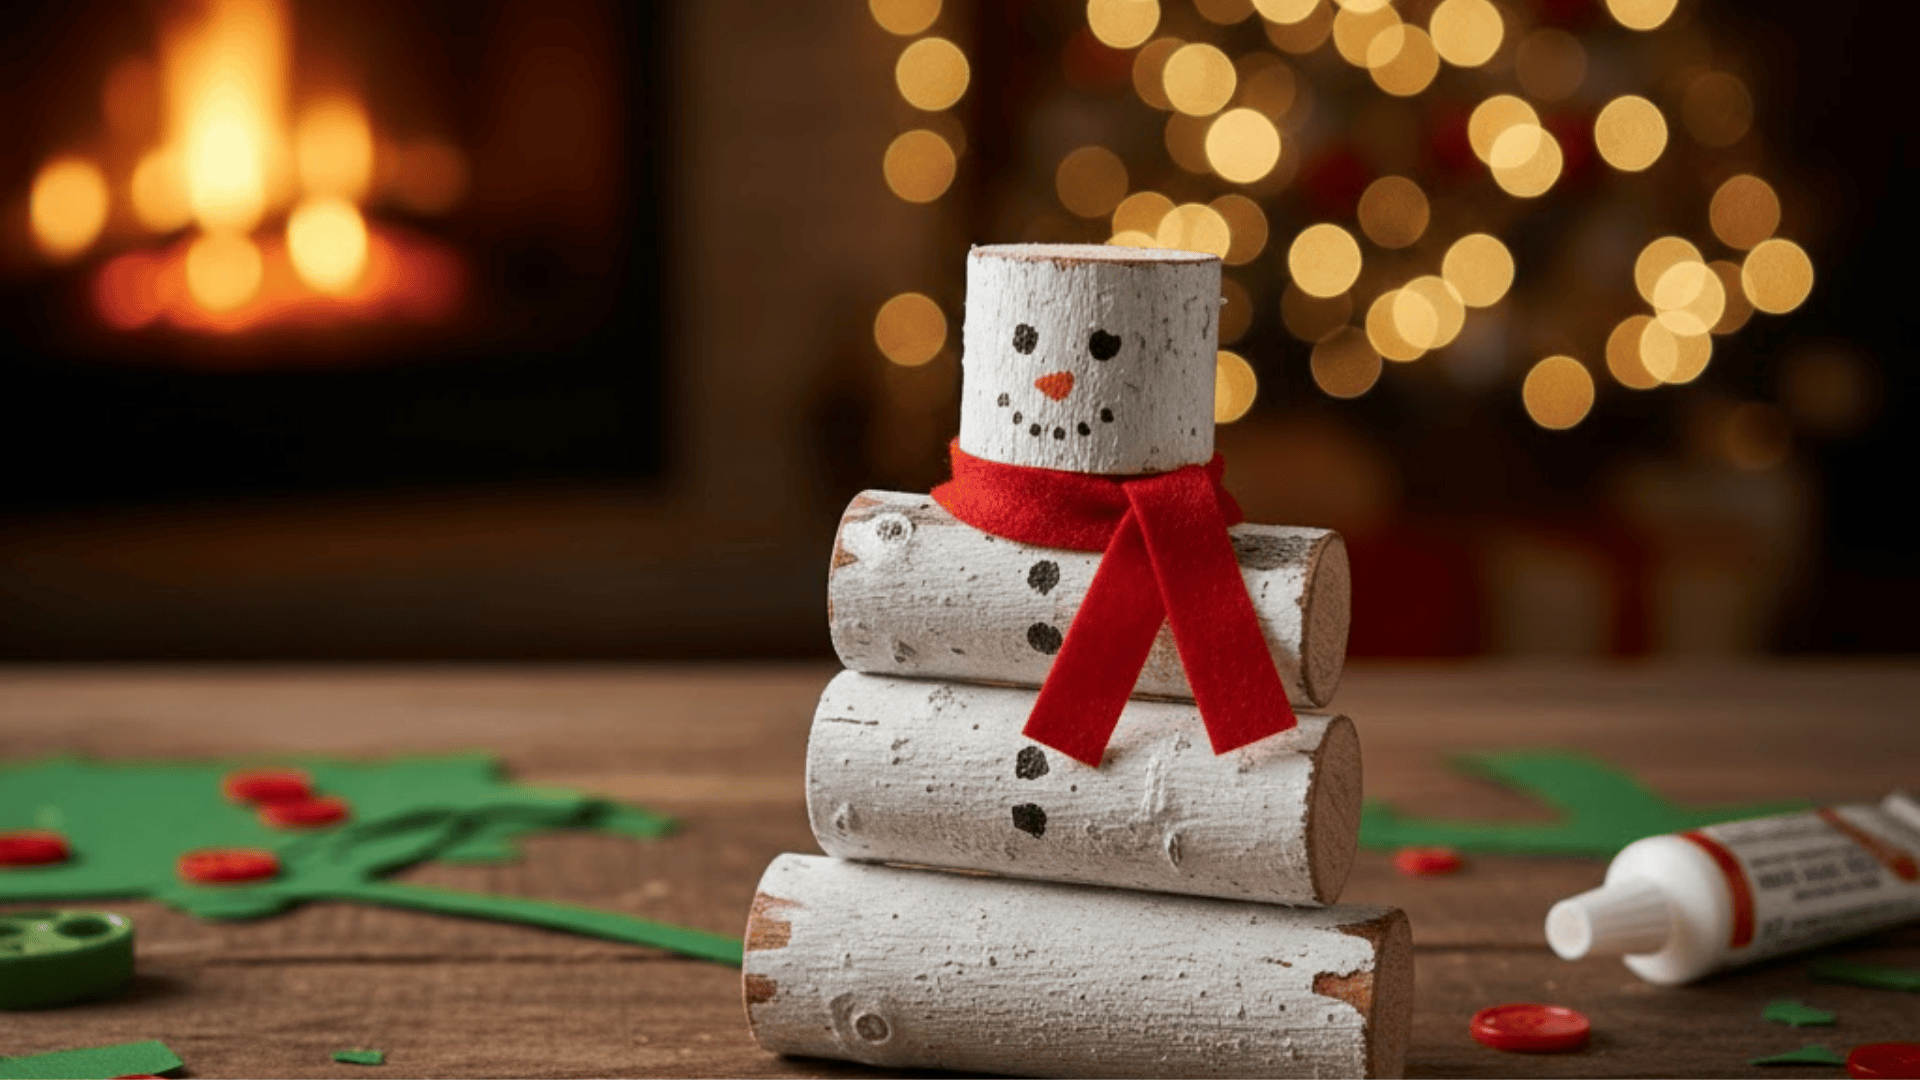
This snowman uses small branches to create a simple, natural figure. Kids enjoy adding the face and tiny scarf to give it personality.
Materials Needed:
- Small straight branches
- White paint
- Markers
- Felt strip for scarf
- Ribbon
Process:
- Cut three branch pieces of different lengths.
- Paint them white and let them dry.
- Stack and glue them from largest to smallest.
- Draw the face and buttons.
- Tie on a small felt scarf and add ribbon.
Recycled & Upcycled Ornaments
Recycled ornaments help kids turn old items into something new and fun. They teach kids how to reuse materials while creating cute holiday crafts.
40. Bottle Cap Snowman Ornament
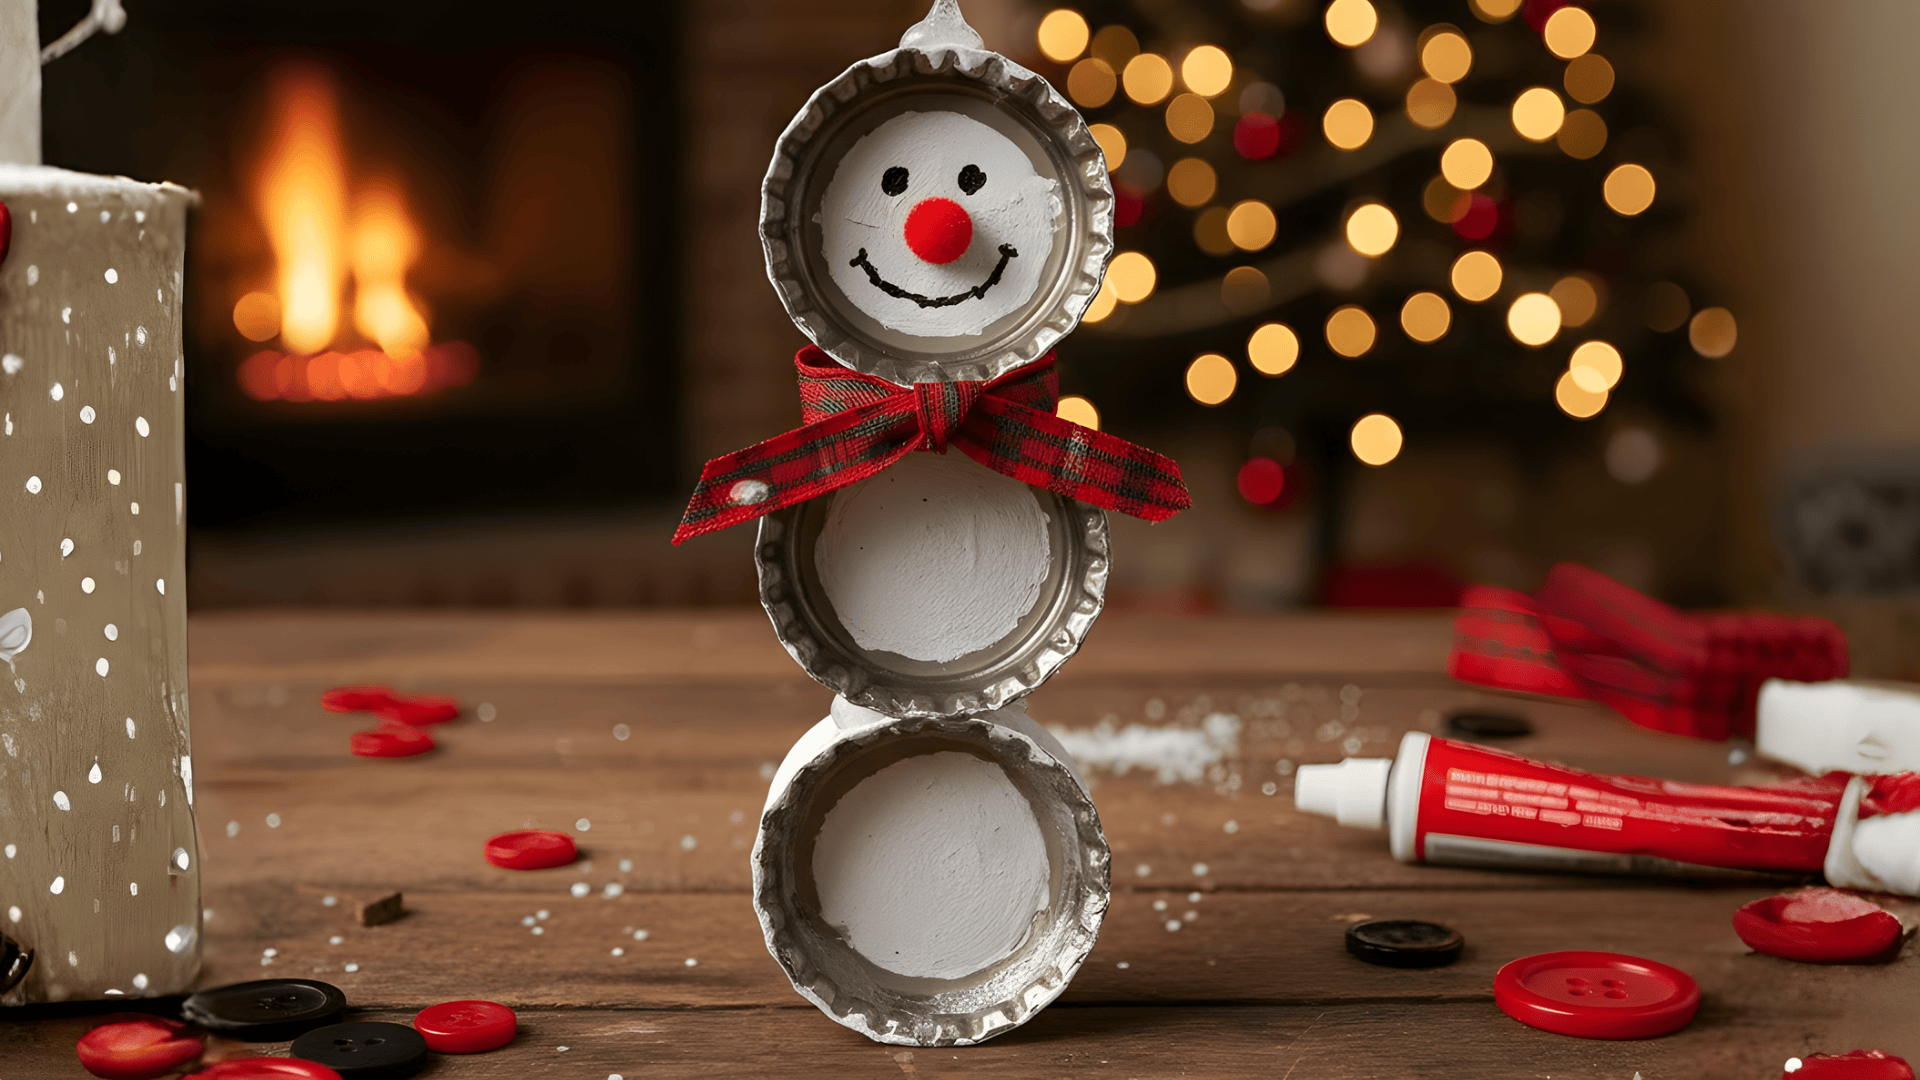
This snowman uses old bottle caps to make a simple stacked design. Kids enjoy painting the little faces and adding small details.
Materials Needed:
- Three bottle caps
- White paint
- Glue
- Markers
- Ribbon
Process:
- Paint the inside of each bottle cap white.
- Glue the caps in a vertical line to make a snowman.
- Draw the face and buttons with markers.
- Add a small ribbon scarf.
- Glue ribbon to the top for hanging.
41. Mason Jar Lid Photo Ornament
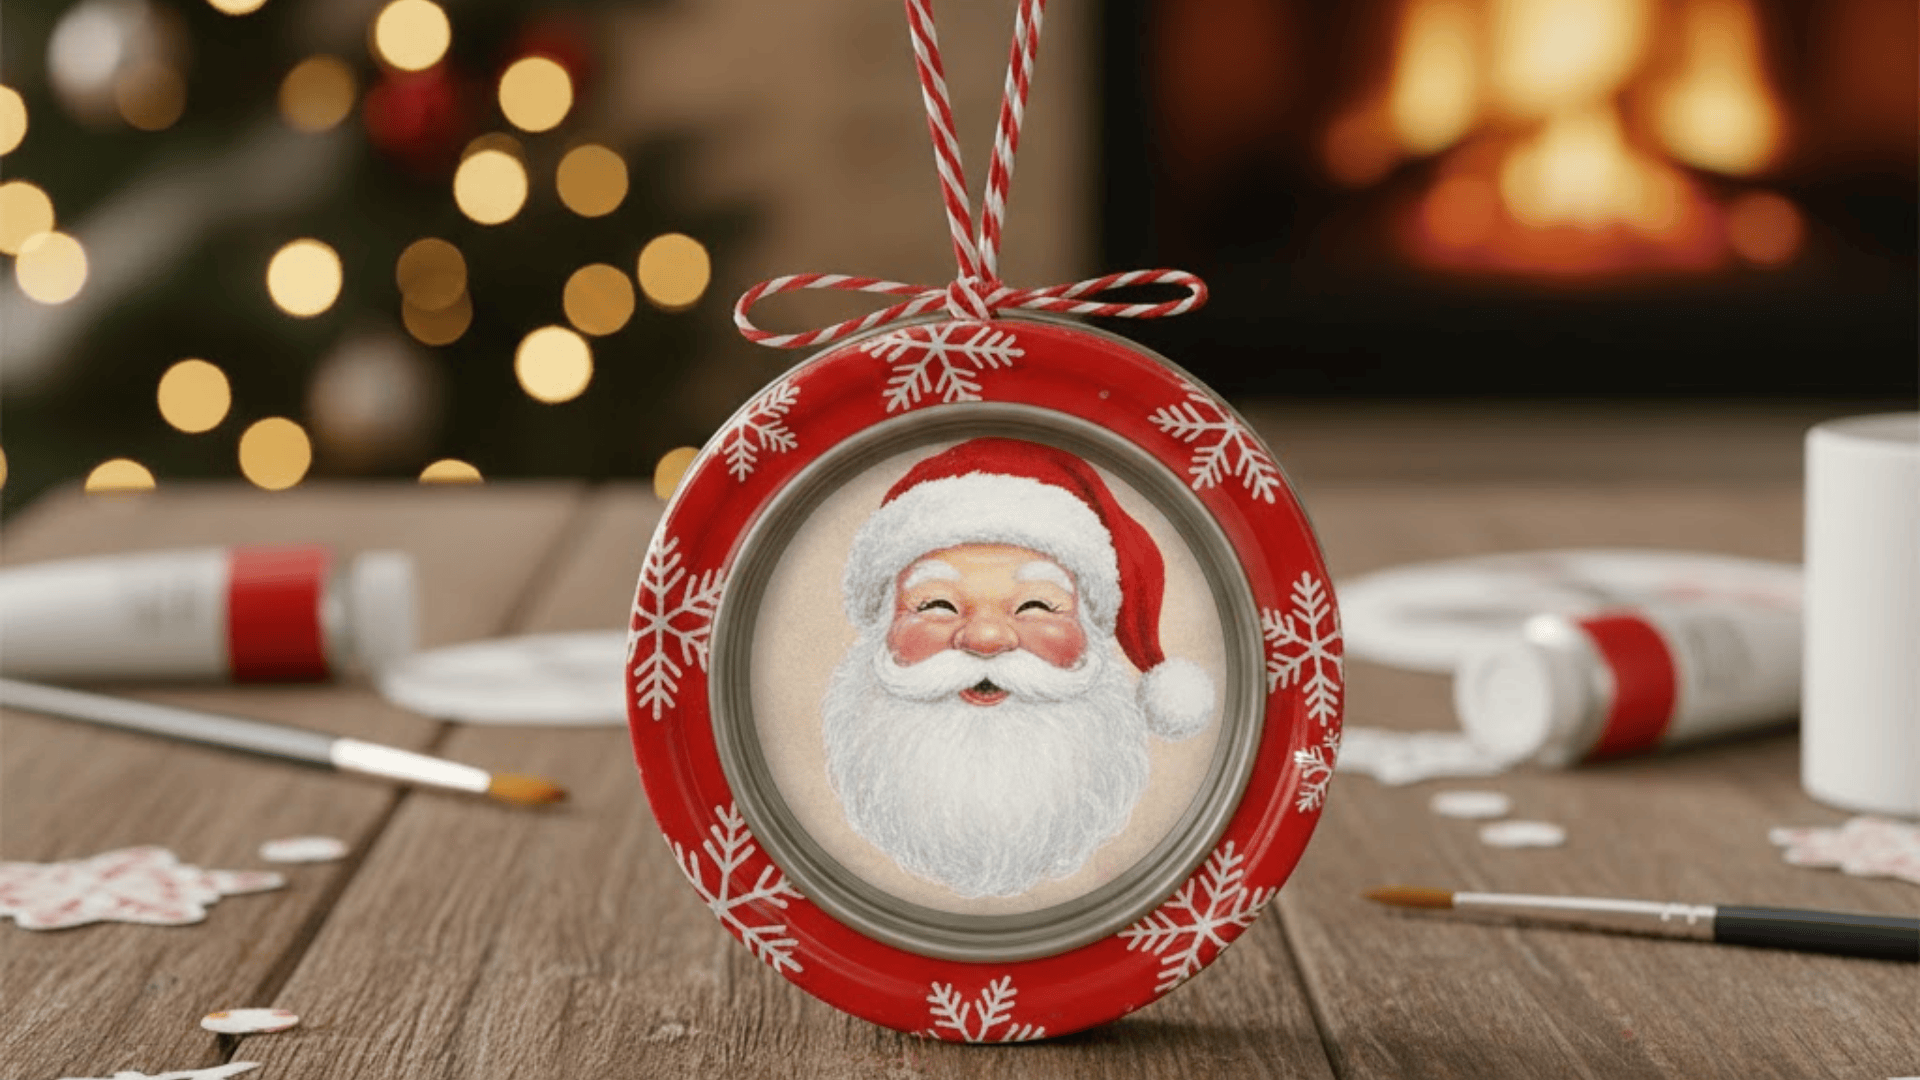
This ornament frames a small photo inside a jar lid. Kids love choosing a picture and decorating the edges.
Materials Needed:
- Mason jar lid
- Small photo
- Glue
- Decorative paper or paint
- Ribbon
Process:
- Cut the photo to fit inside the lid.
- Glue it firmly to the center.
- Decorate the rim with paint or paper.
- Add ribbon to the back for hanging.
- Let everything dry before using.
42. Cardboard Star Wrapped in Twine
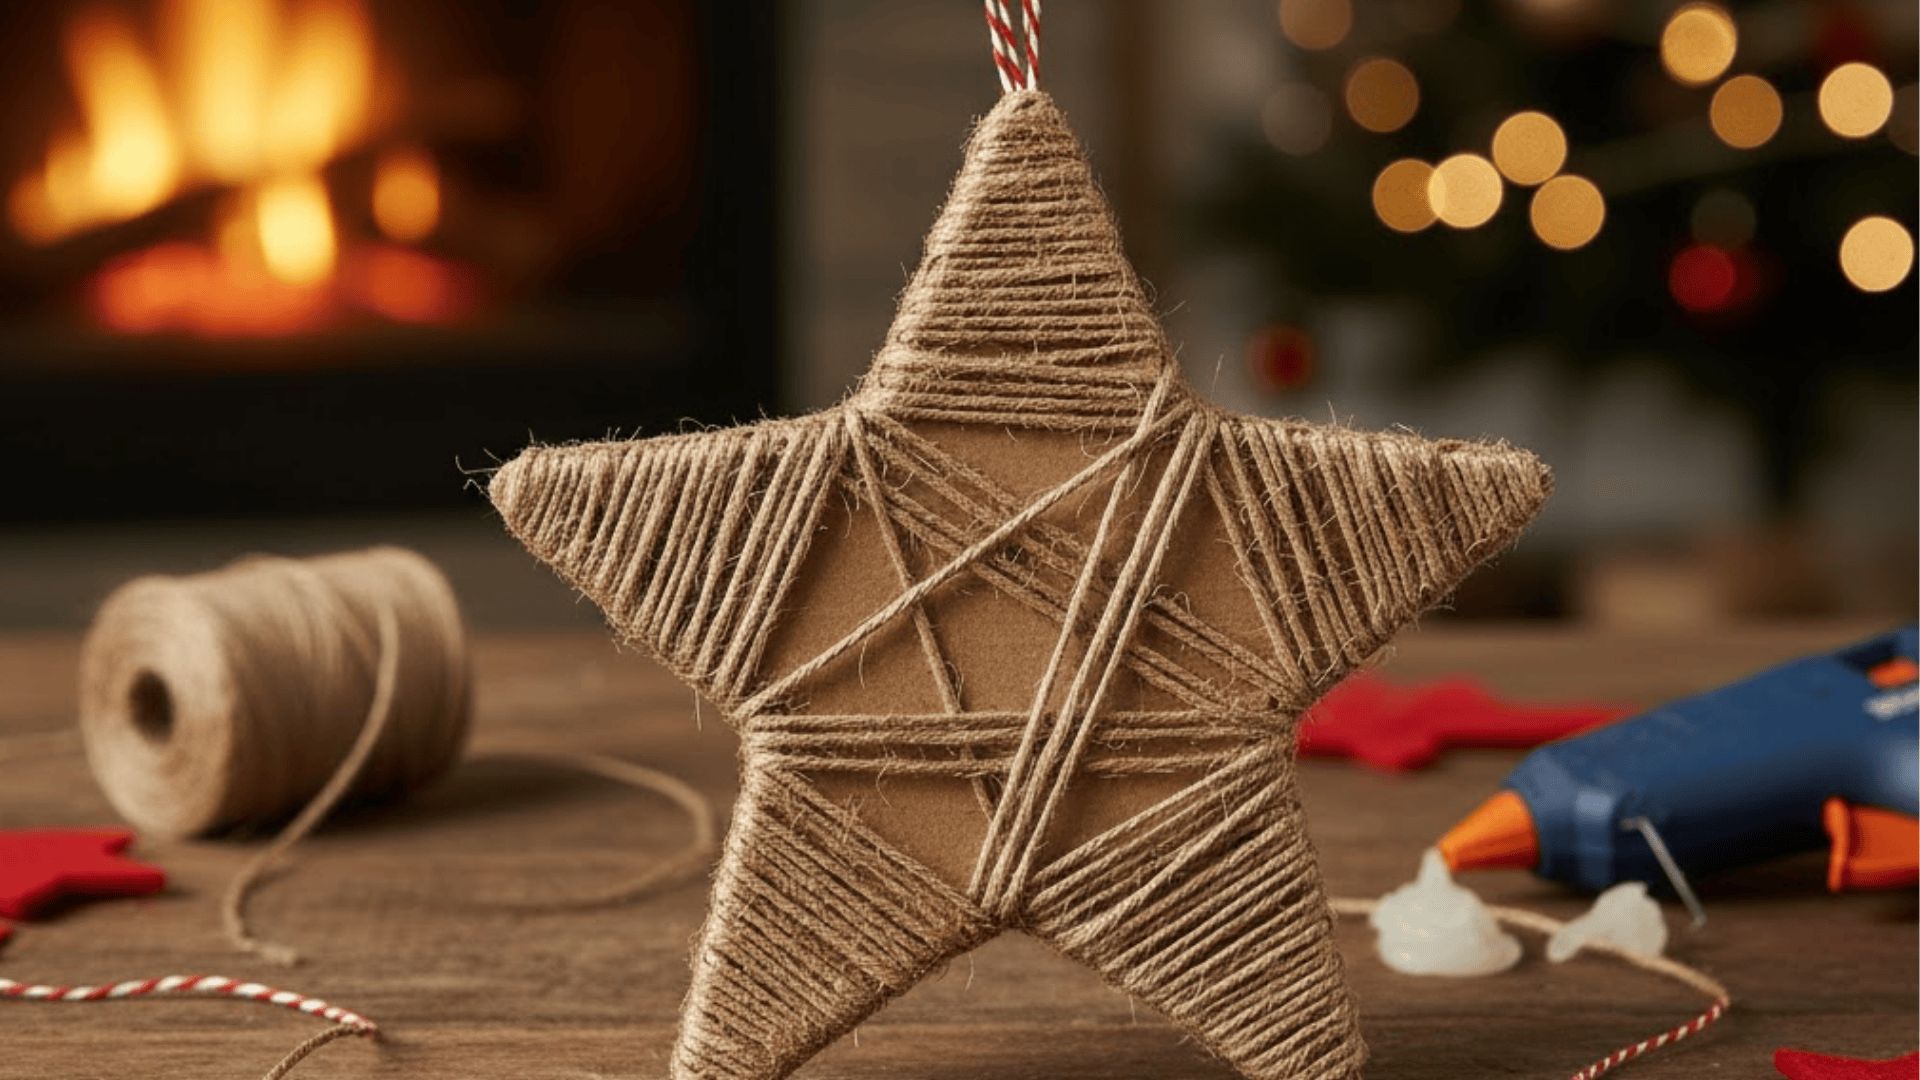
This rustic star is lightweight and easy for kids to wrap. The twine gives it a cozy, natural look on the tree.
Materials Needed:
- Cardboard
- Twine
- Scissors
- Glue
- Ribbon
Process:
- Cut a star shape from cardboard.
- Add a bit of glue to one point and press the twine down.
- Wrap the twine around the star until it’s covered.
- Glue the twine end at the back.
- Add a ribbon loop.
43. Plastic Cup Melt Ornament

This simple melted-cup ornament creates a bright, glossy decoration kids love to design. Adults must handle the oven step for safety.
Materials Needed:
- 6 Clear plastic cups
- Permanent markers
- Baking sheet lined with foil
- Ribbon
Process:
- Preheat oven to 350°F (175°C).
- Have kids colour the cup with permanent markers.
- Place the cup upright on the foil-lined baking sheet.
- Adult step: bake for 1–5 minutes until the cup melts flat.
- Allow it to cool completely.
- Punch a small hole near the edge.
- Thread a ribbon to create a hanging loop.
44. Magazine Roll Bauble
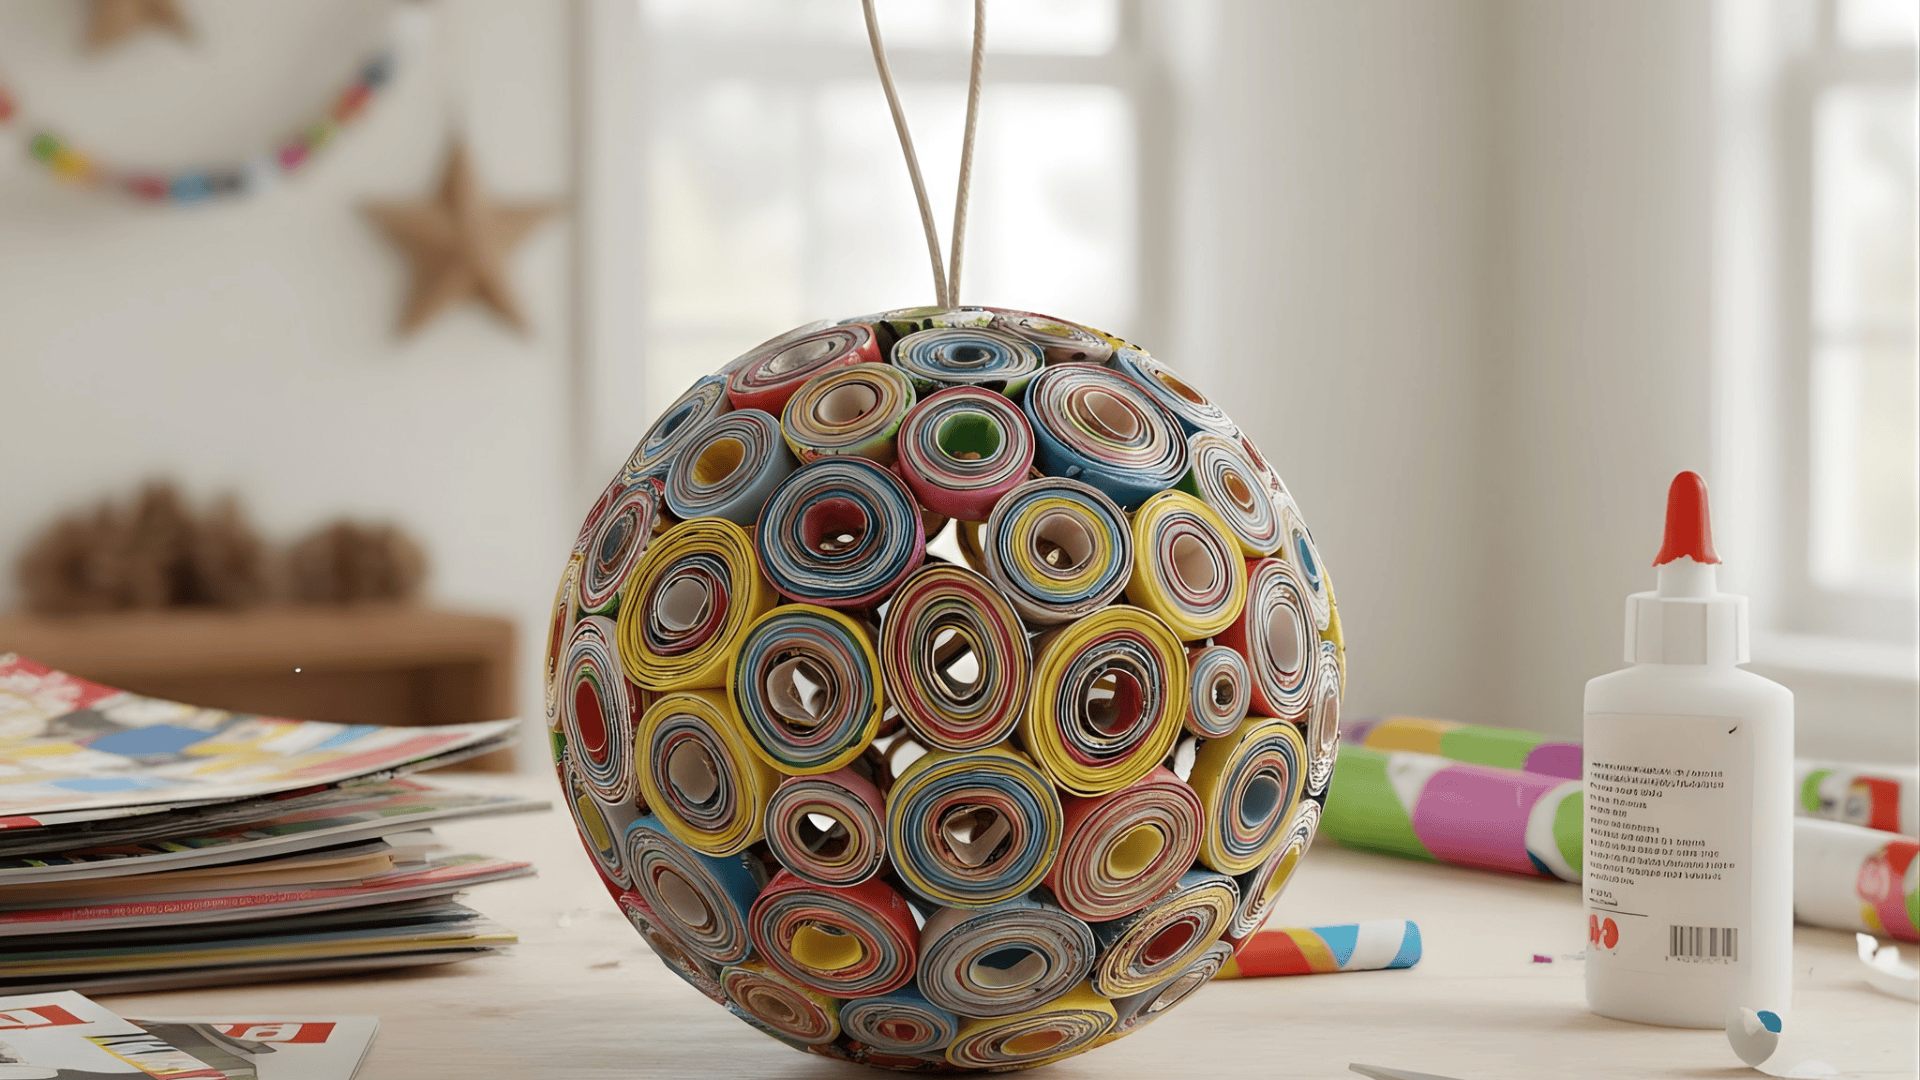
This bauble uses old magazine pages to create colorful rolled strips. Kids love seeing how the different colors and patterns come together.
Materials Needed:
- Magazine pages
- Glue
- Scissors
- String
- Toothpick
Process:
- Cut magazine pages into long strips.
- Roll each strip tightly around a toothpick.
- Glue the ends of each roll to keep them closed.
- Form the rolls into a round bauble shape.
- Add a string to hang the ornament.
45. Egg Carton Bell Ornament
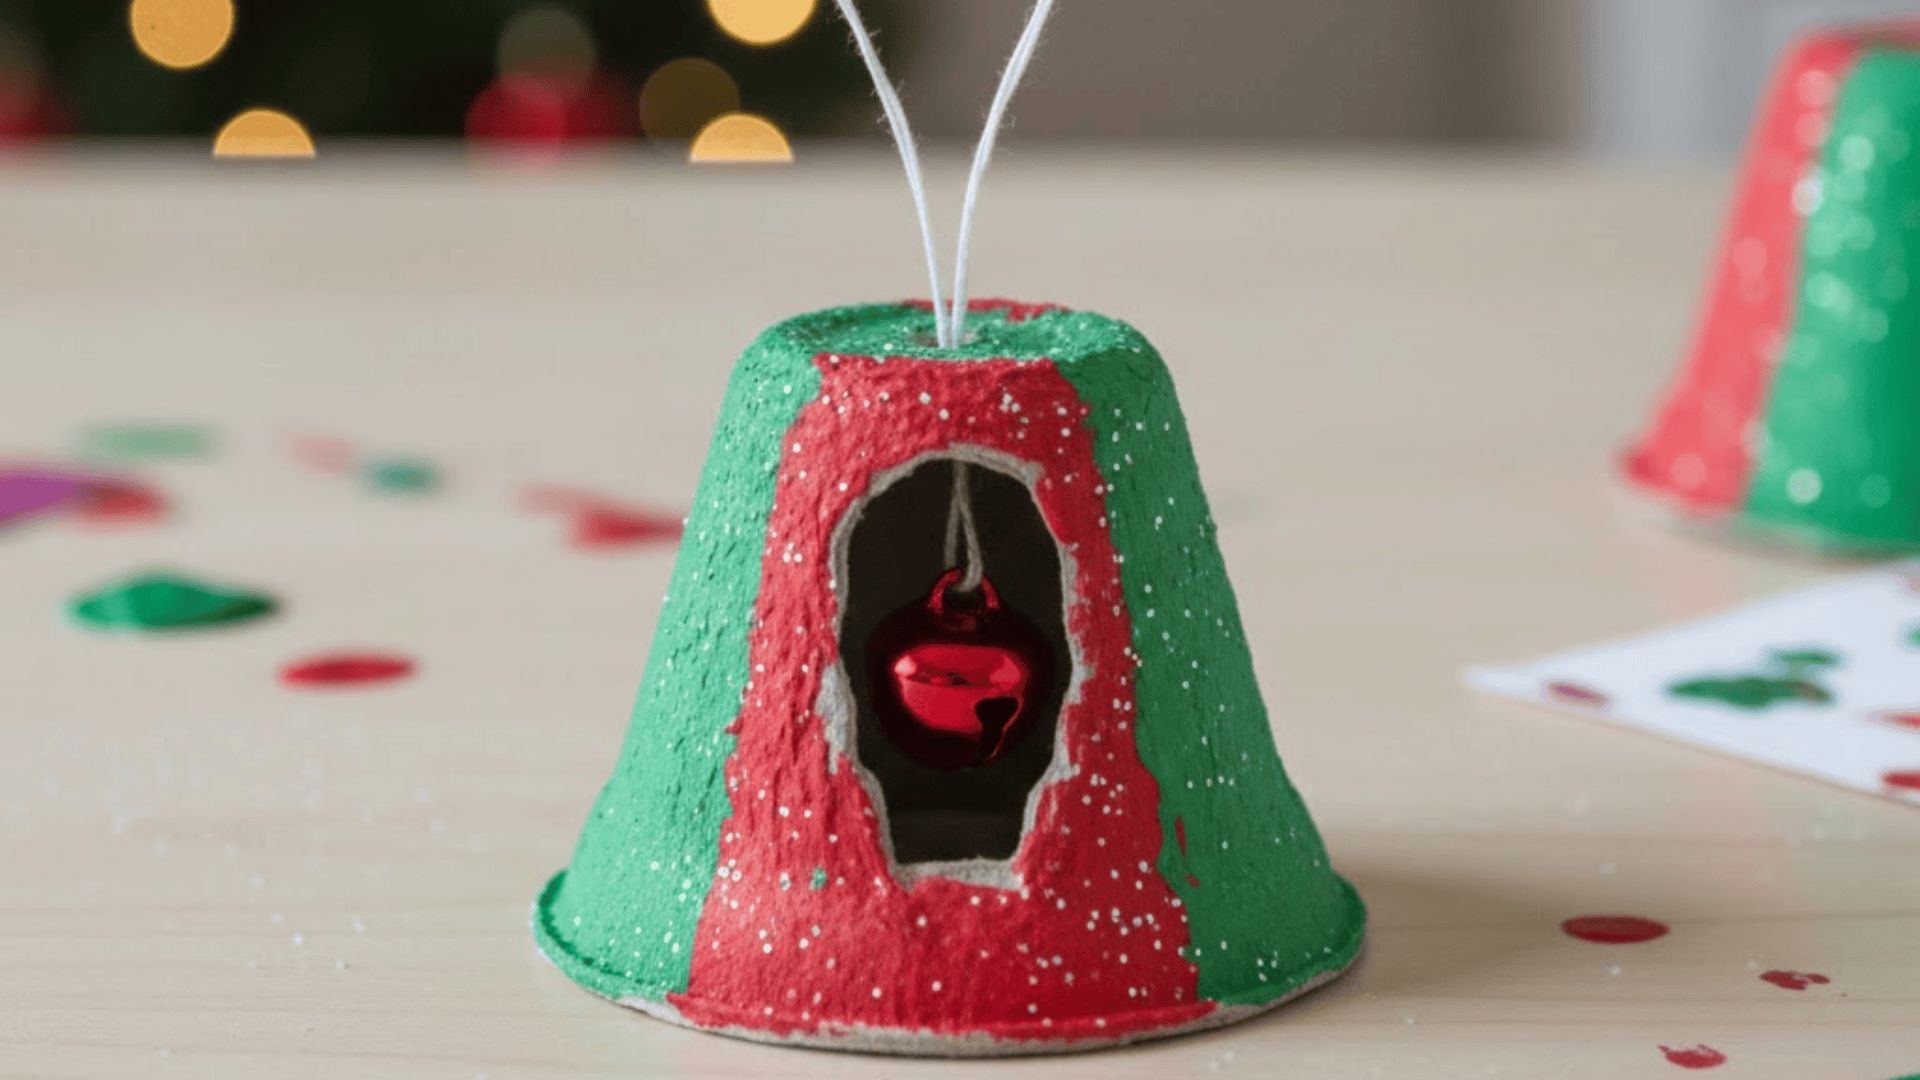
This simple ornament turns egg carton cups into tiny bells. Kids enjoy painting them and adding little jingles at the center.
Materials Needed:
- Egg carton cups
- Paint
- Small jingle bell
- String
- Glue
Process:
- Cut out one cup from the egg carton.
- Paint it in holiday colors and let it dry.
- Thread a string through the jingle bell.
- Pull the string through a hole in the top of the cup.
- Tie a loop for hanging.
46. Leftover Gift Wrap Scrap Ornament
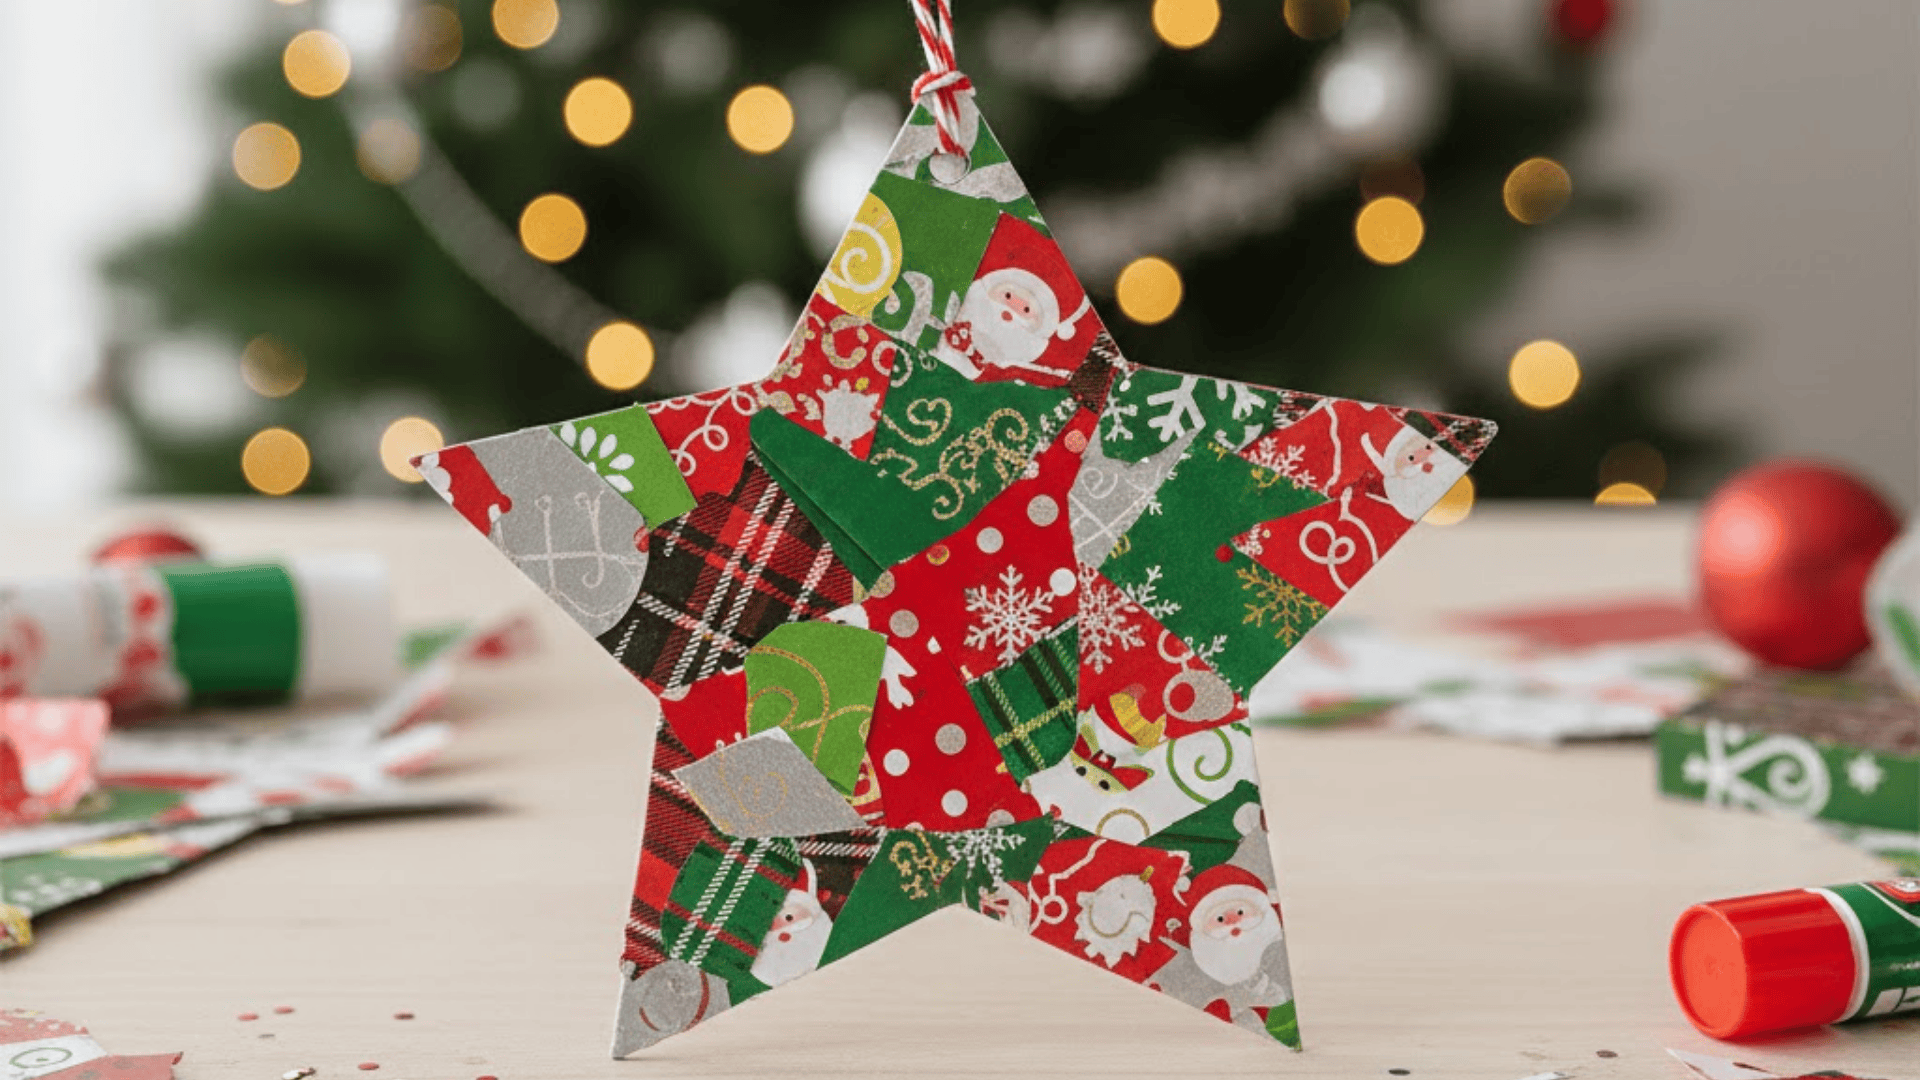
This ornament is perfect for using small leftover pieces of gift wrap. Kids enjoy choosing colors and layering the scraps to make patterns.
Materials Needed:
- Gift wrap scraps
- Cardboard circle or shape
- Glue
- Ribbon
- Scissors
Process:
- Cut a shape from cardboard.
- Glue small scraps of wrapping paper onto the shape.
- Overlap pieces to create a fun patchwork look.
- Trim the edges neatly.
- Add a ribbon loop.
47. Recycled Cardboard Reindeer Face Ornament

This reindeer face uses simple cardboard shapes that kids can decorate easily. They enjoy adding the red nose and drawing the friendly features.
Materials Needed:
- Cardboard
- Scissors
- Brown paint or markers
- Googly eyes
- Red pom-pom
- Ribbon
Process:
- Cut a rounded face shape from cardboard.
- Color it brown with paint or markers.
- Glue on googly eyes and a red pom-pom nose.
- Draw simple ears and antlers.
- Add a ribbon for hanging.
Kids can make any of these ornaments with basic supplies and simple steps. They’re a great way to keep holiday crafting easy, fun, and hands-on.
DIY vs. Ornament Kit
DIY ornaments and ready-made kits both work well for holiday crafting. This quick comparison shows how they differ, so you can choose what fits your needs:
| Feature / Option | DIY Ornaments | Ornament Kits |
|---|---|---|
| Time Needed | Takes longer to set up and clean | Fast and ready to start |
| Skill Level | Works for any age | Easiest for beginners and groups |
| Cost | Usually cheaper | Higher because supplies are included |
| Mess Level | It can get messy with glue and paint | Low mess with pre-packed materials |
| Creativity | Very open-ended | Guided but still customizable |
| Best For | Home projects and unique crafts | Classrooms, parties, and quick activities |
Safety Tips for Kids’ Ornament Crafts
It’s essential to keep kids safe while they make their ornaments. These simple tips help you set up a craft space that feels fun and protected:
- Use non-toxic paint so kids can paint safely without strong smells.
- Choose kid-safe glue, like white school glue, instead of strong adhesives.
- Avoid small parts that could pose can choking hazard to younger kids.
- Leave heat tools to adults, including hot glue guns, ovens, or other heating devices.
How to Make Ornaments Last Longer
You can help your child’s ornaments last for years with a few simple steps. These tips keep each ornament safe, bright, and ready to use again:
- Seal painted ornaments: Use a clear, kid-safe sealer to protect the colors.
- Store ornaments safely: Wrap them in tissue or place them in small boxes.
- Add names and years: Use a paint pen to mark each ornament as a keepsake.
- Hang ornaments securely: Choose strong ribbon or string that stays tied.
Wrapping Up
I’m really glad you stayed with me through this guide, because it means you care about making the holidays meaningful, not perfect.
With these DIY Christmas ornaments for kids, you now have plenty of simple, creative ways to slow down, connect, and enjoy time with your little ones.
You don’t need special skills or fancy supplies; just a bit of time, some basic materials, and the joy kids naturally bring to every project.
So choose one idea that feels doable today, set out a few tools, and let the fun unfold. These small moments are the ones your child will remember, and it’s worth every second you spend together!


